The Best Fluffy Pancakes recipe you will fall in love with. Full of tips and tricks to help you make the best pancakes.


Rainbow nails can be soft, graphic, jewel-toned or nearly neutral around the edges. The common thread is a considered sequence of colors, rather than one particular pattern. These seventeen designs explore different ways to organize that sequence across a hand or within a single nail. Use them to decide how much color you want, where you want the detail to sit and which finish fits your everyday style. A palette you enjoy is a better starting point than trying to fit every possible shade into one manicure.
How to choose rainbow nails that feel like your style
Decide where the rainbow will appear
A different color on each nail gives the set a simple rhythm. Several colors on one nail create a more concentrated focal point. Neither arrangement needs a complicated drawing. Before choosing your shades, decide whether you want the full hand to form the color story or each nail to contain a small version of it.
If you prefer understated rainbow nails, keep most of the nail bed translucent and place the colors in a narrow arc or side detail. For a stronger statement, use a more opaque base or larger sections of color. The amount of painted space can change the overall effect as much as the choice between pastel and bright polish.
Choose the color family before the individual bottles
Pastels, saturated brights, earthy shades and deeper jewel tones each create a different mood. Start with one family and compare the colors together. A single very vivid shade can dominate a quiet palette, while one grayish shade may disappear among several brighter colors. That difference can be intentional, but it helps to notice it before you begin.
You do not need seven separate colors to suggest a rainbow. Five related shades can create a clear sequence across one hand. If you want a smaller palette, repeat the colors in a different order on the accent nails. This gives the manicure variety while keeping the set visually connected.
Keep the pattern readable at your chosen length
A short nail can show a small arc, a clean stripe or one block of color clearly. A longer nail gives you room for additional bands, but extra space does not have to be filled. Ask your artist to preserve the main shape of the design and remove secondary lines when adapting it to shorter nails.
For more ways to use color around the free edge, explore our creative French nail designs. If you prefer a quieter starting point, these short natural manicure ideas can help you choose a simple base and length.
1. Muted Earth Arches
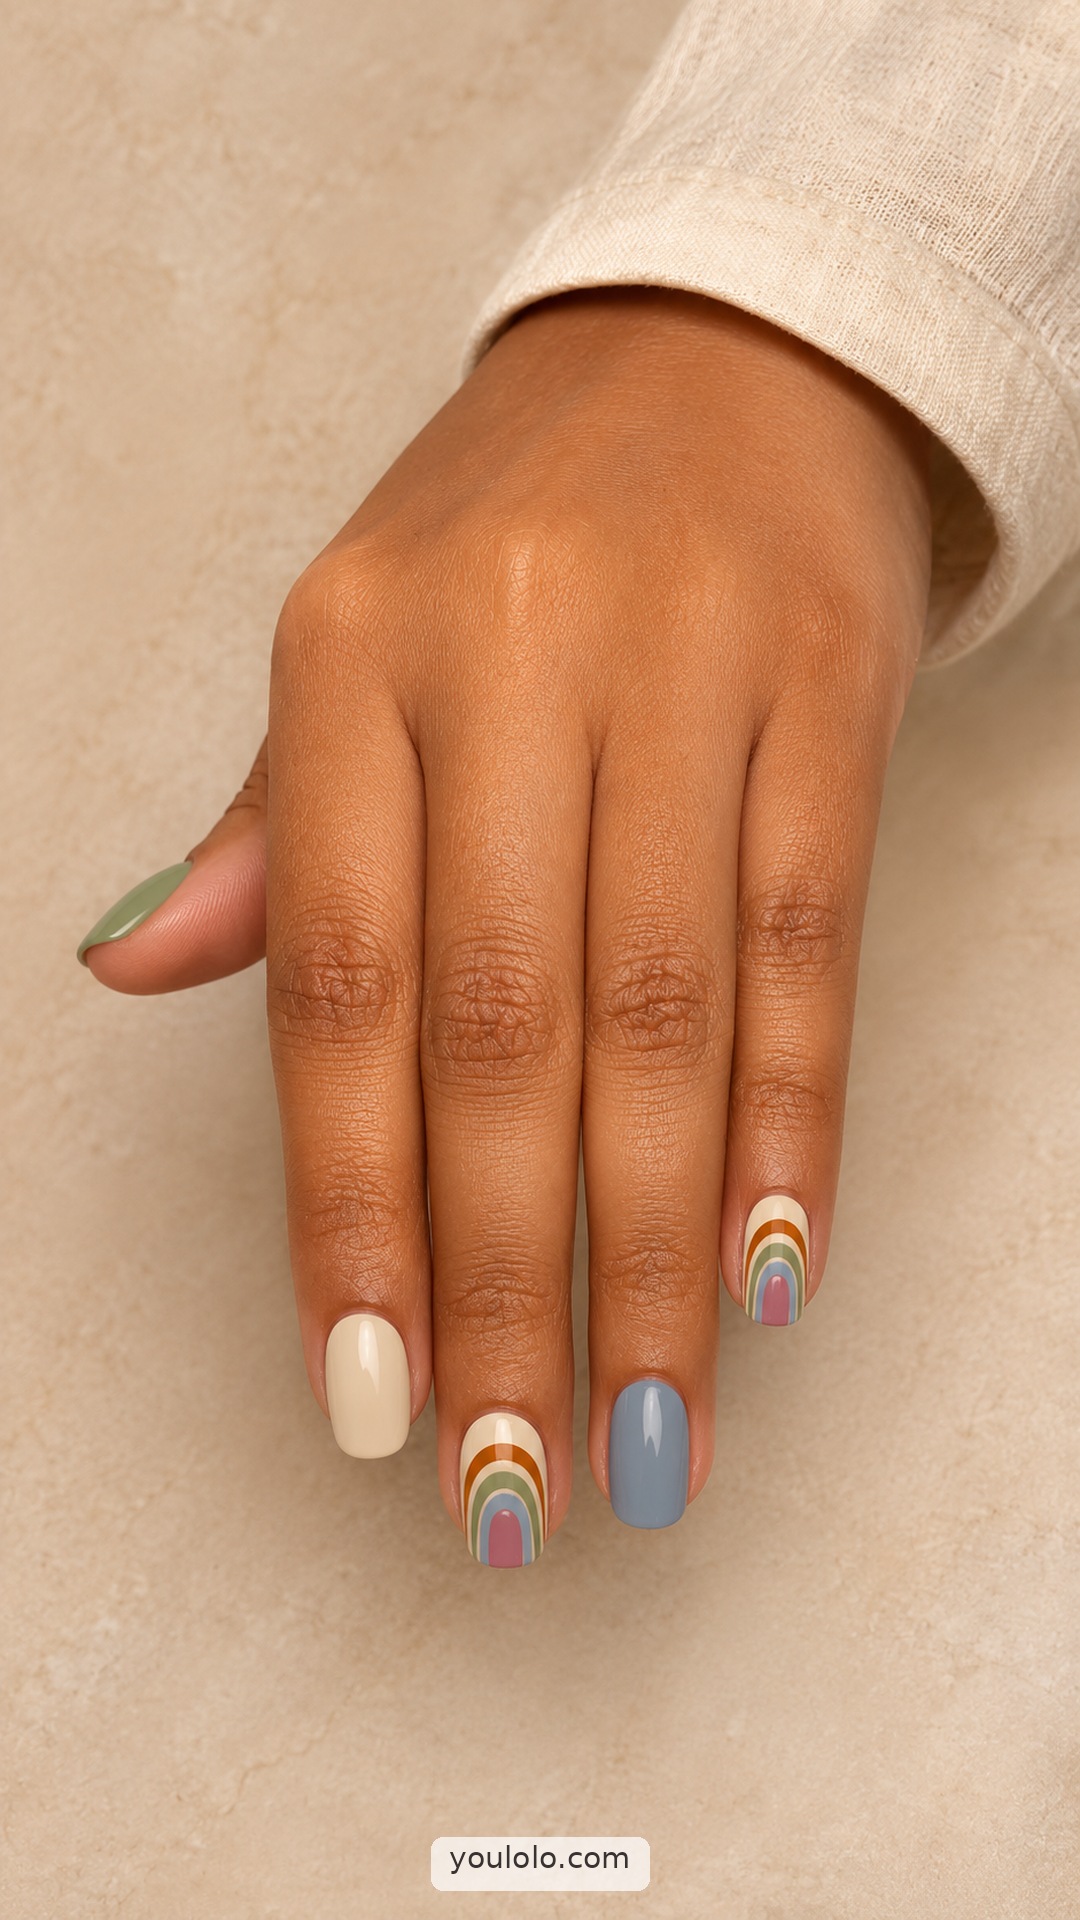
Muted arches give rainbow nails a softer, earthier character. Brick, ochre, sage, dusty blue, and mauve form nested bands on two creamy accents, while the other nails stay in quiet solid shades. The short oval shape keeps the pattern compact, and the warm ivory background separates each color clearly. This is a useful option if you enjoy multicolor designs but prefer a subdued palette. The arches bring movement without needing glitter, extra motifs, or a different pattern on every finger.
Make it yours: Choose the width of each arch before painting and keep the same color order on both accents. Let ivory show around the outer edge, and echo one or two of the bands with solid nails for a coordinated finish.
2. Rainbow Micro French

A narrow sweep of color along each tip turns a sheer pink manicure into a restrained spectrum. Red, orange, yellow, green, and violet appear as delicate edges, leaving most of the glossy nail bed untouched. The short squoval shape keeps the French border neat and minimal. Because the color occupies so little space, the set feels light even with several bright shades together. This is a simple way to introduce a playful palette while retaining the clean proportions of a classic French manicure.
Make it yours: For very short nails, keep the colored edge extremely thin instead of trying to create a deep smile line. Decide the color order first, then check that every tip has a similar visual weight across the hand.
3. Pastel Vertical Fade
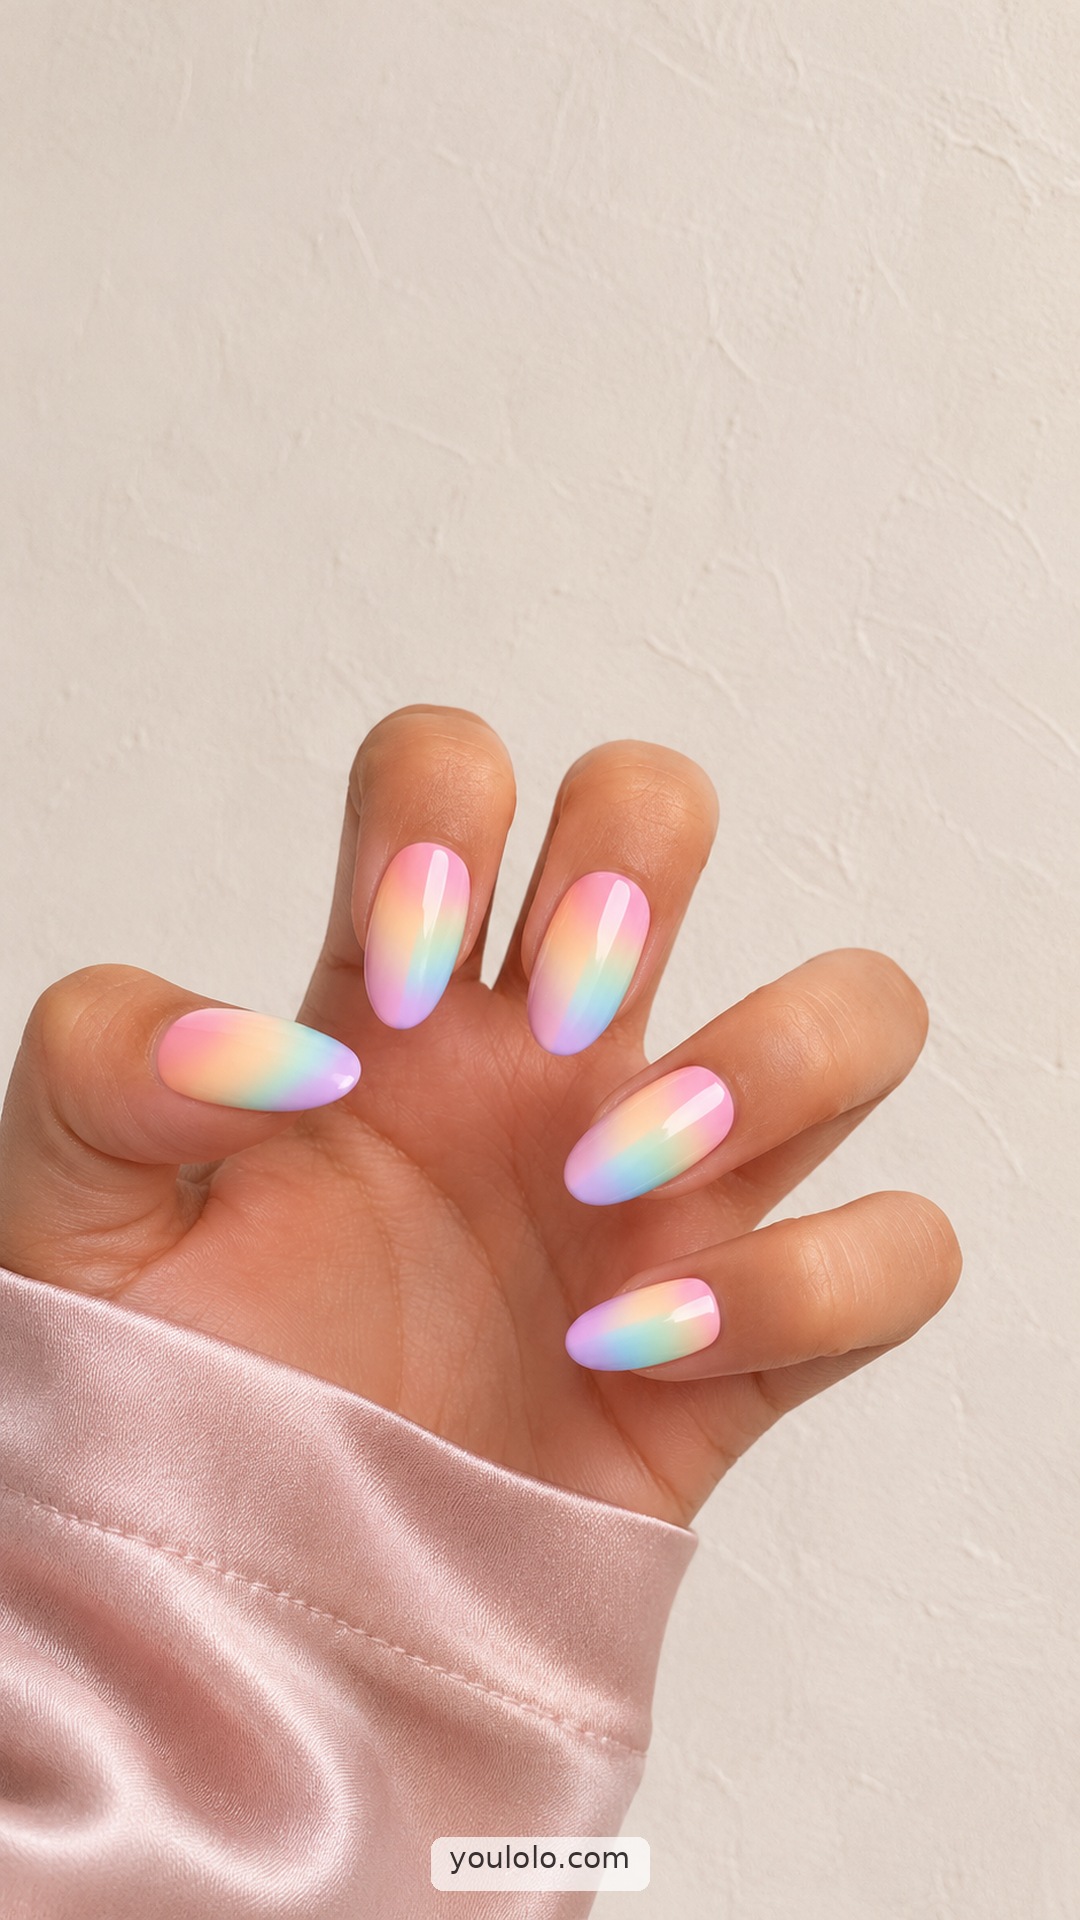
Soft pastel color shifts blend across these oval nails without hard borders. Rose, peach, butter yellow, mint, sky blue, and lilac merge into a luminous-looking gradient beneath a glossy finish. Each nail carries the same gentle range, giving the hand a coordinated effect rather than a separate solid shade on every finger. Medium length leaves enough space for the transitions to stay visible. This design works well when you want a full multicolor manicure with a softer impression than crisp stripes or bold graphic blocks.
Make it yours: Use neighboring colors that blend cleanly and keep the transitions gradual. Ask to see one finished sample before repeating the gradient, because a softer blend and a striped effect can look very different even with the same palette.
4. Jewel Ribbon Loops

Fine jewel-colored loops add movement to two pale nude accents, while the remaining nails provide a quieter frame in deep teal, berry, and navy. The slender ribbons overlap in curves rather than filling the surface, allowing the light base to remain visible between them. Medium almond tips echo the flowing linework and give the design a polished silhouette. This is a rich alternative to a pastel multicolor set, with the darker solid nails making the delicate accent colors feel more deliberate.
Make it yours: Keep the ribbon strokes slender and vary their direction slightly between the two accents. Choose the solid shades from the same jewel palette, and leave clear gaps between the curves so the linework does not merge into one dark shape.
5. Tiny Rainbow Arches

Tiny rainbow arches sit near the bases of these cream nails, leaving plenty of plain polish around each motif. The small scale keeps the multicolor detail light, while the rounded tips repeat the curves in the artwork. Each arc uses a few narrow bands, so the colors stay readable without filling the whole nail. This is a playful option for someone who wants a recognizable rainbow motif in a restrained layout. The ivory background also makes the brighter shades stand out without needing a dark outline.
Make it yours: Mark the outer curve first, then add progressively smaller arcs inside it. Keep each band narrow and leave a clear border of cream around the motif; the open space is what makes these tiny rainbows feel delicate.
6. Soft Skittle Pearls

Pastel pink, peach, butter yellow, mint, and lavender give each nail its own soft color. A refined pearly finish ties the shades together, adding a gentle reflection without introducing glitter shapes or extra artwork. The short oval shape keeps the palette compact and easy to read. These rainbow nails are a useful choice when you want several colors but prefer a simple surface on every finger. Matching the depth of the pastels matters more here than following an exact bright rainbow sequence.
Make it yours: Choose shades with a similar level of softness before starting, then check them beside one another. Use the same pearly finish across the set so one nail does not look much more metallic or opaque than its neighbors.
7. Rainbow Side Contours

Fine colored contours sweep along the sides of these sheer nude almond nails. The curved lines vary slightly from finger to finger, but their narrow width and soft palette keep the arrangement connected. Open space through the centers lets the natural-looking base remain visible. This offers a more fluid approach to multicolor nail art than straight stripes or solid tips. Because the lines follow the edges, the design also echoes the tapered shape without needing a large block of color at the end.
Make it yours: Choose the path of the first curve and use it to guide the neighboring lines. Keep the colors separate with slim gaps where possible, and preserve a generous nude center so the contours do not become an all-over stripe pattern.
8. Graphic Spectrum Tiles

Small angular tiles turn two cream nails into compact color studies. Muted red, ochre, teal, blue, and purple sit in crisp blocks, separated by pale gaps that echo the plain base. The other nails stay ivory, giving the geometric accents space to stand out. Short squared tips suit the straight edges of the artwork and keep the pattern from feeling oversized. This is a practical direction for someone drawn to a broad palette who would rather wear two detailed nails than five busy ones.
Make it yours: Plan the block arrangement on paper before painting, keeping a few cream gaps between the colors. Vary the size of the tiles slightly, but keep the edges clean so the small pattern reads as deliberate geometry rather than scattered marks.
9. Translucent Jelly Prism

Rose, amber, lime, aqua, and violet give each oval nail its own sheer color. Translucent layered shapes and pale reflective details add a prism-like effect within the glossy finish, making this set more dimensional than a simple block of polish. The colors remain soft enough to sit together without competing. These rainbow nails are a good direction if you enjoy a color-per-nail palette but want transparent depth and a little surface interest rather than an opaque, flat finish.
Make it yours: Keep the base colors sheer and choose only a few translucent details for each nail. Match the density across the hand so one accent does not become much busier than the rest, and preserve visible color between the layers.
10. Fine Dotted Rainbow

Tiny colored dots trace gentle paths across a milky pink base, leaving most of these short rounded nails clean. Some nails carry a longer curved sequence, while others use only a few dots to keep the rhythm light. The small scale makes the palette feel delicate rather than loud, and the glossy neutral base ties every shade together. This is a practical choice for someone who likes colorful details but wants the manicure to stay understated when viewed from a distance.
Make it yours: Use the smallest dotting tool available and reload it lightly for each color. Mark the path with just a few spaced dots first, then add others only where needed; keeping the dots separate is more important than using every shade.
11. Cloud and Color Arc

Pale sky-blue nails frame two sheer accents with small ivory clouds and softly muted color arcs. The clouds sit near the tips, leaving enough open base for the miniature scene to feel airy rather than crowded. Medium oval shapes give the artwork a gentle outline, and the solid blue nails keep the palette calm. It is a playful manicure for someone who enjoys a recognizable motif but prefers soft colors and a limited number of detailed accents across the hand.
Make it yours: Choose two accent nails and keep each cloud smaller than the nail width. Paint the colored arc first, then add the ivory cloud where it meets the tip; leave generous clear space around the scene so the shapes remain readable.
12. Rainbow Petal Fans
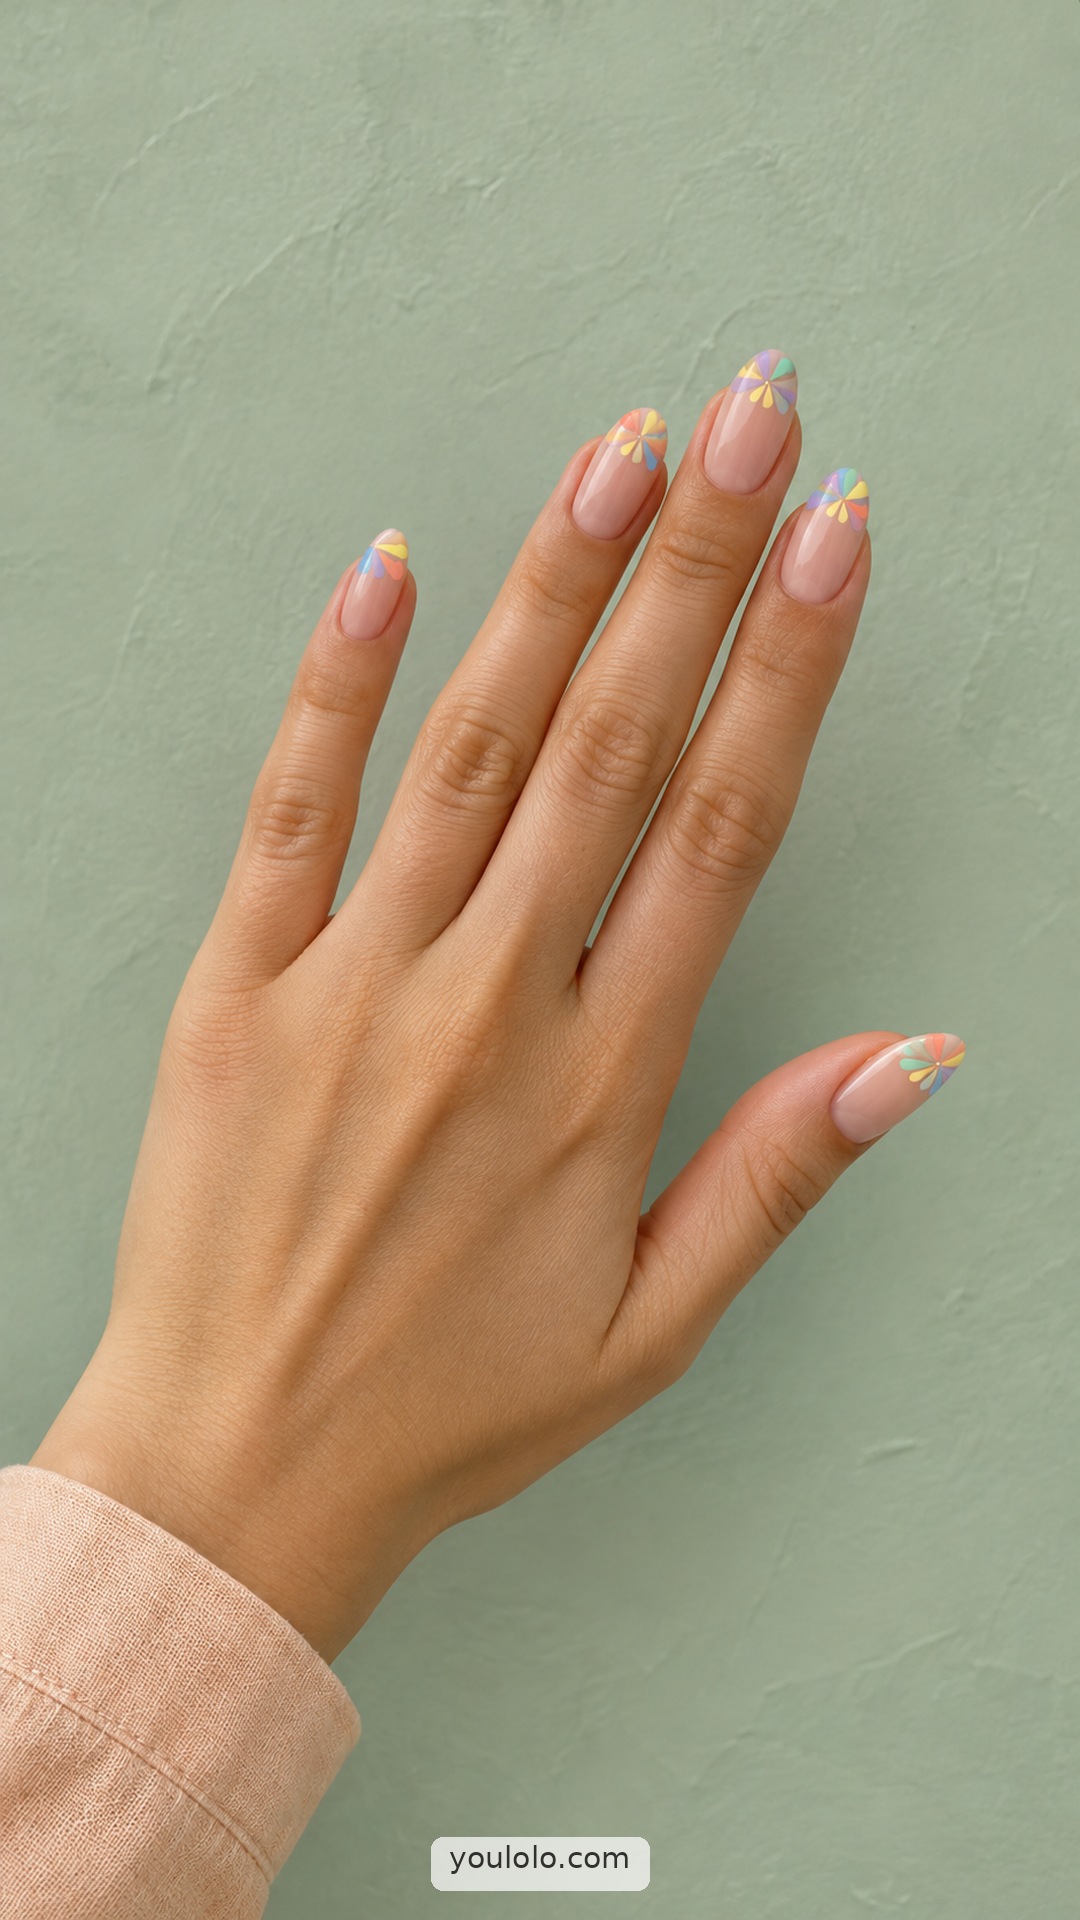
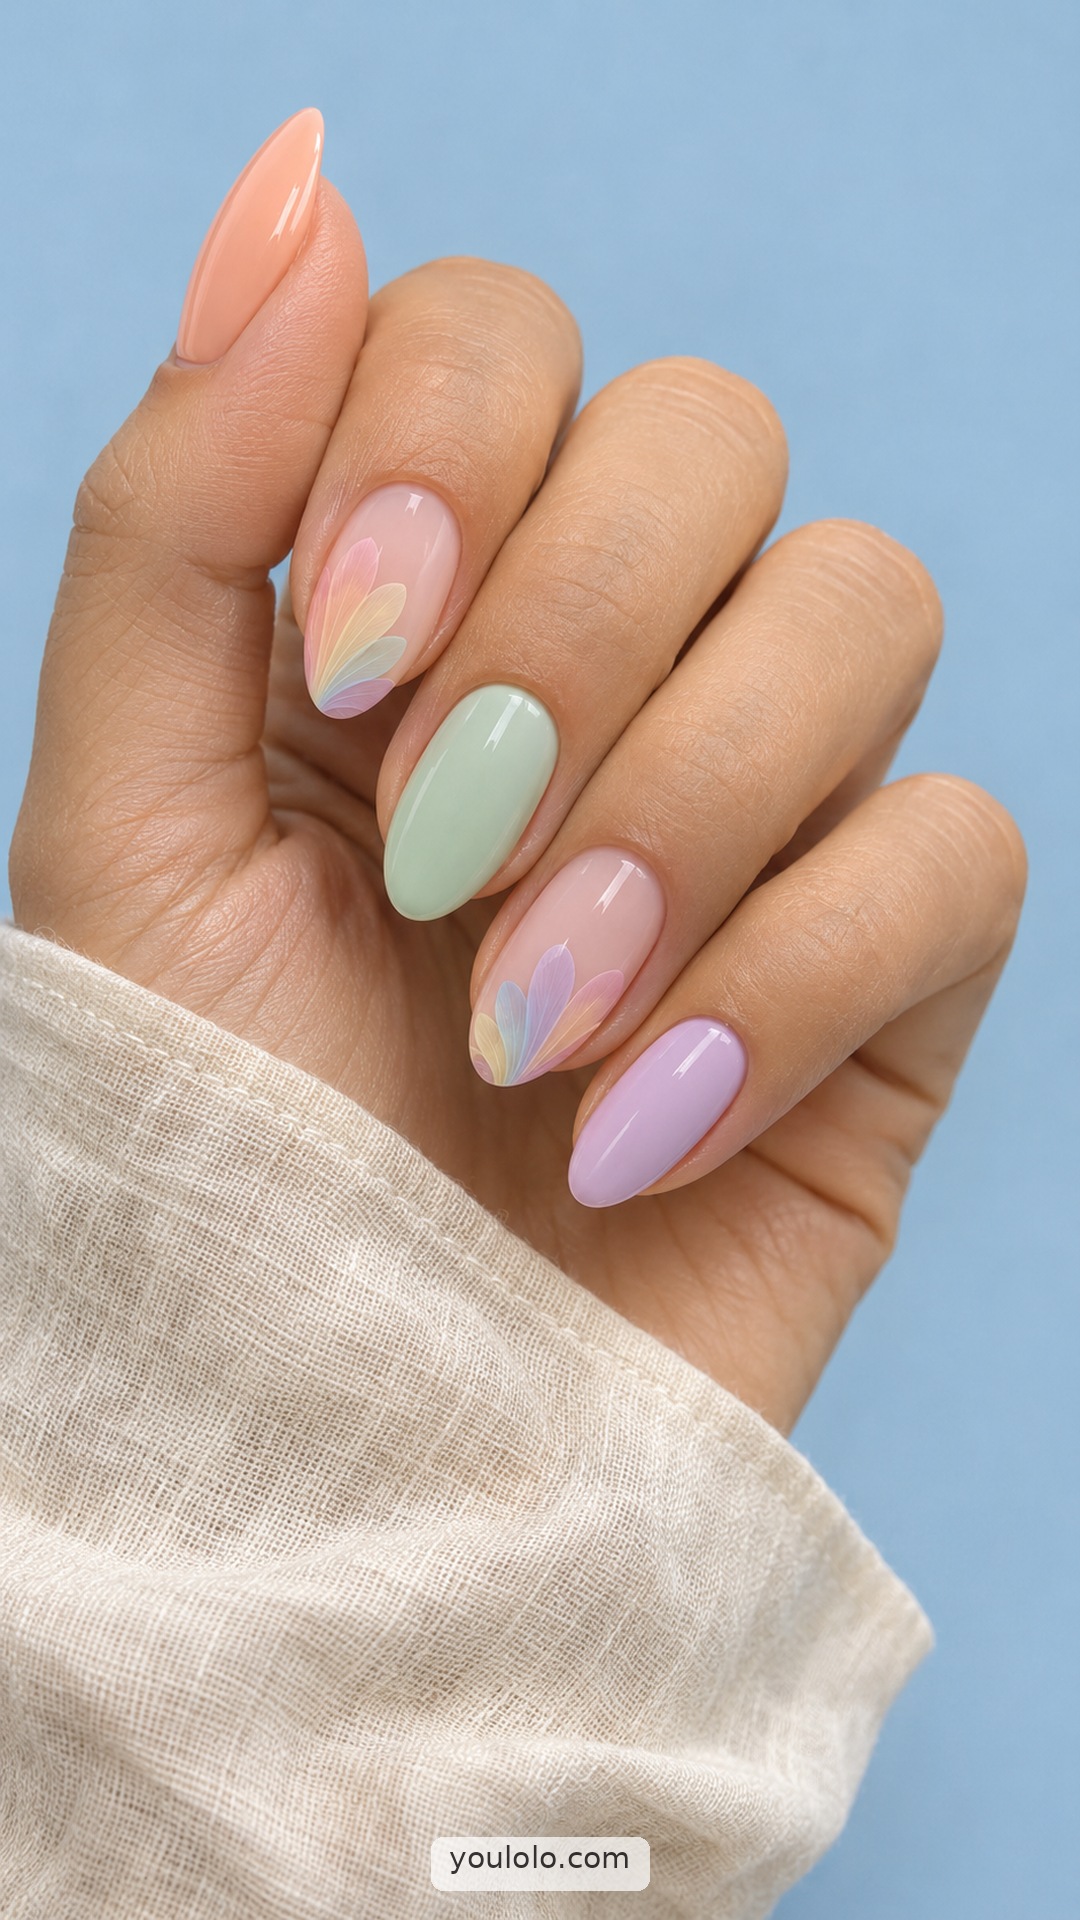
Small petal fans bring a floral rhythm to these rainbow nails without covering the nude base. Coral, yellow, mint, blue, and lilac appear in compact painted clusters near the tips, making the colors feel connected rather than scattered. The almond shape echoes the tapered petals and gives each fan a natural place to sit. Because the artwork stays flat and fine, the surface remains smooth and polished. Choose this approach when you want several cheerful shades but still enjoy seeing a mostly neutral nail bed.
Make it yours: Keep each fan small and leave clear nude space between the petals and cuticle. Ask for flat brushwork rather than raised flowers, and repeat the same five shades across the hand to hold the arrangement together.
13. Matte Chalk Spectrum

Dusty rose, ochre, sage, slate, and mauve create a five-color manicure with a quiet, chalky character. Each nail carries one solid shade, so the interest comes from the relationship between the colors rather than painted decoration. A satin-matte finish softens their intensity and makes the palette feel cohesive. Short squoval shaping adds a clean outline without sharp corners. This is a useful starting point for a multicolor set if you prefer muted tones and want an uncomplicated design to discuss at an appointment.
Make it yours: Compare all five shades together before painting rather than selecting them separately. Choose colors with a similar muted quality, then use one consistent satin-matte finish so no single nail looks much brighter or glossier than the others.
14. Ivory Woven Ribbons

Fine pastel ribbons cross over an ivory base on two accent nails, creating a light woven effect. The open cream areas are just as important as the colored lines, keeping the pattern airy and easy to follow. Plain ivory nails provide a quiet frame for the detail, while an oval shape softens the intersecting strokes. This design offers a way to combine several pastel shades without filling every nail with color. The restrained placement makes it feel decorative but still balanced across the hand.
Make it yours: Ask for narrow ribbons with visible ivory space between them, even where the lines cross. Limit the pattern to two nails and keep the remaining ones plain so the woven detail remains distinct instead of becoming visually crowded.
15. Pastel Crescent Tips

Pastel crescent tips bring color to these short rounded nails while leaving most of the glossy nude surface clear. Pink, peach, butter yellow, mint, and lilac appear as small separate accents, each finished with a narrow white arc. This placement gives rainbow nails a quieter look without losing the range of shades. The open space makes the curved details easy to read, and the cream linen cuff keeps the overall palette soft against the warm rose background.
Make it yours: Keep each colored tip shallow and adjust its width to the individual nail. Trace the white arc with a fine line, preserving plenty of nude space below it so the color remains a small, deliberate accent.
16. Rich Rainbow French
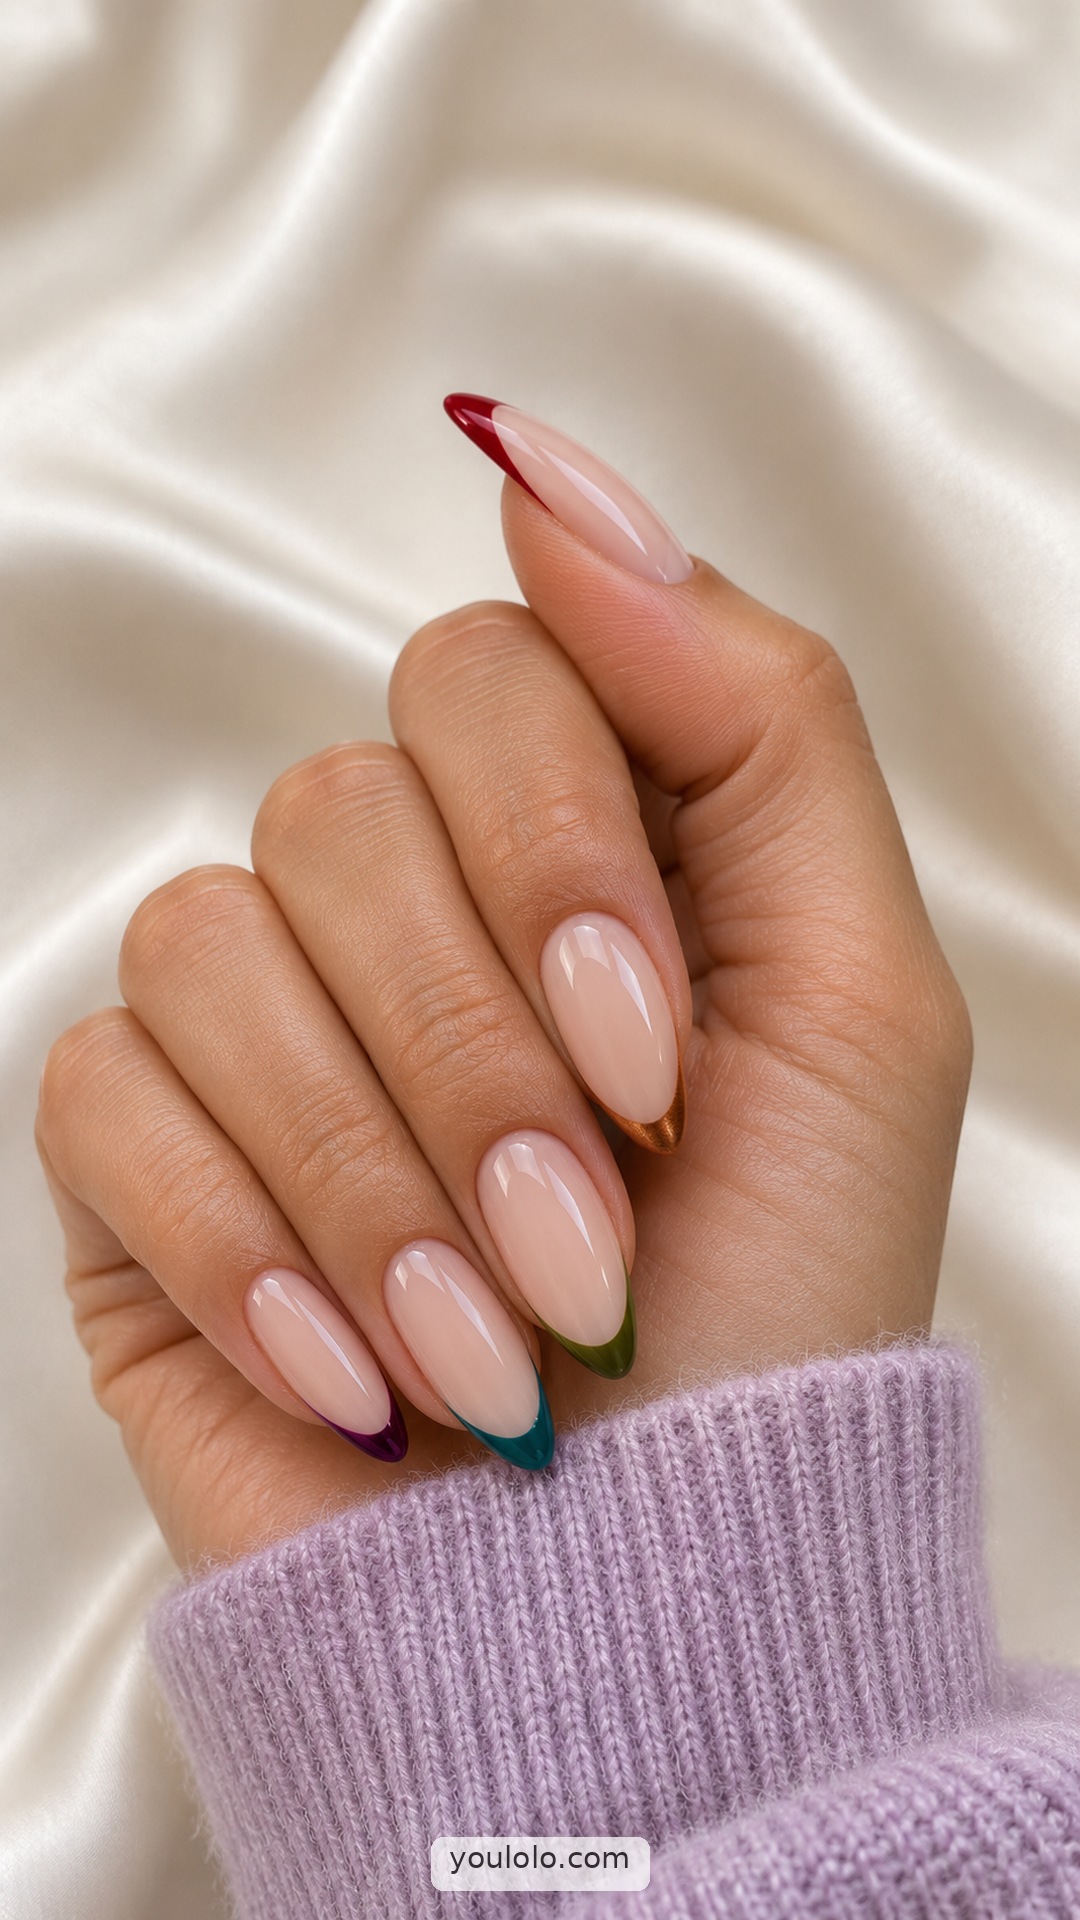
Deep ruby, copper, olive, teal, and plum replace the usual white tips in this polished French manicure. Each almond nail carries a different color, but the shared nude base and consistent curved edges hold the set together. The richer shades feel distinct from a bright primary palette while still offering variety across the hand. A lilac cuff and ivory silk background keep the darker tips visible. This is a restrained way to combine several colors when you prefer a clean surface to intricate nail art.
Make it yours: Choose shades of similar depth so no single tip dominates the set. Keep the French sections narrow and follow each nail’s natural curve, using the same nude base throughout to connect the different colors.
17. Rainbow Watercolor Veils

Soft pools of pink, peach, yellow, mint, blue, and lilac blend over a milky nude base in this watercolor manicure. The colors overlap gently, with no hard outlines separating them, so every oval nail has a slightly different arrangement. The glossy finish adds a clear reflection over the diffused color and keeps the surface looking smooth. Against peach linen and a sage cuff, the pastels remain light and airy. The interest comes from the blended layers rather than added motifs or embellishments.
Make it yours: Work with thin translucent patches and allow some milky base to remain visible. Vary the placement across the nails, but repeat the same small palette so the softly blended areas still feel like one coordinated set.
A practical mini-guide to balanced rainbow nails
Build a five-color swatch row
Place your chosen shades next to one another on practice tips before deciding on their order. Look at the row from normal viewing distance as well as up close. If one shade seems to interrupt the sequence, try moving it between different neighbors. You may find that changing the order solves the problem without replacing any color.
Plan light and dark areas
A row of equally pale colors feels different from a palette that alternates light and dark. If you want a smooth progression, move gradually between similar depths. If you want a bolder graphic effect, use contrast deliberately. On a tiny pattern, a narrow neutral line or clear gap can help adjacent colors stay distinct.
Repeat one feature across the set
Rainbow nails can use different colors and still look consistent when the same shape repeats. Keep the stripe width similar, place each arc at a related height or use the same amount of transparent space. This repeating feature gives the eye a clear pattern to follow even when no two nails use exactly the same shades.
Choose your finish as part of the palette
An opaque cream, a translucent jelly and a pearly surface can make the same general color look quite different. If the finish is important, compare actual samples rather than relying on a color name. A reflective coating changes with the light, so inspect it in an ordinary room as well as under a bright lamp.
Make a simpler practice version
For a first attempt at home, choose one small arc or a different solid shade on each nail. Practice the spacing on a tip before adding several thin lines. Use the drying or curing instructions for your chosen products, and do not assume that a tutorial for another polish system uses the same application method.
Use a reference to communicate priorities
When showing rainbow nails to an artist, explain what you want to preserve: the palette, the pattern or the amount of open space. Mention your preferred shape and length before discussing tiny accents. If only the colors matter, say so; the artist can then suggest an arrangement that works better on your own nails.
Adjust the palette for different seasons
For a winter interpretation, you might choose deeper blue, plum, cranberry and muted gold around a calm neutral. For spring, a lighter sequence can feel fresh without needing flowers on every nail. These are styling choices, so keep any favorite color that makes the set feel personal rather than following a strict seasonal formula.
Frequently asked questions
Do rainbow nails need every color of the rainbow?
No. A smaller selection can suggest the same idea through its order and contrast. Choose colors that work together, then repeat a shape or finish to connect the set.
Which rainbow nails work best on short nails?
Try one solid color per nail, a narrow multicolor edge or a single small arc. Keep enough open space around the detail so the pattern remains clear at normal viewing distance.
How can I make rainbow nails look more elegant?
Use a controlled palette, consistent spacing and a simple shape. A translucent base or a smaller area of color can make the design quieter without removing its personality.
Can I combine pastel and dark shades?
Yes. Decide which family is dominant and use the other as an accent. A small dark outline can define pale colors, while a few light details can soften a deeper palette.
Should both hands have the same color order?
That is a style preference. You can repeat the order, mirror it or vary it while keeping the same five shades and pattern. Agree on the arrangement before the painting begins.
What should I bring to a rainbow manicure appointment?
Bring one main reference, your preferred length and a short explanation of the detail you like most. If a specific color matters, compare a polish sample with your artist rather than relying on a screen alone.
For another perspective on this theme, explore BeautyCoded’s rainbow nails collection. Use the examples above to discuss your preferred palette, length and amount of detail with your nail artist.
Save this collection for your next manicure.