
The Best Fluffy Pancakes recipe you will fall in love with. Full of tips and tricks to help you make the best pancakes.


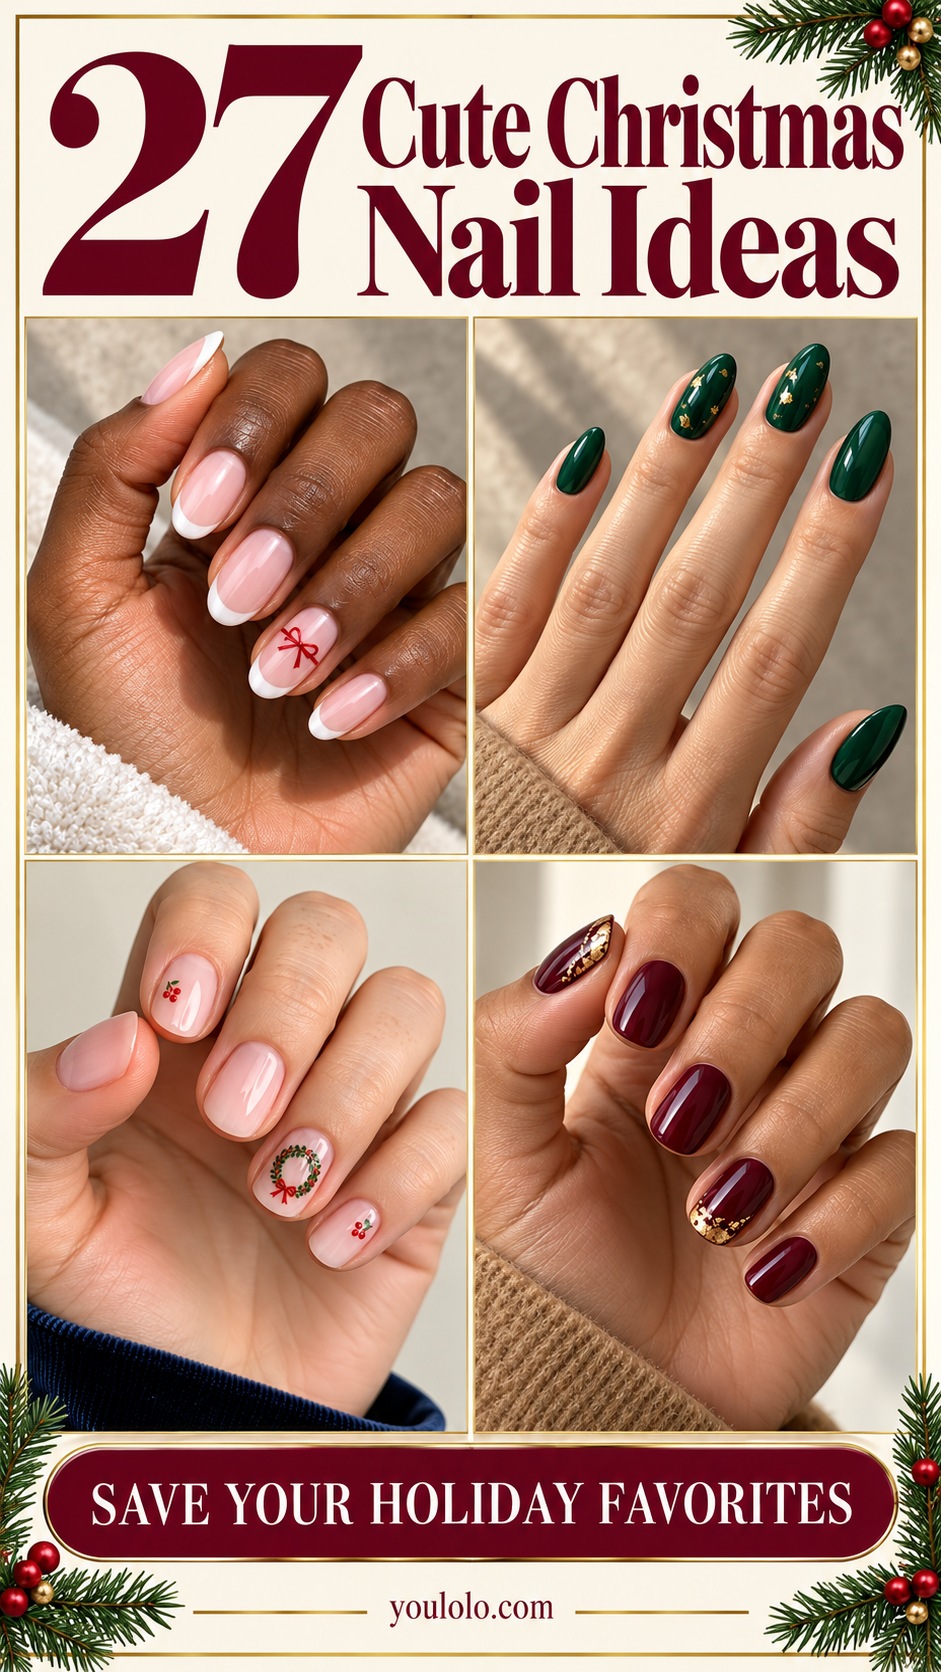
Choosing Christmas nails is a little like choosing the decorations you want to bring out first. Maybe you want the familiar red, a small green wreath or enough silver sparkle to catch the light at dinner. Or perhaps one tiny painted stocking is all the holiday detail you need. The nicest part is that a festive manicure can be quiet, playful or somewhere in between.
I put these 27 Christmas nail ideas into smaller groups so you can browse by mood. Start with the red accents if you like a classic palette, move to the green and botanical designs for something softer, or jump to the little characters if you want a manicure with personality. There are also pale pink and creamy options for anyone who wants the artwork to stay delicate.
The details are intentionally varied. Some sets use a single accent nail; others bring the color to the tips or repeat a small motif across two fingers. Each design has a short note about what makes it work, followed by something specific to discuss with your nail artist. You can keep the main idea and change the length, shape or amount of decoration. Save the close-up you love, then think about the one detail you would miss if it were removed. That is usually the best starting point for making the manicure your own.
Choose a Shape That Gives Your Favorite Detail Room
A shape is a starting point for the artwork, not a rule about which hands can wear it. Short rounded nails suit small dots, simple stars and peeking characters. A soft square gives a straight or scalloped tip a clear edge. Oval and almond nails offer a little more length for a branch, hanging ornament or miniature scene.
- Very little free edge: choose the Cranberry Micro French, a small wreath or one star.
- Short to medium length: try cookie stars, ribbon details or the peeking snowman.
- More space for artwork: save the gingerbread house or snow-globe accent.
If a reference has more detail than your nails can comfortably hold, keep the main motif and remove the extras. A clear little shape is more useful than a crowded miniature of the whole picture.
Classic Reds with a Small Holiday Twist
1. Cherry Red with a Candy-Stripe Corner

The little striped corner is what makes this set feel finished. Most of the hand stays cherry red, so the holiday detail feels like a surprise rather than a pattern repeated everywhere.
I would keep the ivory accent the same short oval shape as the other nails. A few narrow stripes are enough; leaving some ivory visible makes the corner easier to read.
For your nail artist: Ask for one ivory accent with a small striped corner and matching cherry-red supporting nails.
2. Cranberry Micro French and a Tiny Bow
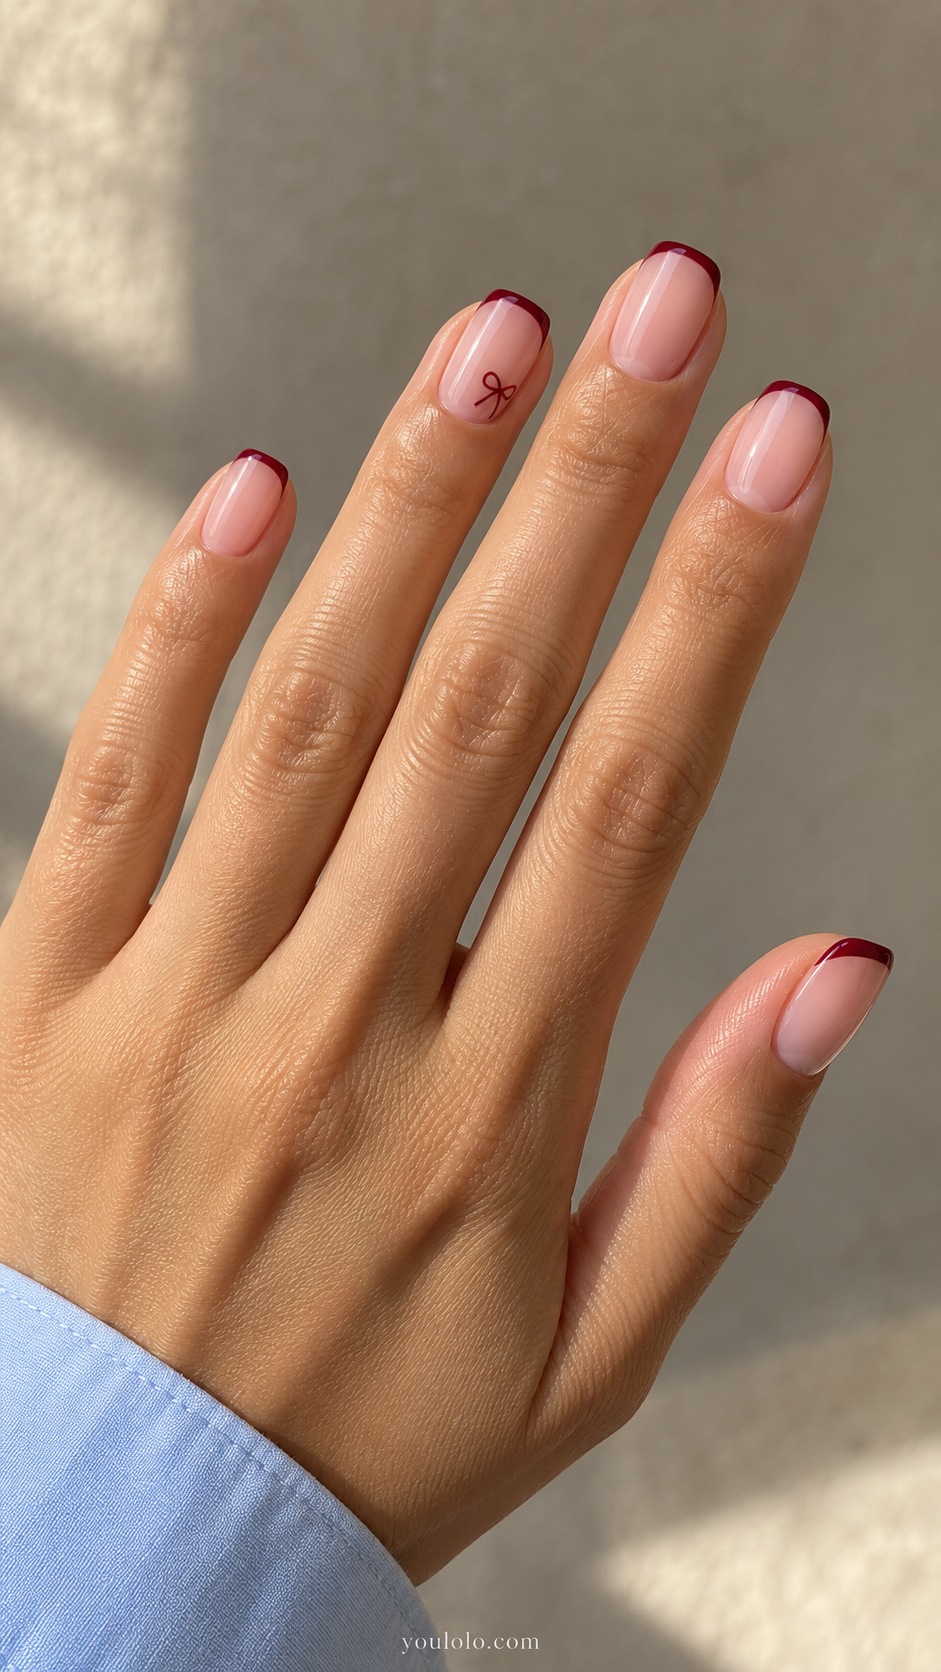
A slim cranberry edge gives a familiar French manicure a festive color change. The tiny bow adds a second detail without covering the open pink base.
This would be one of my first saves for short nails. Keep the bow off-center and the tips evenly narrow so neither element becomes too heavy for the small surface.
For your nail artist: Request a flat painted bow, not a raised charm, and a fine cranberry tip on all five nails.
3. Red Velvet with an Ivory Star

Deep red can carry a manicure on its own, but one ivory star gives this version a clear holiday detail. The satin finish softens the color without making it look dusty.
I like the star placed slightly above the center, with plenty of red around its points. On shorter nails, reduce the number of tiny surrounding marks rather than shrinking the star until it disappears.
For your nail artist: Choose one clean eight-point star and keep the supporting nails plain satin red.
4. Pearl Tips with a Red Ribbon

The red ribbon stands out because the rest of the set is so pale. A pearl-white tip adds a little light without turning the whole nail into a mirror finish.
Let the ribbon travel across one accent nail instead of wrapping every finger. The open milky base keeps the thin red strokes visible, especially where the bow loops meet.
For your nail artist: Ask for a smooth painted ribbon with distinct loops and a softly pearly French edge.
5. Peppermint Half-Moons
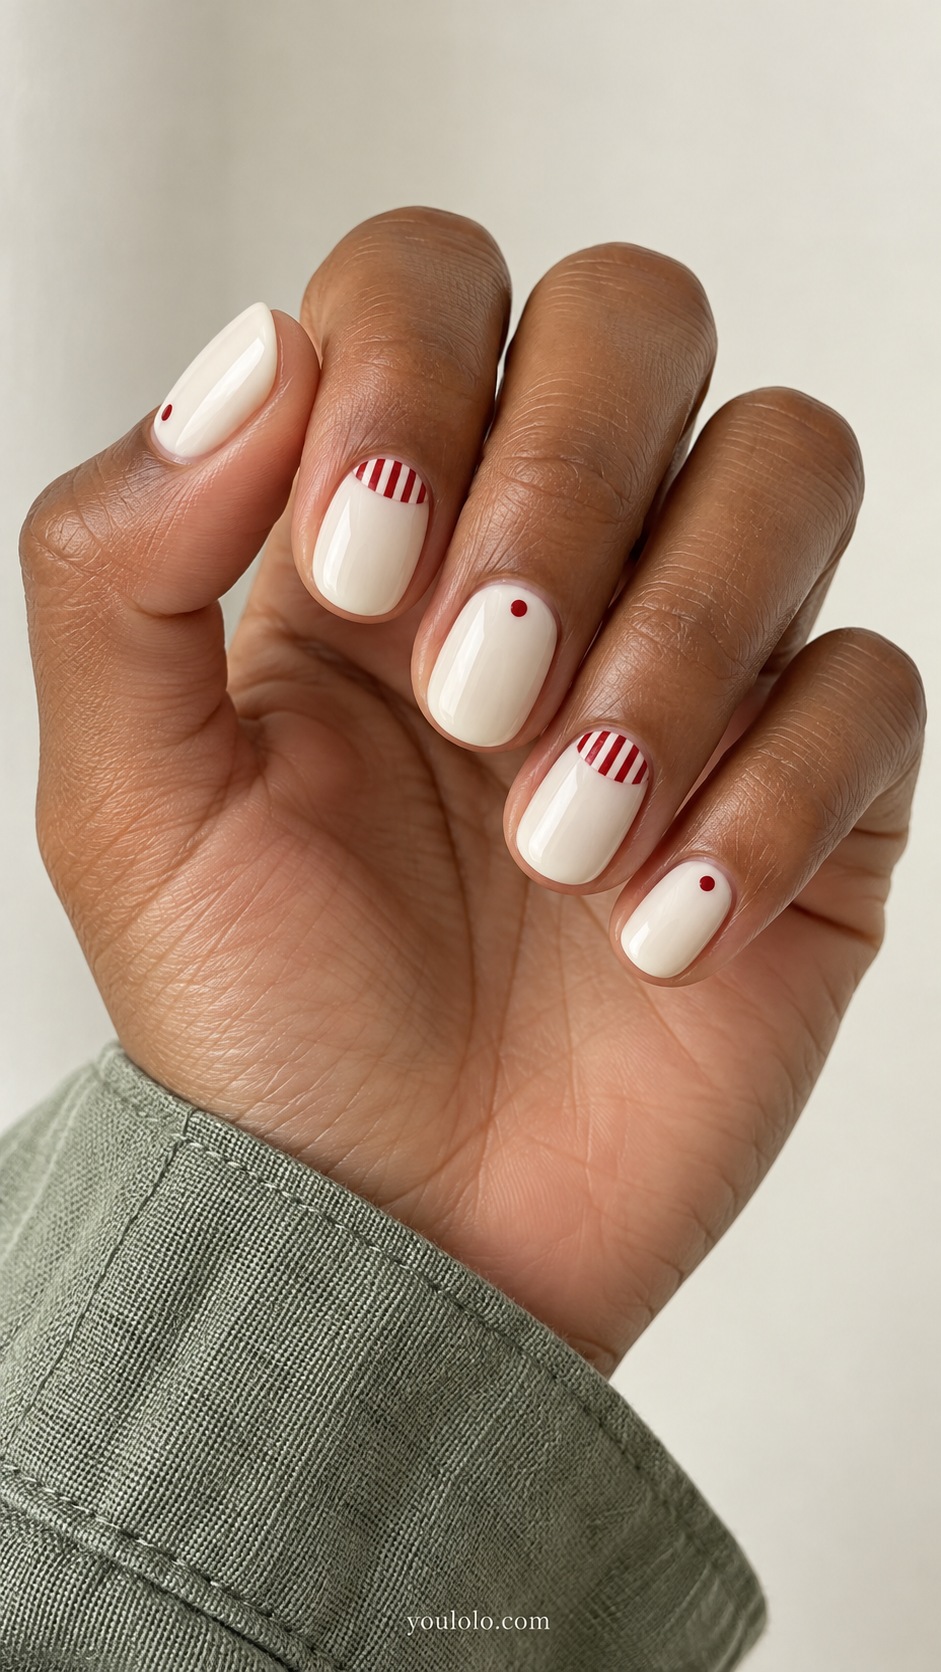
Moving the stripes to the base gives the peppermint idea a different shape. The small semicircles look graphic, and the plain ivory above them keeps the manicure light.
The striped area should stop well before the middle of the nail. A tiny red dot on a supporting nail repeats the color without adding another complete pattern.
For your nail artist: Use two small striped semicircles with clean curved boundaries and leave a little space beside the skin.
Greens, Branches and Little Christmas Decorations
6. Emerald Glass with Gold Flecks

The color is the main attraction here. Deep emerald looks rich beside a few small gold flecks, especially when the surface stays smooth and glossy.
I would keep the foil scattered rather than packed into a solid patch. A little dark green between each piece gives the gold room to show and makes the set feel less busy.
For your nail artist: Ask for a deep glassy green finish and sparse foil sealed flat on two nails.
7. A Little Wreath on Milky Pink

A small wreath is a lovely way to use red and green while keeping most of the nail pale. The circle gives the leaves a clear arrangement instead of scattering them across the surface.
The opening in the middle matters. Keep it visible, with just a few leaf pairs and a very small red bow; too many details can turn the wreath into a dark spot.
For your nail artist: Place one open-centered wreath on the ring nail and keep the leaves small and distinct.
8. Champagne and a Forest Tree

The champagne base makes the green tree the first thing you notice. A small star finishes the silhouette without needing ornaments on every branch.
I would choose a simple layered tree shape rather than a very detailed landscape. It gives the artist room to keep the edges clean and works beautifully with plain beige supporting nails.
For your nail artist: Request one compact tree with three or four branch tiers and a tiny gold star.
9. Pine Sprigs with Pearl-White Berries

The side placement makes these little branches feel delicate. Fine needles follow the curve of the nail, while the white dots add a light detail beside the green.
Keep the branch narrow enough that the sheer base still shows through. I would repeat the green on one or two plain nails to connect the botanical accents to the rest of the hand.
For your nail artist: Use thin painted needles and small flat white dots, with no bulky pearl decorations.
10. Olive Satin with a Gold Crescent Edge

Olive gives a holiday manicure a quieter color option. The small gold curve makes the set feel dressed up, while the satin surface lets the metallic line catch the light.
This is a good choice when you want a festive palette without a recognizable Christmas picture. Keep the curve close to the base and leave the rest of each nail uninterrupted.
For your nail artist: Ask for a smooth, narrow metallic arc on two nails and a consistent satin olive finish.
11. Tiny Copper Bells on Cream

A pair of bells gives this set a clear focal point, but the cream background keeps it from feeling crowded. The dark green ribbon is a small connection to the plain green nails.
The bell shapes should be simple enough to recognize without heavy shading. I would keep the metallic detail limited to that one nail so the little painting remains the main feature.
For your nail artist: Use two small bell silhouettes with a fine green ribbon, all sealed under a smooth finish.
A Quick Check Before You Choose the Artwork
Look at your favorite image at normal phone size, not only zoomed in. Can you still recognize the wreath, tree or bell? If the detail disappears, simplify it. Choose one main motif, decide how many accent nails you want, and repeat a color from the artwork on the plain nails.
Also decide whether you want a smooth surface. All the little illustrations in this collection can be approached as flat artwork. Tell your artist if you prefer that to raised charms, especially when the reference has shiny details that could be interpreted either way.

A Little Sparkle for Holiday Plans
12. Silver Confetti French

This set gives you sparkle at the edge while leaving the base mostly clear. Fine silver particles make the tips look light rather than like a thick metallic block.
A few slightly larger pieces add variety, but they should remain small enough to sit flat. Keep the sparkle inside the nail outline so the finish looks neat from the side as well as from above.
For your nail artist: Ask for fine silver glitter tips with minimal larger pieces and a smooth sealed surface.
13. Midnight Blue with a North Star

A single bright star gives the dark base a focal point. Champagne makes the detail a little warmer than stark silver, while the small dots keep the surrounding space from looking empty.
I would leave most nails plain blue and avoid repeating the large star on every finger. The contrast is strongest when the main star has its own generous area of dark polish.
For your nail artist: Choose one larger star, a few very small dots and plain midnight-blue supporting nails.
14. Rose Gold Ornament Outlines

Outlined ornaments feel lighter than fully filled circles. The sheer base shows through the middle, and a fine hanging line is enough to explain the shape.
Use ornaments at slightly different heights so the set does not look too rigid. I would keep each circle small, with no extra gemstones inside, letting the rose-gold outline supply the shine.
For your nail artist: Request two fine ornament outlines across the accent nails, each with a tiny cap and hanging line.
15. Burgundy with Champagne Foil Tips

The burgundy gives this manicure depth, and the foil adds a small bright edge. It is an easy palette to dress up without adding a separate holiday motif.
Let the foil placement be uneven but controlled. A few gaps of red between the pieces make the tip feel lighter than a solid gold band, particularly on short rounded nails.
For your nail artist: Keep the foil near the free edge on two nails and seal every piece smoothly.
Choose Where the Shine Goes
If you want a little sparkle, put it on the tips or one accent nail and leave the rest of the color plain. If you prefer a darker manicure, a small metallic star can be enough. Think about which part you want to notice first: the polish color, the artwork or the reflective finish. Giving one of them the lead makes the set easier to read.
Playful Christmas Nail Art with Personality
16. A Gingerbread House on Blush

The icing roof is the detail that makes the little house recognizable. A blush background gives the warm brown shape enough contrast without making it look harsh.
Keep the house small and simple: roof, door and a couple of windows are plenty. White dots on a supporting nail can echo the icing without turning the whole hand into a busy scene.
For your nail artist: Ask for one flat painted house with clear roof and door shapes, plus quiet caramel companions.
17. A Snowman Peeking over the Tip

A peeking snowman uses the tip as part of the drawing. You only need a small white curve, two eyes and a tiny nose to give the character a face.
This is a useful way to keep playful artwork compact on short nails. Leave the blue area above the character mostly plain so its features stay easy to see.
For your nail artist: Use one small snowman face at the edge, with very fine features and no full-body scene.
18. Cocoa Reindeer with a Red Scarf

The red scarf brings a little color to this otherwise soft brown-and-cream set. Fine antlers give the face its identity without needing a large drawing.
I would keep the face low on the accent nail so the antlers have room above it. Plain cocoa nails make the character feel part of the palette rather than a separate sticker-like detail.
For your nail artist: Request one compact reindeer face with thin antlers and a small red scarf, using flat painted art.
19. A Penguin in a Berry Hat

A berry-colored hat makes the little penguin feel festive while keeping the palette gentle. The black outline needs to stay narrow so the character does not take over the pale nail.
Choose a simple oval body and tiny feet instead of a detailed scene. On very short nails, the face and hat alone can preserve the idea while leaving more room around the drawing.
For your nail artist: Keep one penguin accent and simplify its outline to suit the nail length.
20. Caramel Cookie Stars

The white icing outline makes these stars feel like little cookies rather than ordinary celestial art. Warm caramel on the supporting nails repeats the main color and keeps the set connected.
Vary the stars slightly in size, but leave enough cream between them to see each outline. Two larger stars are a better option than three cramped ones on a smaller accent nail.
For your nail artist: Ask for flat star-shaped cookie artwork with fine white icing borders and plain caramel nails.
21. Mini Stockings on Vanilla

Small stockings give this manicure a playful detail without covering the whole nail. A white cuff separates the colored stocking from the pale background just enough to define the top.
Keep each stocking to one side, with the toe clearly turned outward. I would use one red and one green accent rather than both colors on every nail.
For your nail artist: Request one tiny stocking on each of two nails, with simple white cuffs and no extra ornaments.
22. A String of Jewel-Tone Lights

The curve of the wire brings movement to this design. Jewel-toned bulbs give it color, but their small size lets the sheer base remain the main part of the manicure.
Each bulb needs a little space from the next. I would use just a few on each accent nail so the wire stays visible and the colors do not blend into a row of dots.
For your nail artist: Ask for a fine curved line and spaced teardrop bulbs, all painted flat with no glow effect.
Soft Colors and Cozy Finishing Details
23. Ivory Knit Lines on Mulberry

Mulberry and ivory make the cable pattern easy to read. Keeping the knit flat gives the design its detail through linework rather than raised texture.
One narrow cable down the center is enough for a short nail. I would keep the side areas plain mulberry instead of filling every space with dots and extra stitches.
For your nail artist: Specify a flat painted cable pattern, with one central braid and simple supporting lines.
24. Blush Gift Tags and Fine Red Lines

A tiny gift tag adds a different detail to the familiar ribbon idea. The cream shape stands out softly against blush, while the red string gives it a clear connection to the other accent.
Leave the tag blank rather than squeezing lettering into it. Its angled corners and little string are enough to suggest a wrapped present, especially beside the simple crossing ribbon lines.
For your nail artist: Request a small blank painted gift tag and one separate ribbon accent, keeping all details flat.
25. Dusty Pink with Frosted Stars

Dusty pink gives white star shapes a soft backdrop. A few silver dots add a small change in texture, but the white artwork should remain the clearest part of the design.
This would be a lovely lighter option alongside the red and green sets. Keep the stars separated and use different sizes rather than filling the nail with identical tiny shapes.
For your nail artist: Choose two star accents with open pink space between each motif and minimal silver detail.
26. Cream and Merlot Scalloped Tips

A scalloped edge gives a dark French tip a softer outline. Merlot keeps the color rich, while a single small gold dot adds a little holiday shine.
The curved edge should have only a few broad scallops. Too many tiny bumps can make the tip look uneven, especially when you see the whole hand rather than a close-up.
For your nail artist: Ask for three broad rounded scallops at the tip and very small gold dots on two nails only.
27. Moonlit Snow Globe Accent
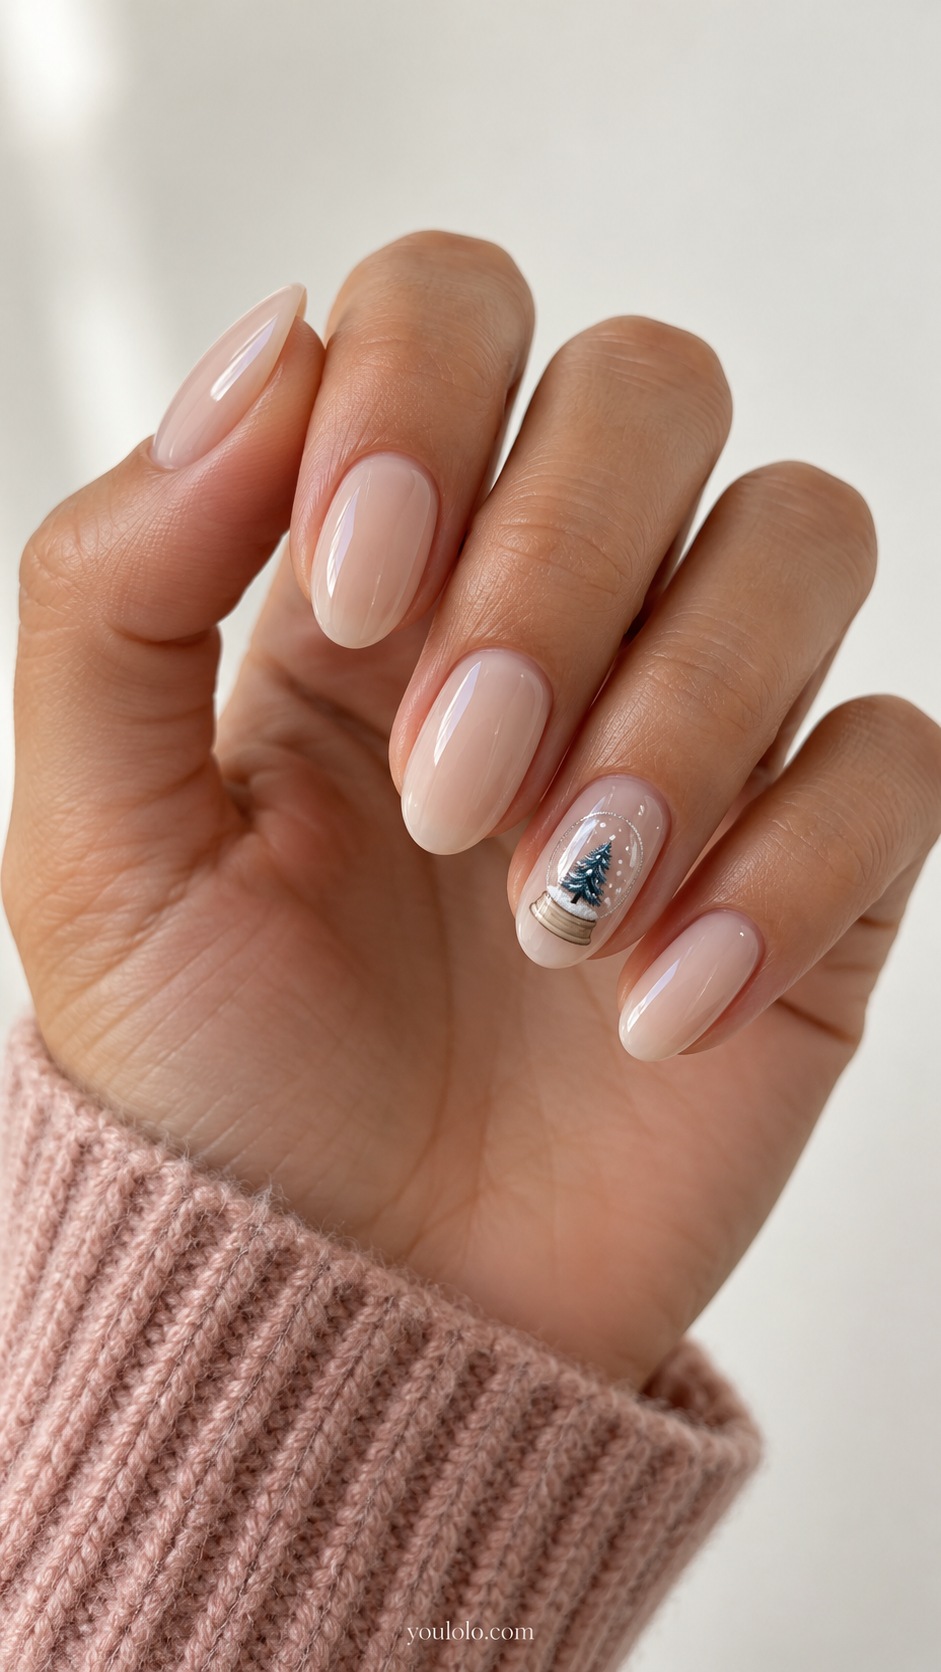
The little rim gives this scene a clear boundary, so it looks like a snow globe rather than a landscape spread across the nail. A dark tree supplies the strongest contrast inside the pale shape.
Keep the scene minimal: one tree and a few snow dots are enough. I would leave the rest of the hand milky beige so the tiny framed picture has room to stand out.
For your nail artist: Request one compact snow-globe accent with a fine rim, a simple tree and no bulky raised dome.
Make Your Saved Design Easier to Explain at the Salon
Bring one favorite close-up rather than a long collection of unrelated screenshots. Point out the base color, the main motif and the finish you want. A clear request might be: “I like the milky pink wreath, but I want it on short rounded nails with just one accent.” That gives your artist room to adapt the scale while preserving the detail you chose.
Ask about the level of detail before the appointment begins. A plain emerald set and a tiny gingerbread house involve different amounts of artwork. Decide which elements are essential and which you are happy to simplify. If you are combining two ideas, keep one palette across both so the hand still feels coordinated.
A Small Holiday Detail to Try at Home
If you want a simple place to start, try a few small dots on one accent nail. Choose one base shade and one contrasting color, then practice the spacing on a spare nail tip first. Leave more empty space than you think you need; it is easier to add one dot than remove a crowded cluster.
Follow the application and drying or curing instructions for the products you use. For more visual technique examples, explore OPI’s nail art tutorials and essie’s nail art library. Use those resources to compare methods, then keep the colors and placement that fit your chosen design.
Christmas Nail Ideas FAQ
Which Christmas nail designs work well on short nails?
A tiny wreath, micro French edge, simple star or peeking snowman can work well in a small space. Use fewer details rather than trying to fit a complete scene onto every nail. One accent is enough to make the set feel festive.
Can I have Christmas nails without red and green?
Yes. Midnight blue, dusty pink, ivory, champagne and cocoa all appear in this collection. A small ornament, cookie star or snow-globe detail can supply the holiday theme while you keep a palette you enjoy.
Should every nail have a Christmas design?
No. A single detailed nail with coordinated plain nails is often easier to appreciate. Repeat a color from the artwork on the other fingers, or use one much smaller detail to connect the set.
How can I make holiday nail art look more delicate?
Use a sheer or pale base, keep the motif small and leave open space around it. Thin lines, one restrained metallic detail and fewer accent nails can all make a set feel lighter.
Can I ask for flat artwork instead of charms?
Yes. Tell your artist that you want a smooth painted finish. Bows, ribbons, berries and ornaments can be drawn rather than added as raised decorations. Metallic foil should also be sealed smoothly if that is the surface you prefer.
Which designs can I keep wearing after Christmas?
Plain emerald, the silver tips, midnight-blue stars and dusty-pink frost details have a broader winter feel. If you want that flexibility, choose a finish or small seasonal motif rather than stockings, presents or a decorated tree.
Which One Would You Save?
I would start with the little wreath for something delicate, the gingerbread house for a playful accent, or the midnight-blue star for a darker set. Save the version that feels most like you, then keep its best detail when you adapt it to your own nails.
[…] the little characters are your favorite detail, our cute Christmas nail ideas offer more ways to make playful artwork the focus of your […]
[…] more playful holiday details, our cute Christmas nail ideas offer more ways to make playful artwork the focus of your […]