The Best Fluffy Pancakes recipe you will fall in love with. Full of tips and tricks to help you make the best pancakes.



Ladybug nails work best when the small motif has enough space to be recognized. A red shape, a dark outline and a few carefully placed marks can communicate the idea without covering every nail in detail. These twenty designs explore different bases, placements and supporting garden elements. Some keep the illustration as a tiny surprise; others make it the focus of the set. Choose how prominent you want the ladybug to be, then build the rest of the manicure around that decision.
How to choose ladybug nails without overcrowding the design
Set the scale of the main motif
A tiny ladybug near the free edge feels different from a larger illustration placed in the center. Decide which version you want before adding leaves or flowers. If the nail is short, a simpler outline with fewer interior marks can stay clearer than a miniature version of a very detailed drawing.
Choose a base that gives the artwork contrast
A cream or sheer pink base can make red and dark details easy to see. Green introduces a garden mood, while a darker base can make the red body the strongest feature. Check that the outline remains visible against your chosen background. If two dark areas blend together, a small light gap or a different placement may solve the problem.
Repeat one supporting detail
Ladybug nails do not need the same insect on every finger. You can repeat a leaf color, a tiny dot or a curved edge elsewhere in the set. That shared detail connects the manicure while allowing the main illustration to stand out. Keep the supporting marks smaller or simpler if the ladybug is meant to be the focal point.
For a related approach to small repeated marks, explore our polka-dot nail ideas. If you enjoy garden-inspired accents with a different subject, browse these fruit nail designs with botanical details.
1. Cream Garden Visitors
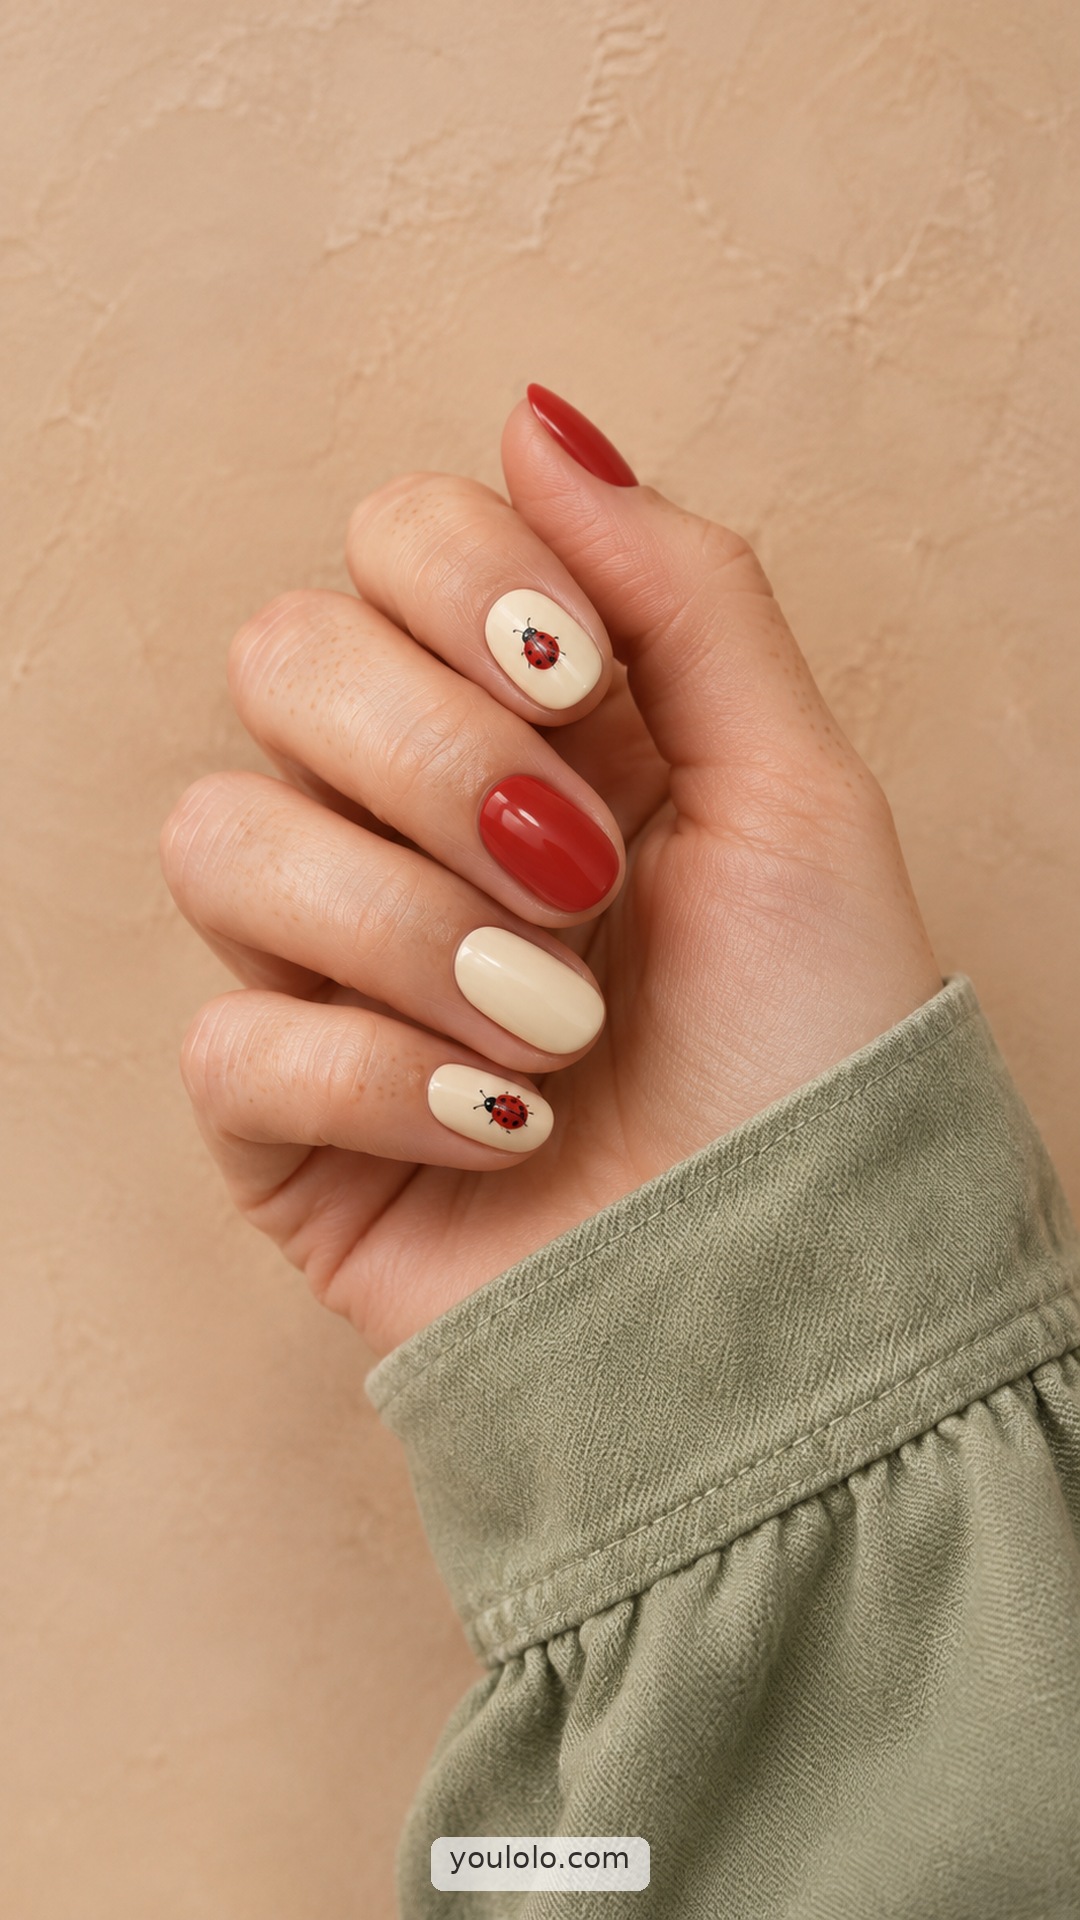
Warm cream and soft red give these ladybug nails a simple, cheerful palette. Two tiny red-and-black illustrations sit on separate cream accents, while the other nails stay plain to keep the miniature artwork easy to notice. The short oval shape feels tidy, and a smooth glossy finish connects the solid colors with the detailed nails. This is a useful reference if you want a playful motif without covering every finger. The little painted figures have enough space around them to remain clear and delicate.
Make it yours: Keep each ladybug small enough to leave a generous cream border around it. A red oval, tiny dark head, center line, and a few restrained spots will read more clearly than trying to fit many tiny details onto one nail.
2. Sage Leaf Landing

Muted sage frames two ivory nails painted with slender leaves and tiny red ladybugs. The green stems connect the small illustrations to the surrounding solid color, creating a botanical theme without a dense floral pattern. Medium oval tips give the leaves room to extend along the nail while keeping the insect motifs small. The warm ivory base helps the red stand out, and the glossy finish keeps every element polished. This palette works especially well with natural linen, pale pink, and other softly muted clothing.
Make it yours: Paint the leaf stems first so you can judge where the small red motif will sit. Keep the green linework slender, and use only a few dark spots on each ladybug to preserve its miniature scale.
3. Red Micro French Trail

A red micro French edge adds a bright outline to this sheer blush manicure. Most nails stay simple, while one accent carries a miniature ladybug and a short dotted trail. The very thin tips repeat the red artwork without competing with it, making the overall design feel connected. Compact rounded edges keep the set neat and understated. This is a good choice when you enjoy a themed accent but want the clean nail bed and familiar structure of a delicate French manicure.
Make it yours: Keep the red tip narrower than the little ladybug motif so the accent remains the focal point. Use just a few fine dots for the trail, with space between them, rather than drawing a heavy continuous line.
4. Daisy and Ladybug Pair
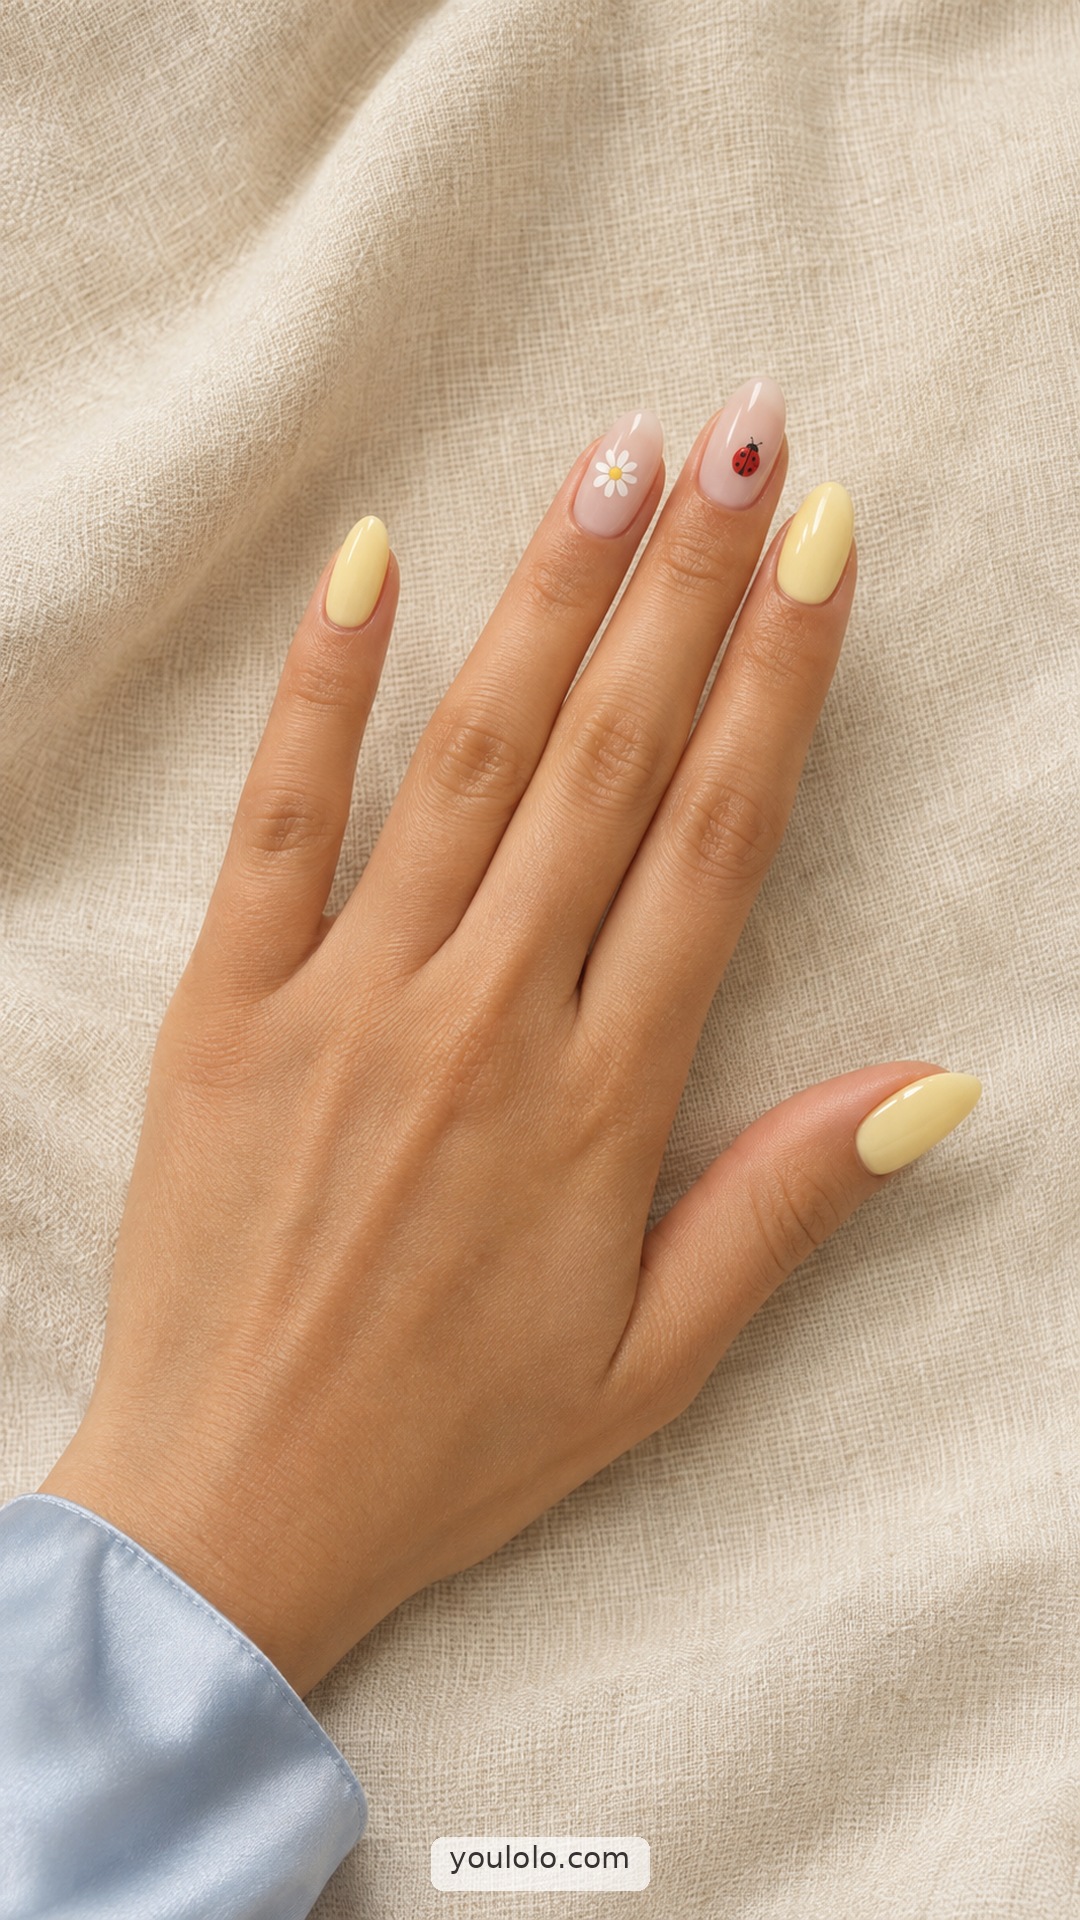
Butter yellow nails bring a soft sunny frame to two milky nude accents. One carries a small white daisy with a yellow center, while the other shows a tiny painted red ladybug. Separating the motifs gives each detail room to breathe, and the yellow solids link back to the flower center. The tapered almond shape keeps the set graceful without making the artwork large. This is a light garden-inspired combination that balances a playful subject with a restrained palette and smooth glossy finish.
Make it yours: Place the daisy and ladybug on separate nails so neither needs to be squeezed into a crowded scene. Keep their scale similar, and repeat the daisy center's yellow in the solid nails to tie the design together.
5. Blue Porcelain Picnic

Powder blue gives these short rounded nails a cheerful backdrop for tiny red ladybugs. Two nails carry the miniature motifs, while sparse white dots repeat across the set without filling every space. The red and blue contrast makes the small insects easy to spot, and the plain rounded shape keeps the artwork compact. These ladybug nails take a playful direction without requiring a busy garden scene on every finger. The light base also helps the fine black details remain visible at this small scale.
Make it yours: Place the ladybug motifs first, then add a few white dots in the remaining space. Keep the spots on each red oval much smaller than the surrounding white dots, so the two details stay visually distinct.
6. Lilac Meadow Spots

Lilac and cream frame a single sheer accent in this soft meadow-inspired manicure. The clear-looking nail carries a tiny red ladybug beside slender green grass strokes, leaving most of the base open. The other nails repeat the pale colors without adding more motifs. That separation gives the small illustration room to stand out and keeps the overall set balanced. The oval shape follows the gentle lines of the grass, making this a quieter option than an all-over floral or insect pattern.
Make it yours: Keep the grass strokes fine and leave gaps between them rather than painting a solid green patch. Place the red ladybug slightly away from the center of the accent so the open base remains part of the composition.
7. Classic Red and Cream

Glossy tomato red and warm cream create a clear contrast in this compact manicure. Two cream nails each hold one small red ladybug, with dark spots and a tiny black head defining the simple shape. The remaining nails stay solid red, repeating the motif color without adding more detail. Short squared tips suit the straightforward arrangement and give the cream accents a tidy frame. This is a good choice if you want the theme to be immediately recognizable while keeping the rest of the set uncomplicated.
Make it yours: Center the small red ovals on the cream accents before adding black details. Leave a generous cream margin around each motif, and use only a few tiny spots so the illustration does not become a dark patch.
8. Tiny Clover Companion

Pale mint nails surround two translucent accents with delicate clover sprigs and tiny red ladybugs. The green leaves connect the illustrations to the solid mint polish, while the red provides a small contrasting detail near the lower part of each accent. Keeping the bases sheer prevents the little scenes from feeling crowded. The almond shape adds a tapered outline that suits the fine stems. This combines botanical and insect motifs in a restrained way, with enough plain polish elsewhere to keep the set easy to read.
Make it yours: Paint the thin clover stems first and build the leaves around them, leaving space for the tiny red motif. Keep the ladybugs smaller than the leaf clusters, and preserve clear areas around both illustrations to avoid crowding.
9. Peach Petal Pause

Pale peach polish gives these short oval nails a warm base, while fine ivory petals gather near the tips. A tiny red ladybug sits at the side of one accent, adding a small point of contrast without taking over the soft floral details. The glossy finish keeps the palette fresh and simple. These ladybug nails offer a gentle approach to the motif if you prefer a single miniature illustration rather than a full set of repeated red and black patterns.
Make it yours: Keep the ivory petals close to the tips and leave the peach centers open. Add the ladybug only after deciding where the petals end, allowing a small clear gap so the red shape stays easy to distinguish.
10. Ladybug Gingham Corner

Muted sage nails frame two cream accents with small gingham corners, bringing a picnic-inspired pattern into a restrained palette. One cream nail also carries a miniature red ladybug, positioned away from the checks so both details remain readable. Medium oval shapes give the corners a soft outline and leave plenty of plain color between the accents. This is a balanced option for someone who likes a playful theme but wants the overall manicure to feel calm and neatly composed.
Make it yours: Limit the gingham to a corner of each cream accent and keep the grid fine. Place the ladybug in the open cream area rather than directly over the checks, where its small black details could get lost.
11. White French Visitor

Fine ivory French edges frame a sheer rose base on these short rounded nails. A tiny painted red ladybug and a subtle dotted trail add a playful detail to one accent while the remaining nails keep the familiar French shape. The small illustration sits within the open nail bed, leaving the pale edge easy to see. This design is a useful choice if you want a classic manicure with one unexpected detail instead of a busy theme across every finger.
Make it yours: Keep the ladybug small and leave space between it and the French tip. Use only a few dots for the trail, varying their spacing slightly so the path looks light rather than becoming a heavy black line.
12. Butter Yellow Field
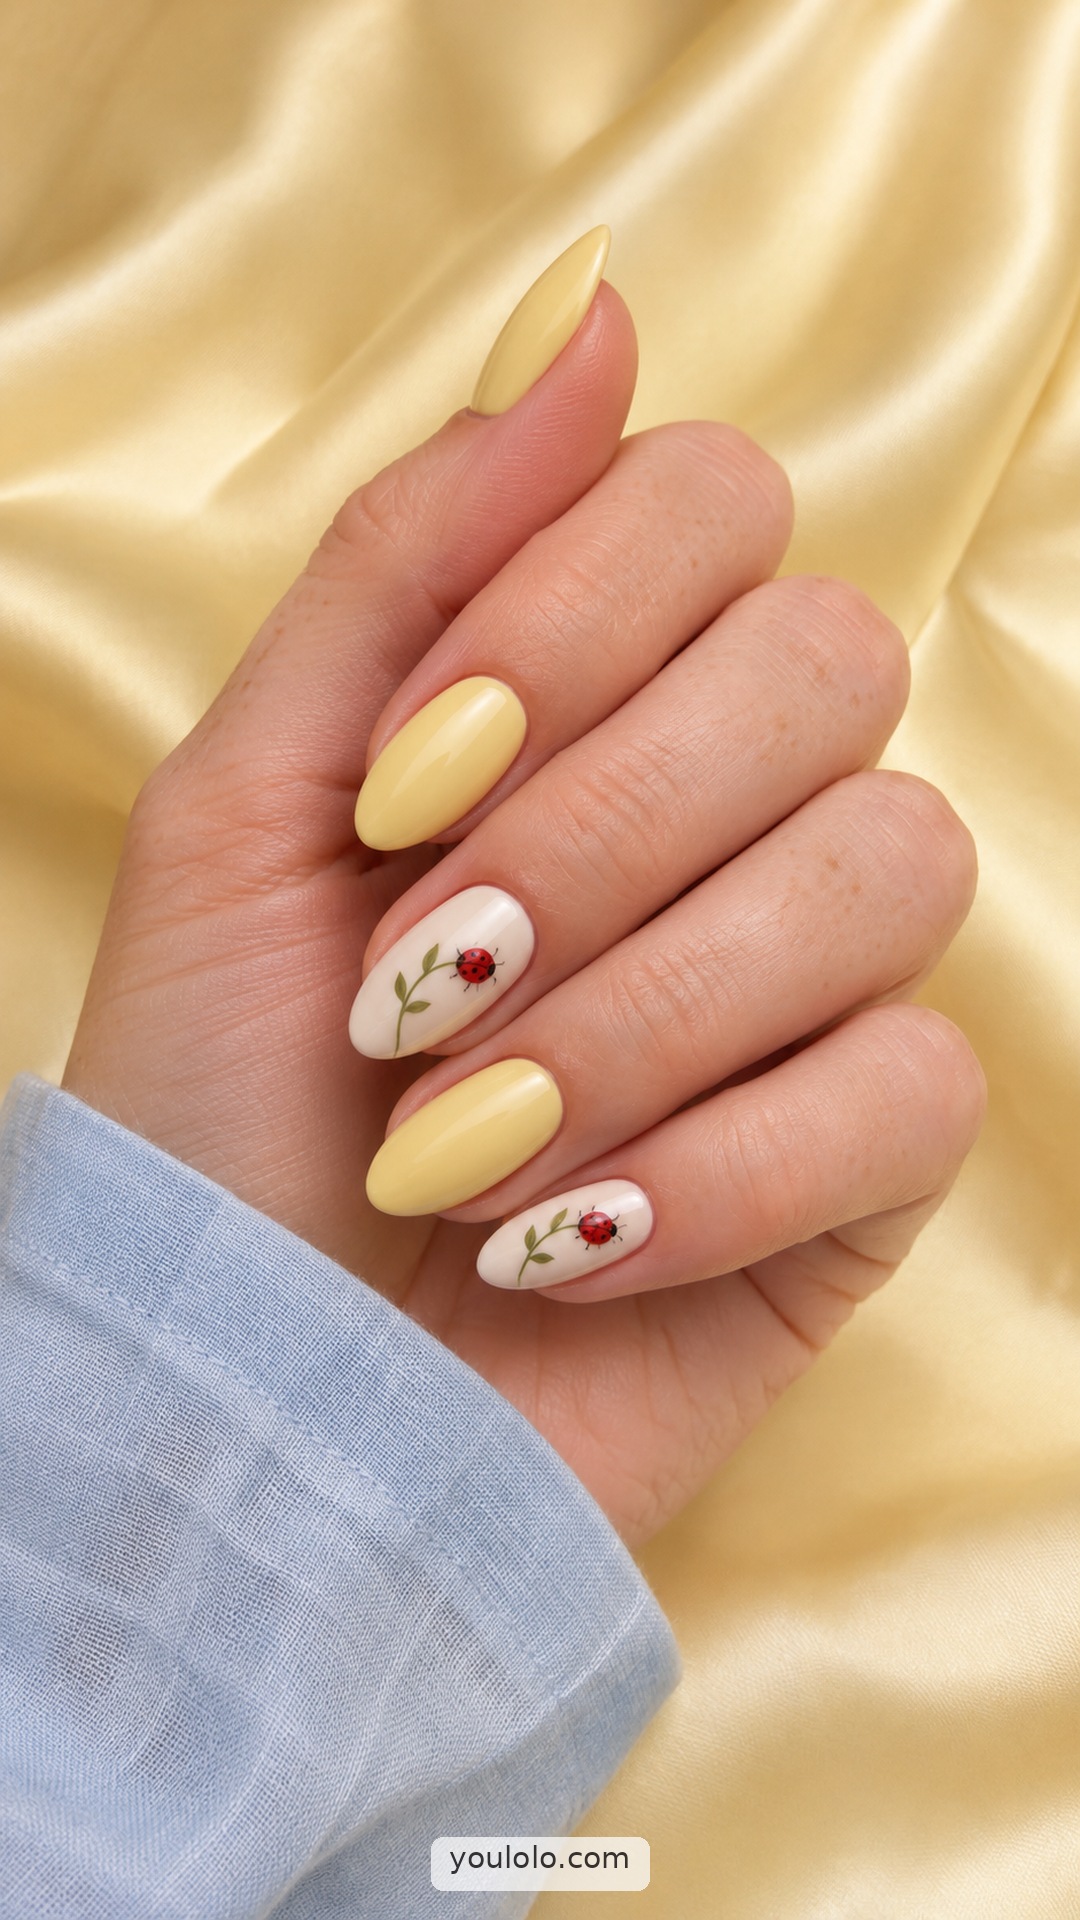
Butter yellow nails brighten this almond set, while two ivory accents carry tiny red ladybugs beside slender green stems. The small painted details stay flat and delicate, keeping the manicure smooth and easy to read. Repeating the same miniature garden idea on two nails gives the set a clear theme without covering every finger in artwork. The warm yellow and ivory pairing also softens the contrast of red and black, making the design feel light rather than strongly graphic.
Make it yours: Keep the green stems fine and the ladybugs smaller than the width of the accent nails. Use the same red and green on both illustrations, but vary their placement slightly so the two accents feel related rather than stamped copies.
13. Rose Garden Stems

Dusty rose gives these ladybug nails a muted garden palette, with two pale translucent accents carrying fine green stems. Small white buds and miniature burgundy-red ladybugs add detail without covering the whole nail. The short oval shape makes the arrangement feel compact, while the plain rose nails provide a quiet frame for the artwork. Because the illustrations are flat and small, the glossy surface stays smooth. This is a gentle botanical approach for someone who prefers softened colors to a bright red statement manicure.
Make it yours: Keep the stems thin and allow pale space around each ladybug. A muted burgundy red will blend with dusty rose more softly than a bright scarlet, while a few tiny black details can still make the illustration recognizable.
14. Emerald Leaf Frames

Deep emerald nails frame two nude accents decorated with fine green leaves. A small red ladybug sits among the foliage on one nail, adding a concentrated warm color against the cool green palette. The leaves follow the sides rather than filling the center, which keeps the nude base visible. Medium oval shaping suits the curved botanical lines and gives the illustration room to breathe. This set balances a rich solid polish with delicate artwork, making the tiny ladybug a detail to notice rather than an oversized focal point.
Make it yours: Ask for the leafy borders to remain fine and open, especially near the center of each accent. Keep the ladybug small enough to sit within the frame, and use the same green family for the leaves and solid nails.
15. Ladybug Polka Mix

Ivory and glossy red give this short squoval manicure a clear, graphic palette. Tiny black dots decorate one red nail, while a small ladybug illustration appears on an ivory accent. The remaining solid nails separate those two patterns and prevent the set from becoming crowded. Repeating red and black in different ways makes the design feel coordinated without putting a ladybug on every finger. The softened square shape supports the neat arrangement and keeps the overall look compact, playful, and easy to read.
Make it yours: Keep the black dots smaller than the ladybug illustration so the accents have different visual weights. Leave some ivory visible around the insect, and retain the plain nails to give both patterned elements enough breathing room.
16. Lavender Bud Landing

Pale lavender nails surround two nude accents, one painted with a slender lavender sprig and the other with a tiny red ladybug. The flower buds give the set a soft botanical rhythm, while the single red detail creates a small point of contrast. Medium almond shaping follows the narrow stems and keeps the composition elongated without excessive length. The nude bases make the artwork easy to see, and the plain lavender nails hold the palette together. This is a delicate alternative to a densely floral manicure.
Make it yours: Place the lavender sprig and ladybug on separate accents so each remains clear. Keep the flower buds small, with a slim stem between them, and match the solid lavender polish to the lighter tones within the painted sprig.
17. Negative Space Pair

Two tiny red ladybugs sit near the side edges of these clear blush nails, accompanied by sparse dark dotted trails. The remaining nails are plain, giving the small painted details plenty of space. Short rounded tips keep the overall look compact and natural, while the glossy pink base adds a gentle reflection. This pared-back version of ladybug nails uses placement rather than a busy pattern to create interest. Against rose stone and a cream cuff, the miniature red accents provide a clear focal point.
Make it yours: Keep the ladybugs small enough to leave a broad clear area around them. Use only a few separated trail dots, then leave the other nails undecorated so the two illustrated accents remain easy to find.
18. Pistachio Tulip Visit
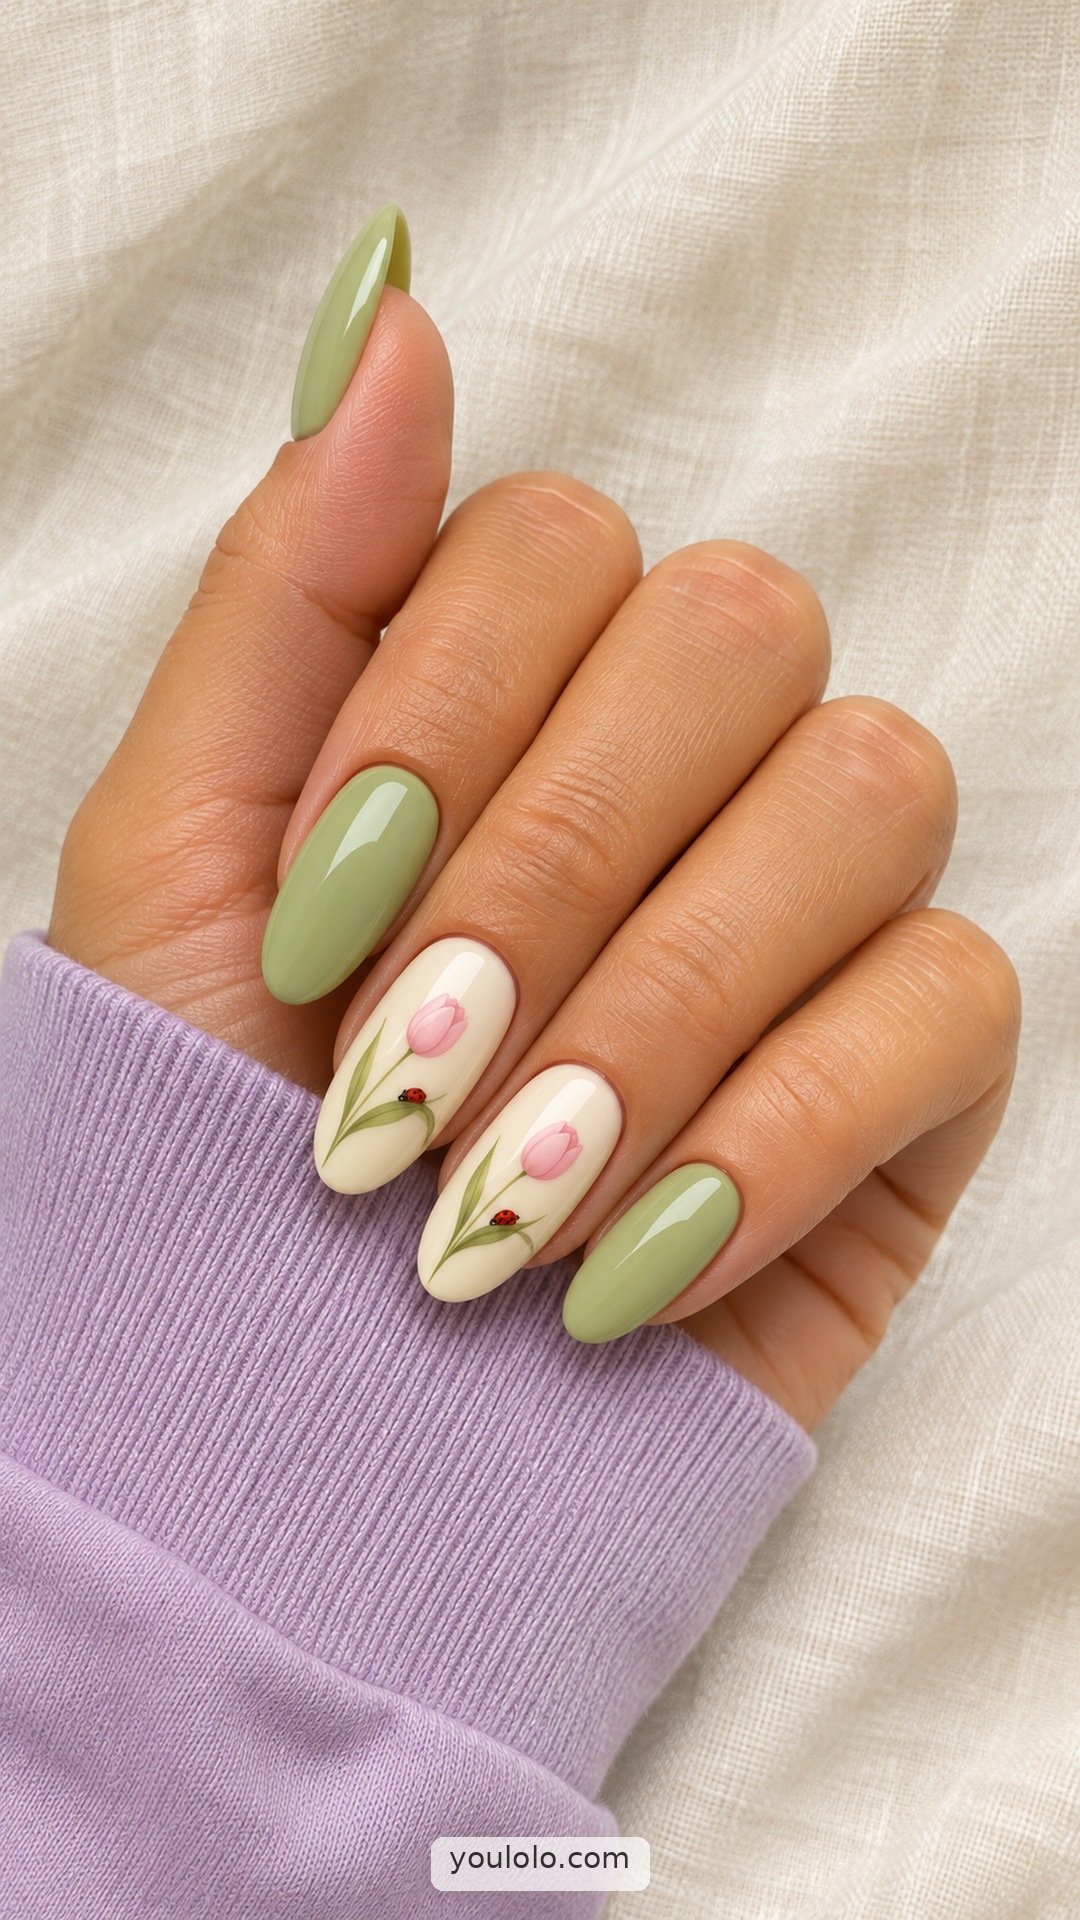
Pistachio green surrounds two creamy botanical accents in this almond manicure. Each light nail carries a small pink tulip, slender green leaves, and a miniature red ladybug painted beside the stem. The colors stay soft, making the red insects a tiny detail rather than the dominant feature. Plain green nails give the illustrations breathing room and connect the set through one shared shade. A lilac cuff and ivory linen background complement the pale flowers while keeping the delicate leaf strokes visible.
Make it yours: Paint the tulip and its stem first, then place the tiny ladybug where it will remain separate from the flower head. Keep both accent layouts light, with enough cream showing between the stems and nail edges.
19. Red Ribbon Garden
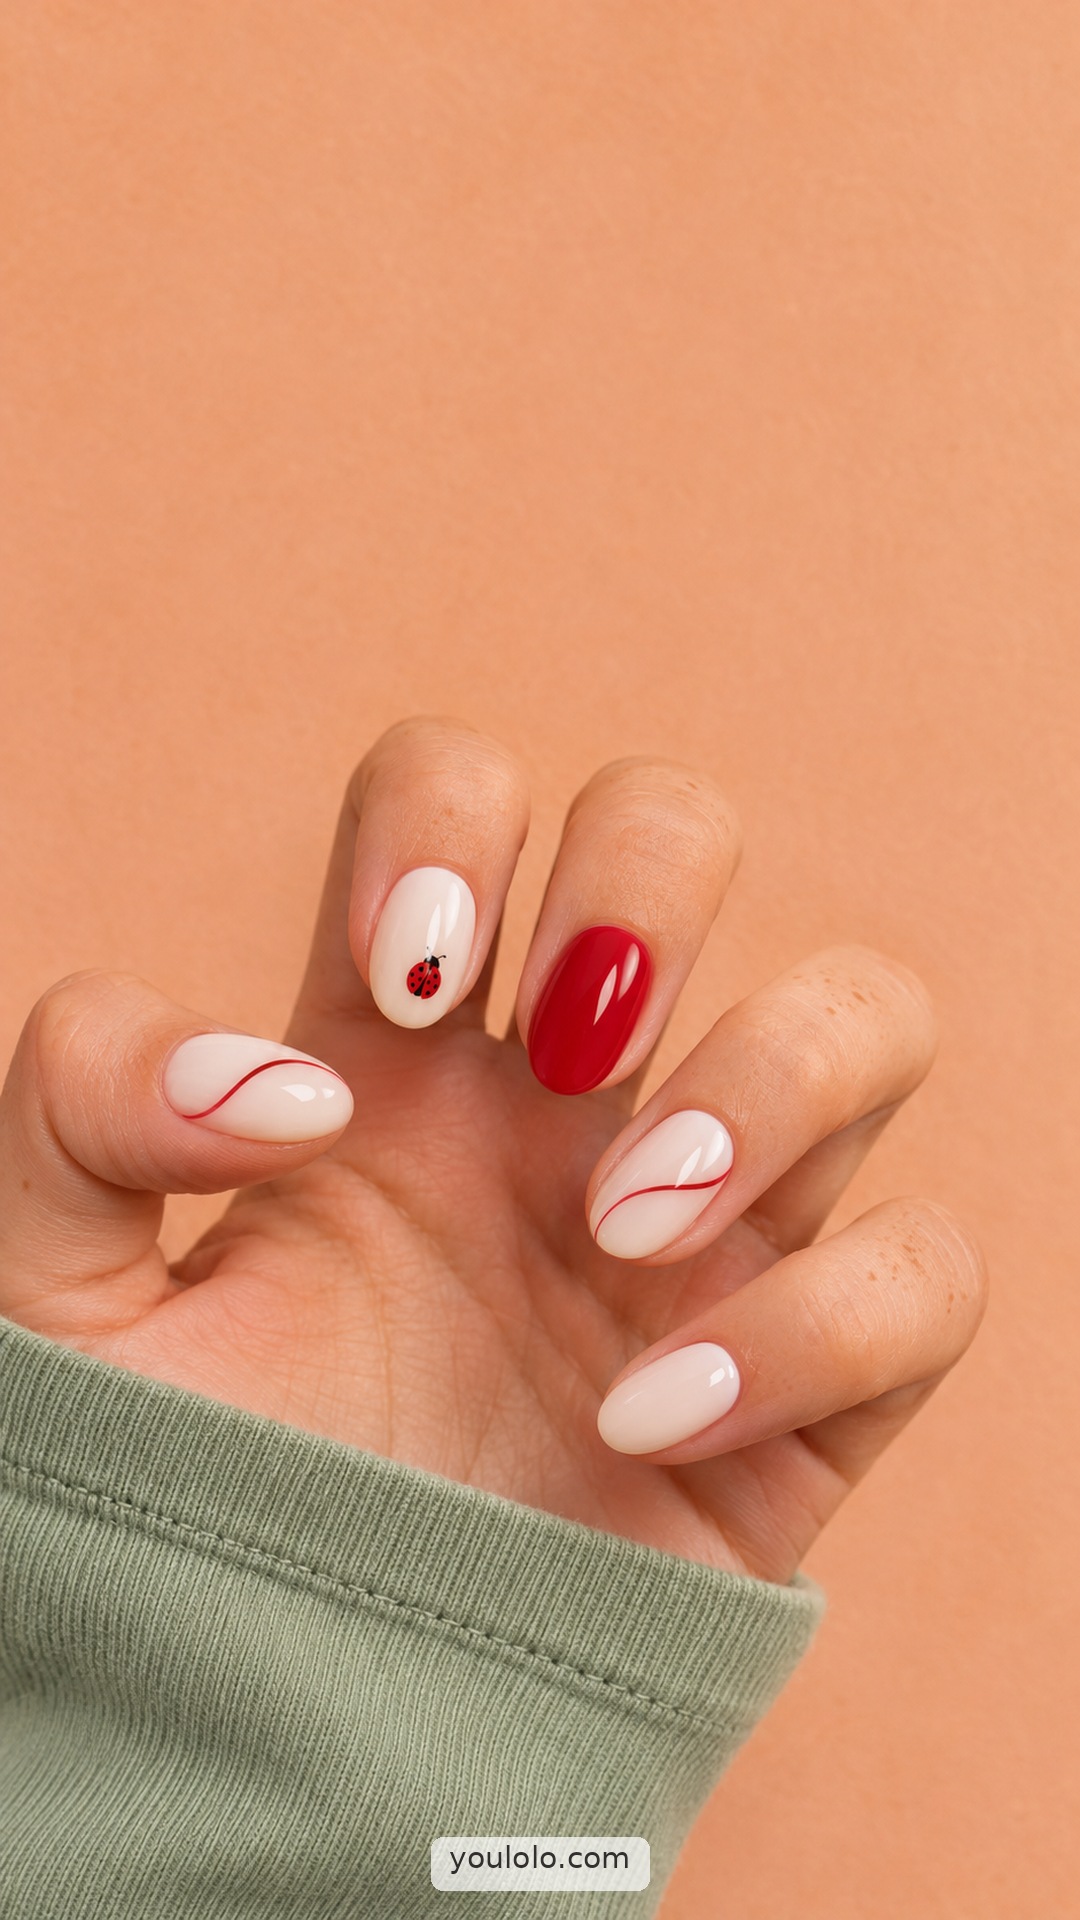
Thin red ribbons sweep across two milky cream nails, balanced by one solid red nail and a small painted ladybug on another. The remaining cream nail stays plain, so the miniature insect does not have to compete with a fully patterned set. Short oval shapes keep the curves compact and easy to read. The red details share the same warm tone, which ties the different elements together. A sage cuff and peach backdrop add soft surrounding colors without distracting from the red-and-cream arrangement.
Make it yours: Keep the ribbons thin and let each curve take a slightly different path. Place the ladybug on its own cream nail, leaving clear space around it, and use the same red for the motif and solid accent.
20. Ivory Meadow Miniatures

Fine olive stems and tiny pale wildflowers decorate several warm ivory almond nails in this meadow-inspired set. A miniature red ladybug sits among the botanical details on one accent, adding a small point of contrast. The other ivory nails remain plain, keeping the overall color light despite the intricate strokes. The long tapered shape gives the stems room to rise from the edges without filling the whole surface. Soft pink linen and a green plaster setting reinforce the gentle garden palette.
Make it yours: Keep the stems very slender and leave gaps between the tiny flowers. Position the ladybug in an open area rather than over a dense cluster, and preserve some plain ivory nails to balance the botanical detail.
A mini-guide to clear, polished ladybug nails
Plan the illustration as a silhouette first
Start by checking whether the outer shape reads clearly. The body, head and overall placement matter more than adding a large number of tiny dots. On a practice tip, look at the motif from normal distance. If it becomes a dark spot, simplify the interior marks or give the body a little more space.
Balance the dots and the outline
Small painted dots can merge visually when they are crowded together. Leave enough red visible between them to preserve the shape of the body. The outline does not need to be equally heavy everywhere; a finer line may look more delicate on a pale base. Discuss this balance with your artist when adapting a reference to your nail length.
Use a garden element with a purpose
A leaf, stem or small flower can suggest a setting, but it should not obscure the ladybug. Place the supporting element so it guides the eye toward the main motif. If the nail starts to feel crowded, move the extra botanical detail to a neighboring accent nail rather than shrinking everything further.
Decide how many accent nails you want
One or two illustrations can be enough for a full set of ladybug nails. The remaining nails might use a matching solid color, a thin edge or a few related dots. If you prefer more artwork, vary the placement while keeping the palette consistent. Repetition is useful, but identical placement on every nail is not required.
Keep the texture choice explicit
A ladybug can be painted flat or interpreted as a raised decoration. Those choices feel different on the nail and may require different materials. If you prefer a smooth everyday surface, ask for a flat painted version. A small highlight can suggest roundness without needing a large sculpted ornament.
Prepare a manageable home-practice version
Practice one simple motif on a tip before attempting the whole manicure. Choose a calm base, make the main shape and let the products reach the appropriate stage before adding details according to their instructions. Avoid assuming that every polish, paint or gel behaves the same way. For a salon appointment, bring the simplified version as a useful alternative.
Frequently asked questions
Can ladybug nails look subtle?
Yes. Use a small illustration on one accent nail and keep the rest of the set simple. A sheer or creamy base with a restrained supporting color can make the motif feel delicate.
Do ladybug nails have to be red and black?
Those colors make the motif easy to recognize, but stylized versions can use other palettes. Keep the silhouette and placement clear if you change the familiar colors.
Are short nails large enough for a ladybug design?
Yes, provided the illustration is simplified to suit the available space. A clear body shape and a few distinct marks are often more effective than a highly detailed miniature.
Should I add flowers to every nail?
No. Flowers are optional supporting details. Consider placing one botanical accent beside the ladybug and leaving the other nails plain or lightly patterned.
What should I tell my nail artist?
Specify the size and placement of the ladybug, your preferred nail length and whether you want flat or raised artwork. Identify which supporting details are optional so the design can be adapted cleanly.
For another perspective on this theme, explore BeautyCoded’s ladybug nails collection. Use the examples above to discuss your preferred palette, length and amount of detail with your nail artist.
Save this collection for your next manicure.