The Best Fluffy Pancakes recipe you will fall in love with. Full of tips and tricks to help you make the best pancakes.


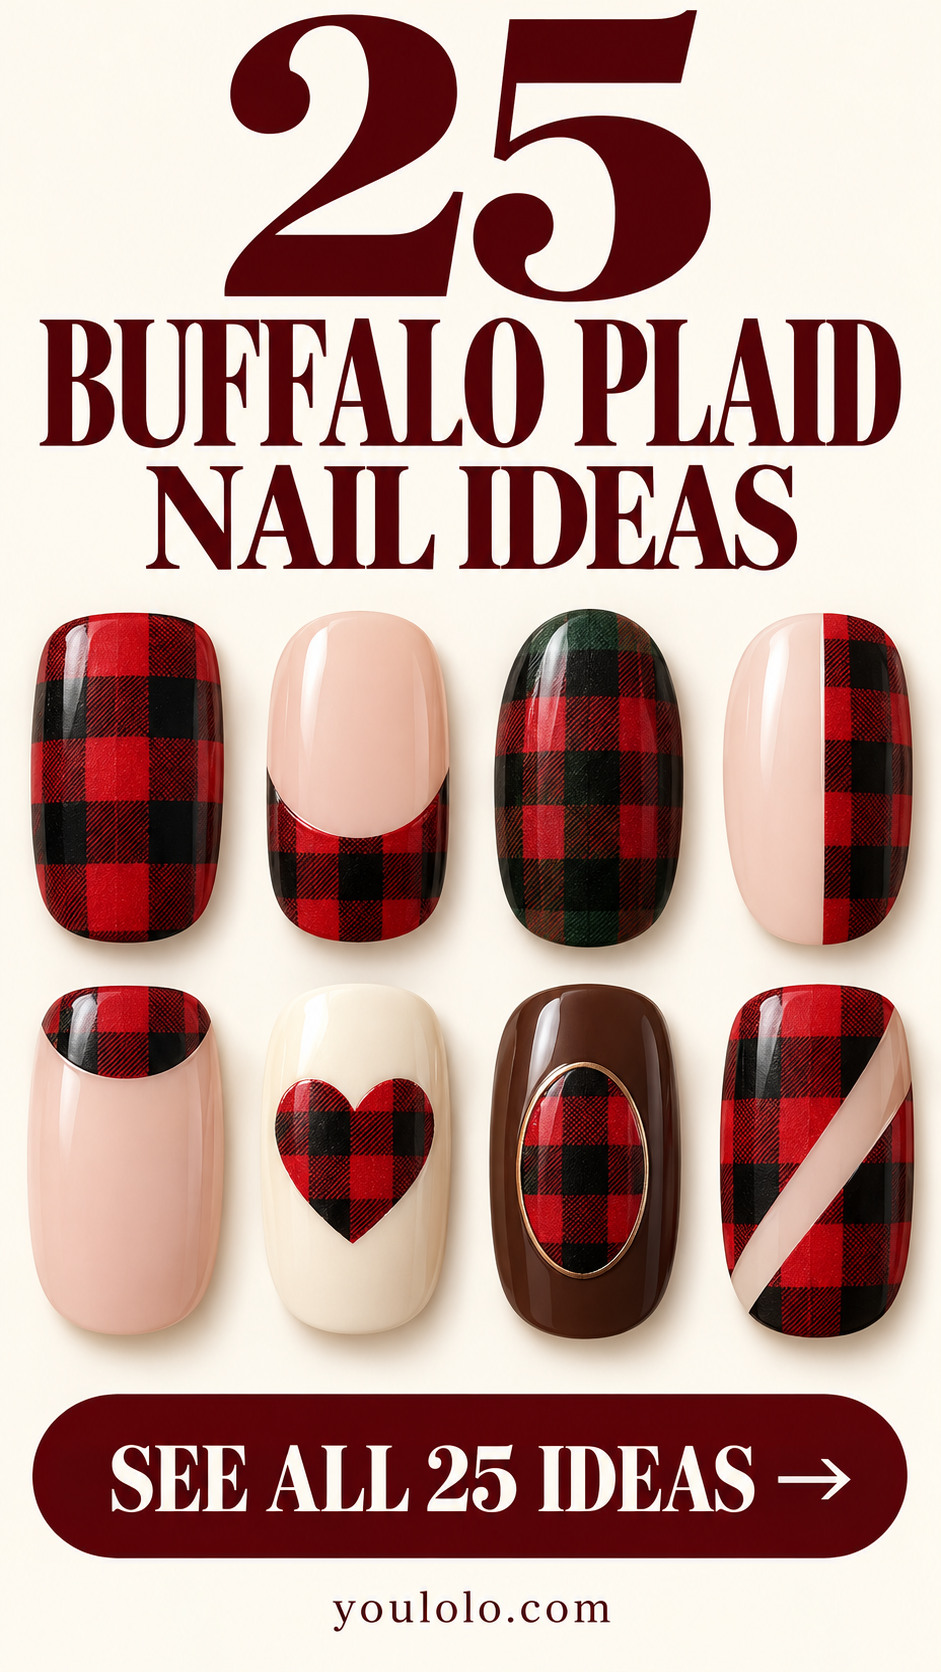
Buffalo plaid nails bring the cozy feel of a flannel shirt into a small, graphic design. The pattern works best when its broad crossing bands are easy to see: a base color, a darker middle tone and the deepest squares where the bands overlap. It is a different effect from a fine tartan grid or a simple two-color checkerboard.
This collection explores 25 ways to use those checks, from a single red-and-black accent to patterned tips, curved islands and a holiday ornament. Start by deciding how much pattern you want, then choose the scale and finish. Each design includes a short salon brief to help you explain the detail that matters.
Buffalo Plaid Nails: Start with Scale and Accent Placement
1. Classic Cabin Checks
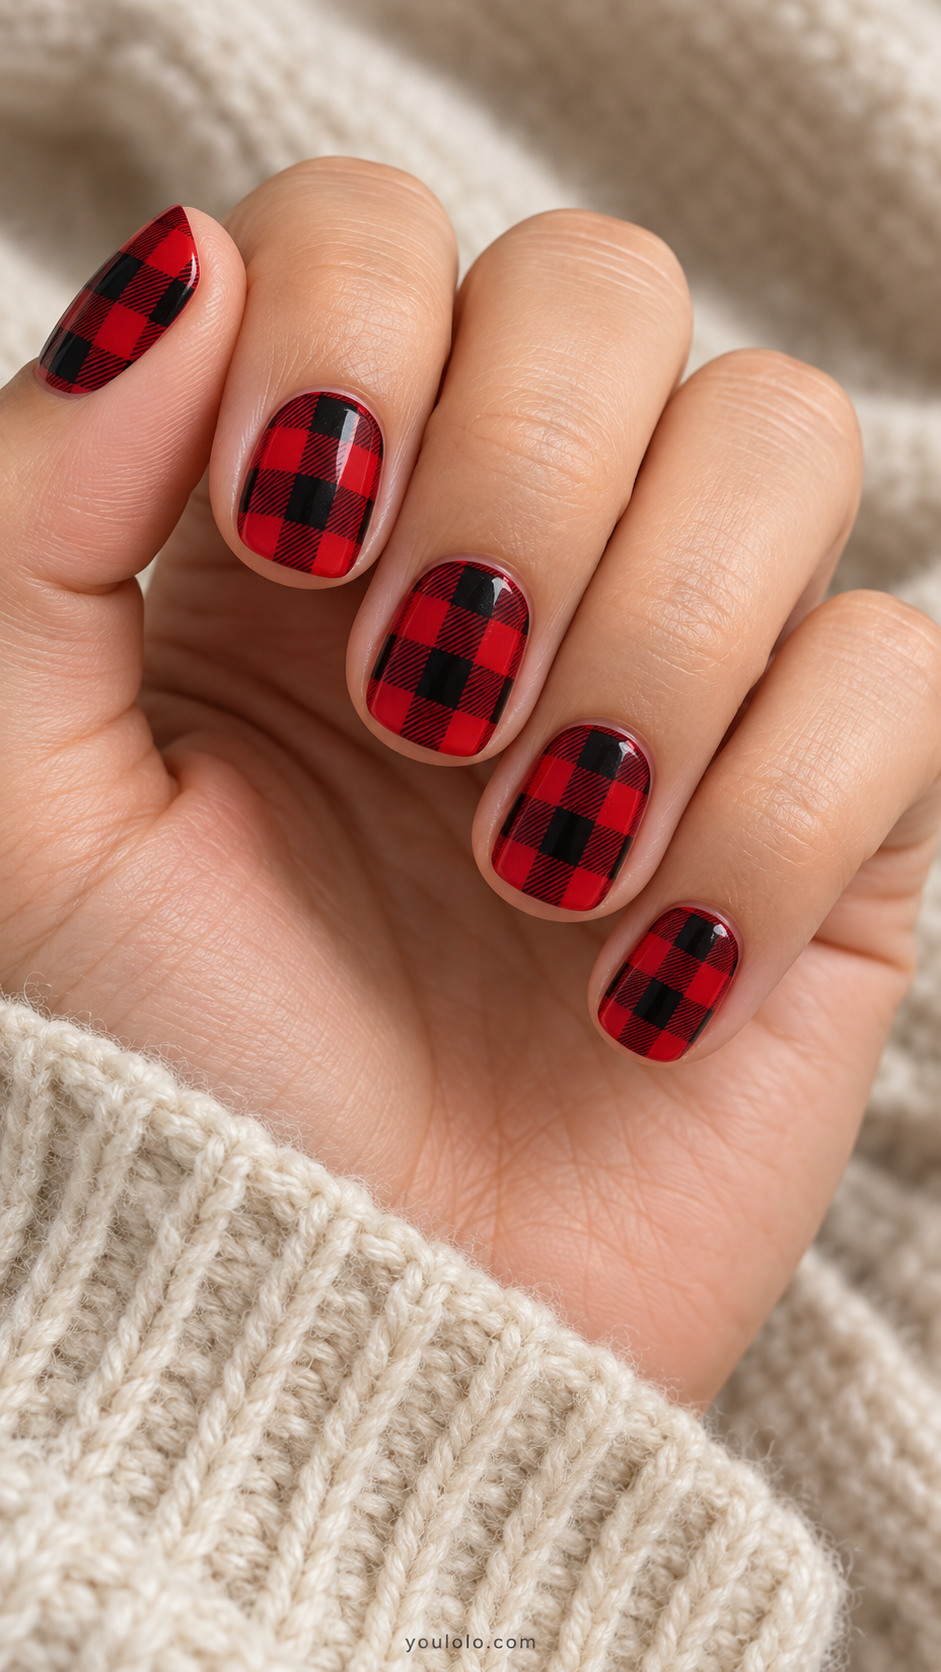
The familiar red-and-black combination earns its place through proportion. Broad squares leave the pattern legible on a short squoval nail, while tiny diagonal hatch marks give the middle tone a woven look. Keep the cuticle edge clean and the surface smooth; the textile reference should come from the painting, without adding bulk. Pair it with plain denim or a cream knit.
Salon brief: Short squoval nails. Full red and black buffalo check on all nails, crimson base, translucent black broad equal-width horizontal and vertical bands, opaque black overlapping squares, fine diagonal hatching only in midtone squares. Gloss finish.
2. One Plaid Nail, Four Quiet Neighbors
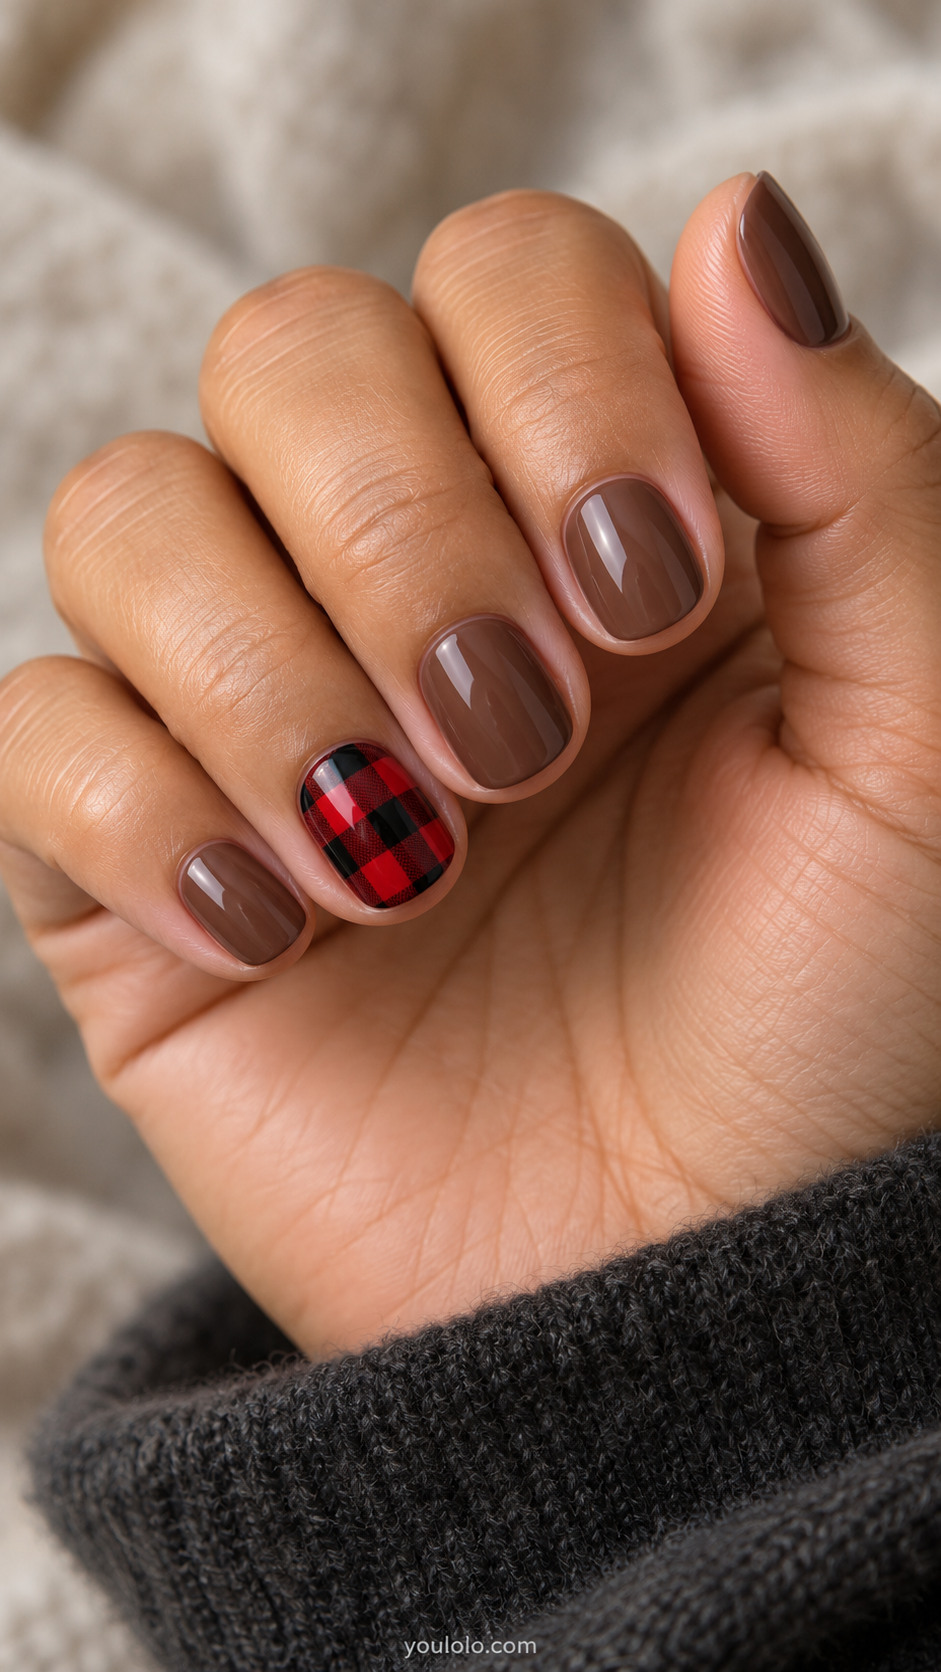
A single checked nail is enough when the surrounding color feels intentional. Chestnut softens the contrast of the red-and-black accent, making this a practical starting point if a whole patterned set feels busy. The round shape keeps the overall effect relaxed. Ask for at least two complete columns of checks on the accent so it reads as buffalo plaid rather than a few stripes.
Salon brief: Short round nails. Ring nail red and black large buffalo check; other four nails warm chestnut cream polish, glossy.
3. Double Accent in Forest Green

Two neighboring accent nails create a small block of pattern across the hand. Forest green gives the checks depth, and ivory provides enough separation for the grid to remain visible. This arrangement suits an oval shape because the softer outline balances the straight bands. Use a green that stays visibly green indoors; a nearly black base would lose the point of the pattern.
Salon brief: Medium oval nails. Middle and ring nails forest green and near-black buffalo check with clear green midtone; remaining nails solid warm ivory, smooth satin.
4. Oversized Two-Column Checks
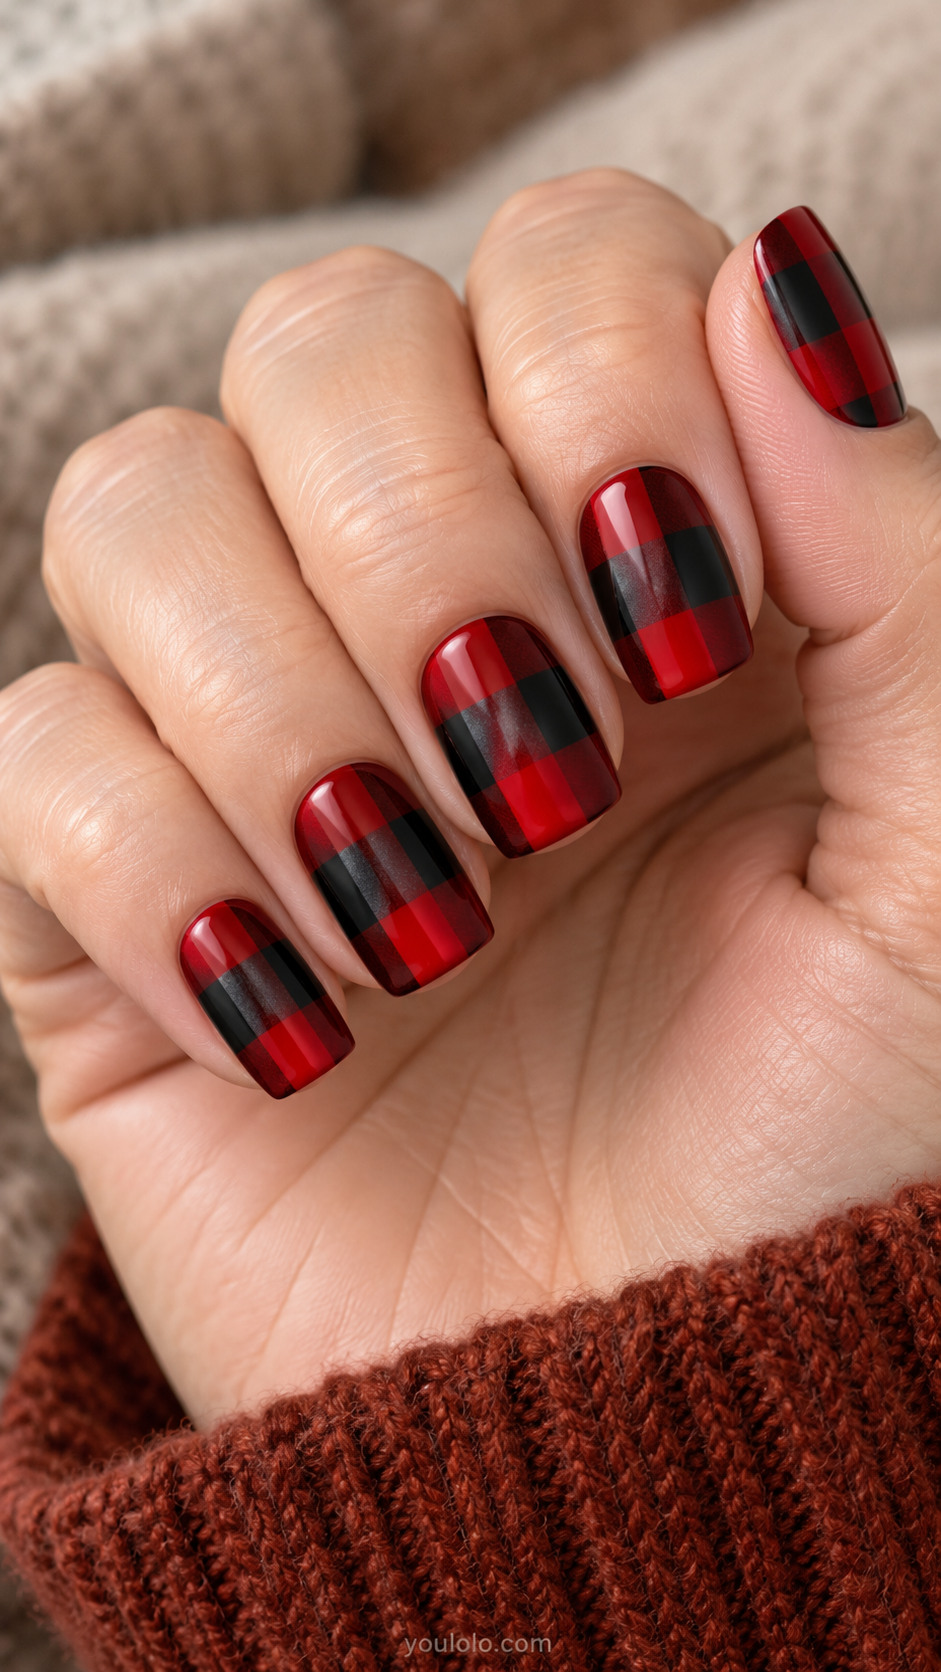
Large squares make the manicure feel graphic and deliberate. With only two broad columns across each nail, the check becomes the entire design rather than a tiny decorative print. A medium square edge gives the geometry room to breathe. The key is matching the width of the vertical and horizontal bands, allowing the darker overlap to form clean squares instead of uneven rectangles.
Salon brief: Medium square nails. All nails oversized red charcoal and black buffalo checks only two broad columns and three rows per nail; glossy, no fine stripes.
5. Small-Scale Flannel Accent
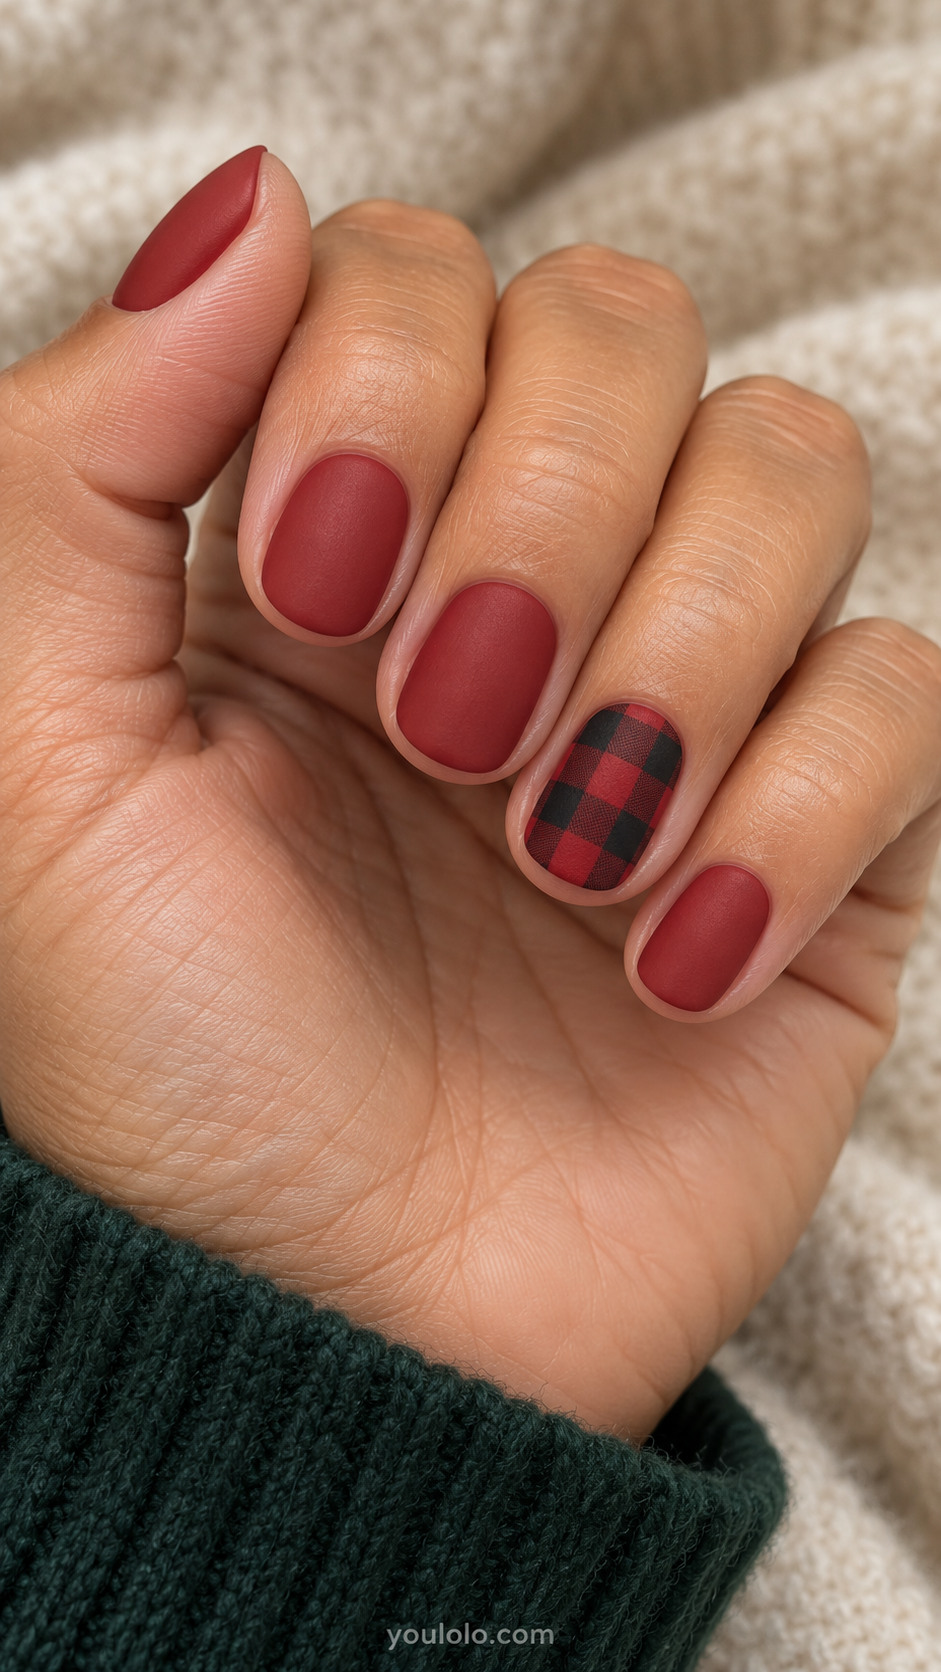
Smaller checks offer a softer flannel effect, especially when they are confined to one nail. Muted brick red keeps the palette warm without the brightness of a holiday red. Matte finishing makes the printed accent feel even more textile-like. Leave the other nails completely plain; repeating extra lines or symbols would compete with the small grid and make this short shape look crowded.
Salon brief: Short oval nails. Ring nail small dense but readable brick red and black buffalo checks four columns, other nails solid muted brick red, matte finish.
Checked Tips, Bands and Curved Shapes
6. Deep Buffalo Check French Tips
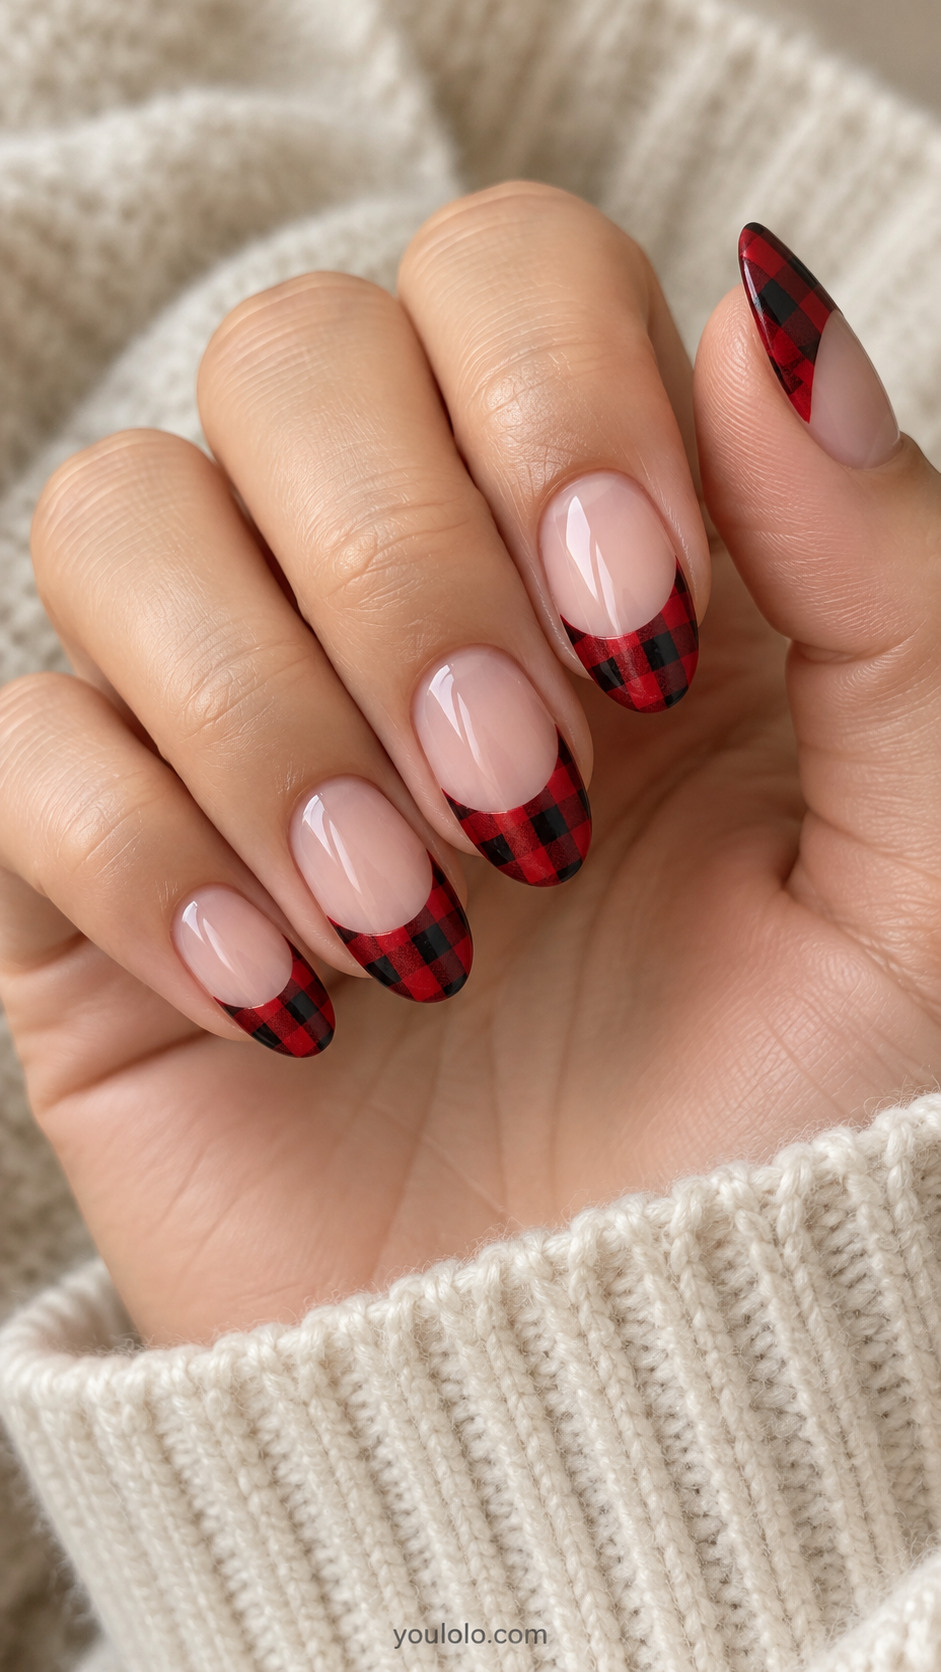
A deeper French tip leaves room for a real check pattern. The nude base provides a pause before the red-and-black edge, and the oval shape gives the set a lighter profile than full coverage. Ask for the pattern to continue naturally beyond the sides of the nail. Avoid shrinking it into a thin stripe, where the overlapping squares would no longer be clear.
Salon brief: Medium oval nails. Nude base with deep curved red and black buffalo check French tips on all nails; patterned tips occupy distal third, clear curved smile line.
7. Straight-Across Checked Tips
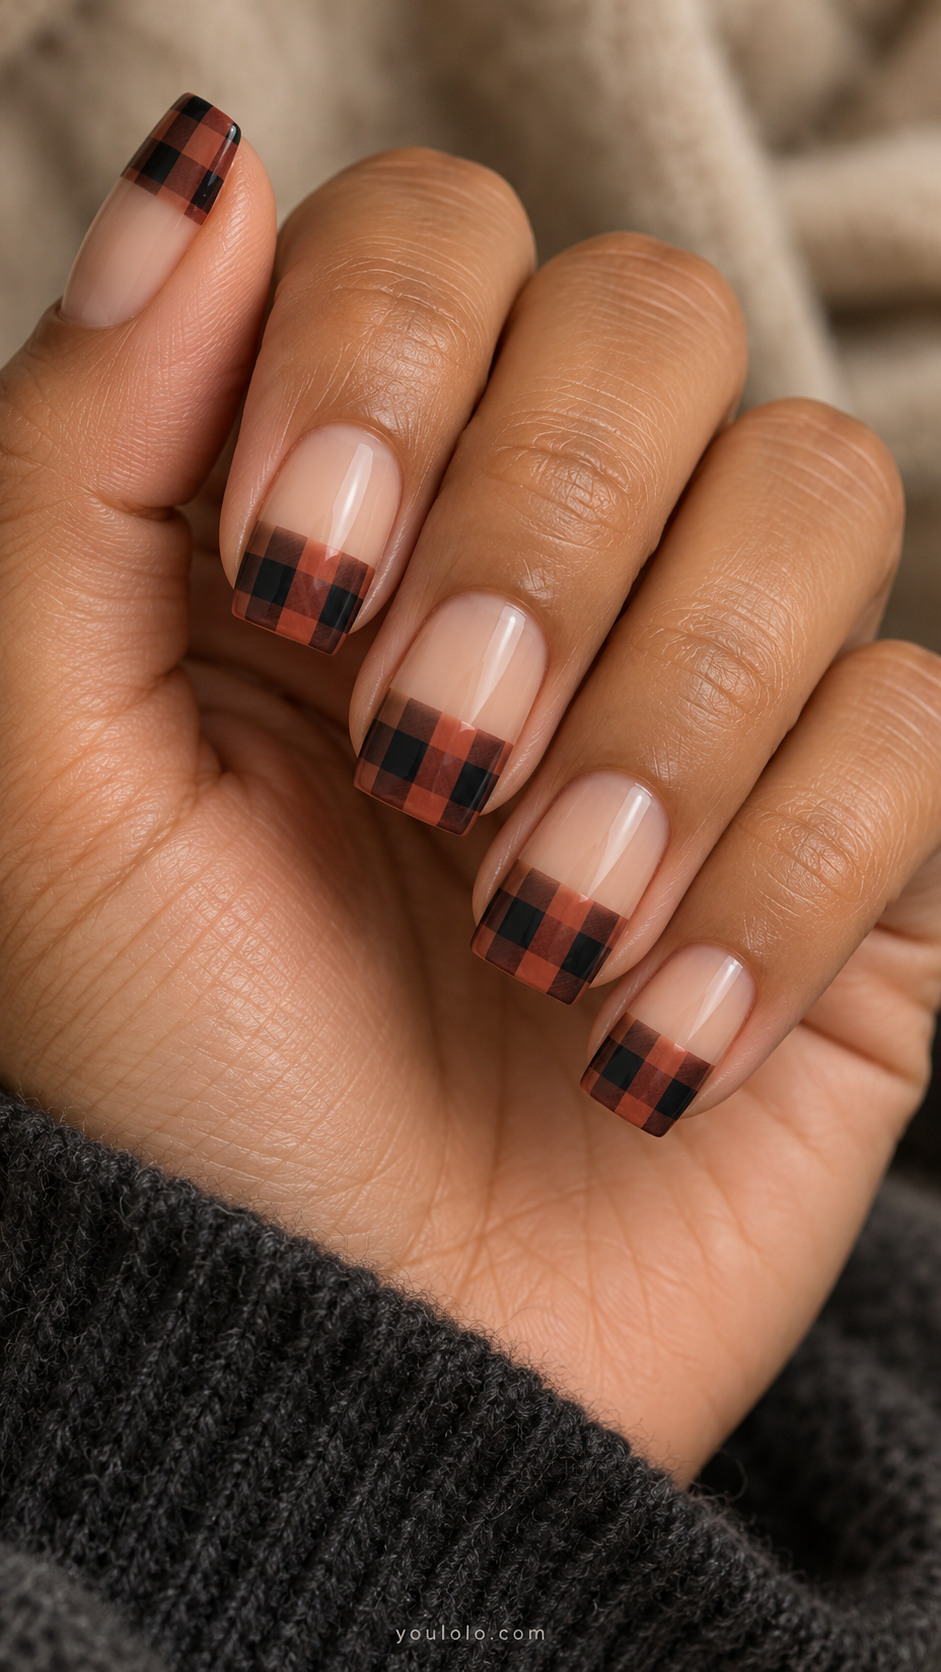
A straight border works with the square shape instead of drawing a curved smile line across it. Terracotta makes this checked tip especially easy to wear with brown boots, camel coats and washed denim. The band needs enough depth for two rows of squares. Keep the base sheer and unadorned so the crisp horizontal boundary remains the strongest detail in the set.
Salon brief: Medium square nails. Sheer beige base, straight horizontal terracotta charcoal and black buffalo check tip band occupying distal third, all nails.
8. Diagonal Flannel Corners
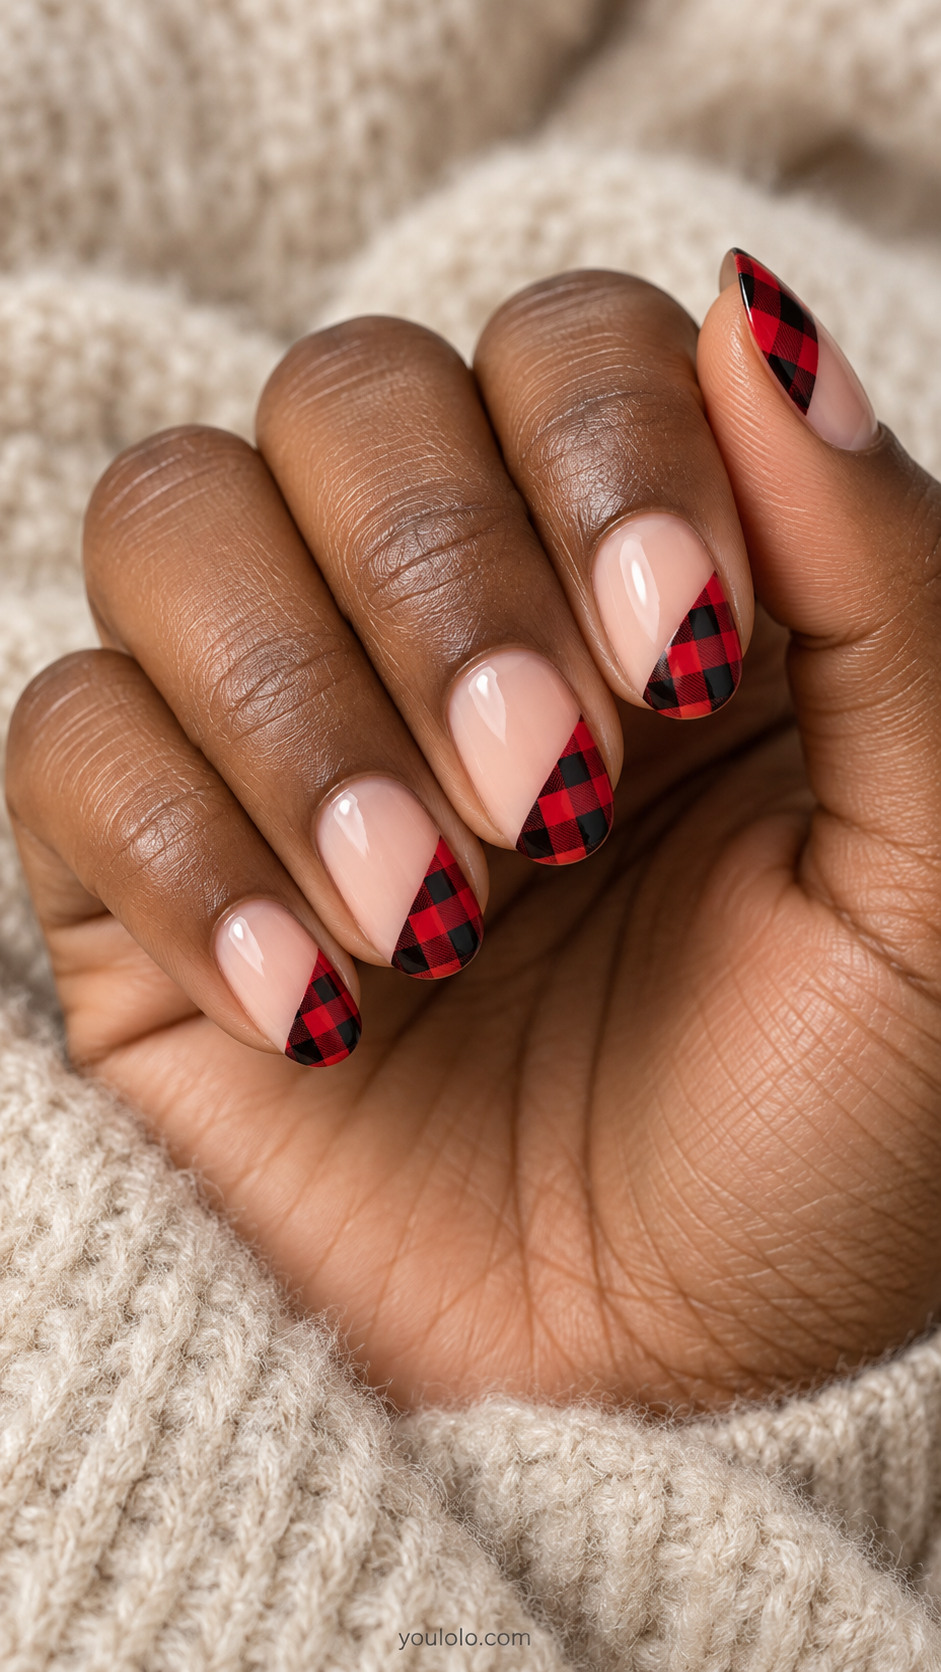
A diagonal patch turns the usual French placement into something more directional. Only one corner carries the flannel pattern, leaving a broad area of nude visible. The result feels lighter while still delivering recognizable checks. Keep every diagonal moving in the same direction within the hand for a tidy finish, and let the size of each patch follow the width of that nail.
Salon brief: Medium oval nails. Sheer nude nails each with a diagonal triangular red and black buffalo plaid corner covering one side of free edge; distinct triangular check patches, no outlines.
9. Checked Crescent Islands
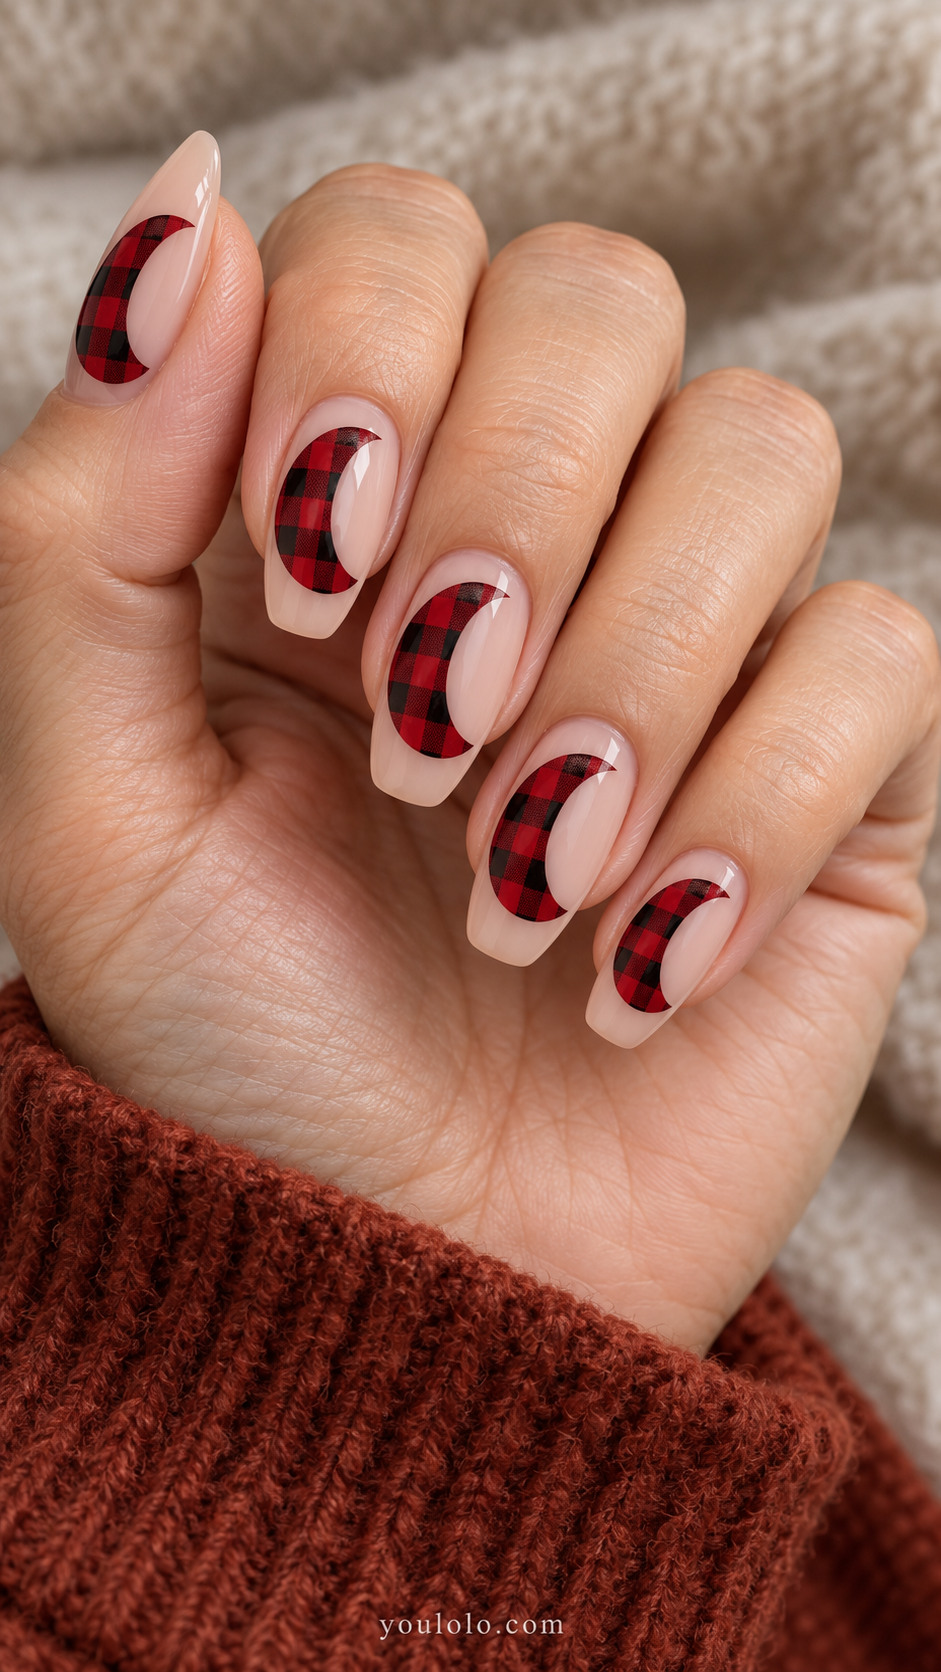
A broad crescent gives the checks a curved boundary without turning them into a tip. Nude space surrounds the entire shape, making the patterned island feel light on the nail. Keep the crescent thick enough to contain recognizable squares. Matching its curve across the hand brings order to the set, while the red-and-black grid supplies all the contrast it needs.
Salon brief: Nude tapered square nails with a bold red-and-black buffalo check crescent floating in the center. Keep a clear curved nude opening on one side.
10. A Checked Waistband
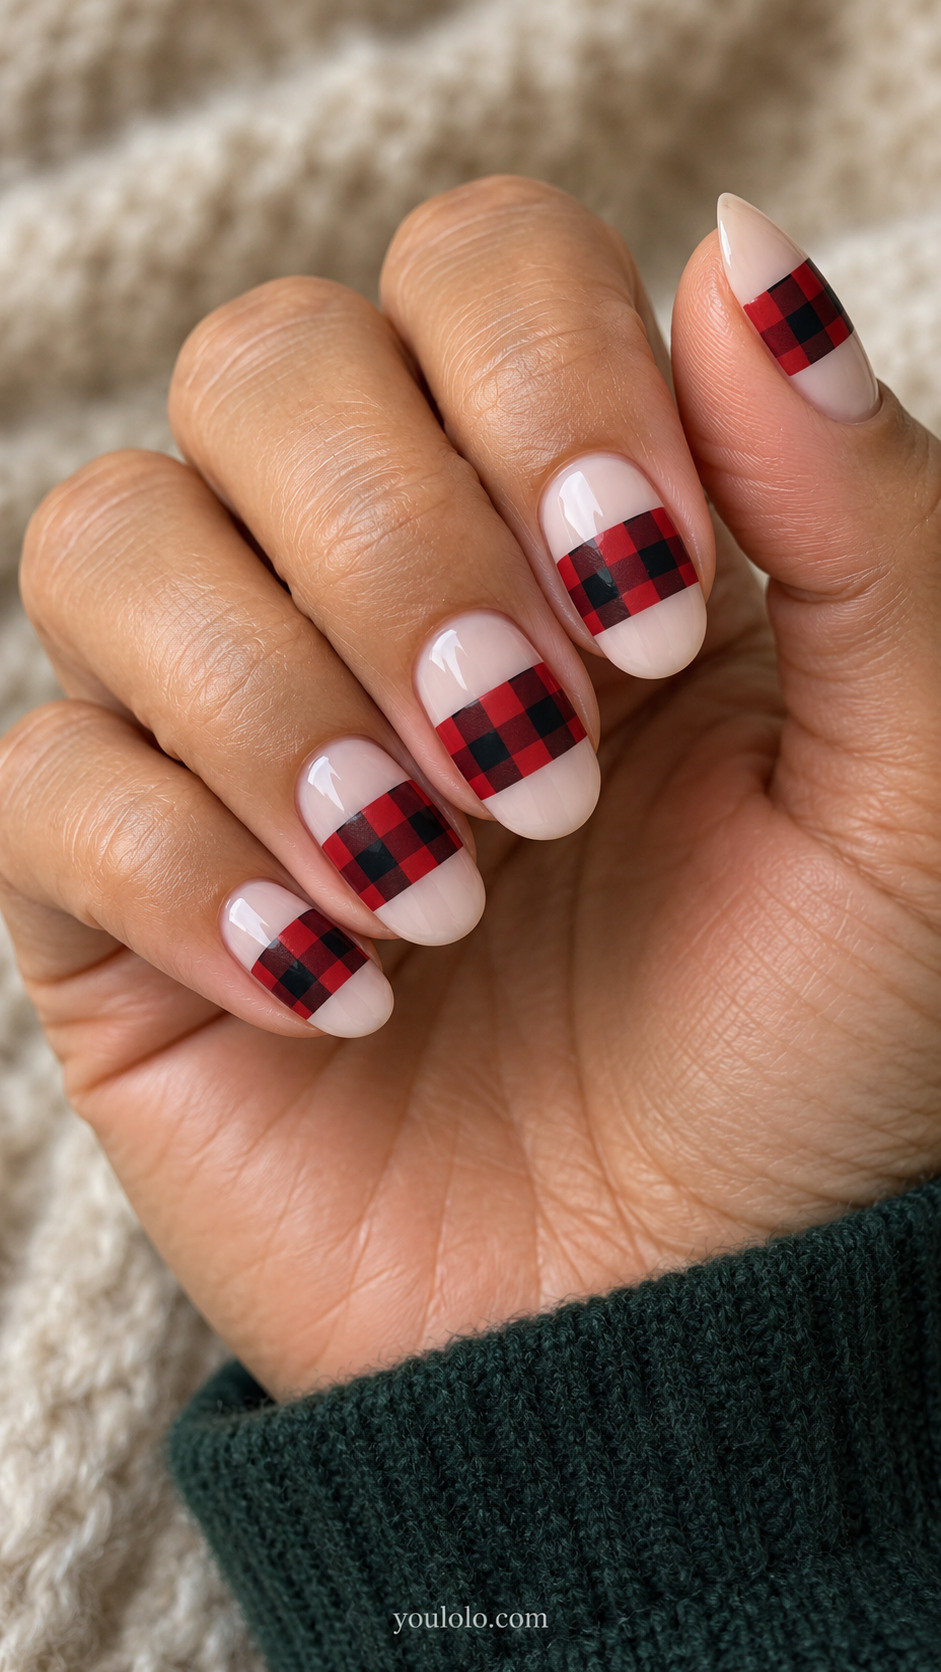
Placing the checks through the center creates a distinctive band of color. Both the cuticle area and the free edge stay milky nude, which makes the pattern look suspended rather than like a French tip. Keep the band broad enough to hold visible squares. This is a good option for someone who likes graphic nail art but wants less dark polish around the fingertips.
Salon brief: Medium oval nails. Milky nude nails with one broad red and black buffalo check horizontal central band across middle third; nude both cuticle and tip.
11. Scalloped Cream Tips over Plaid
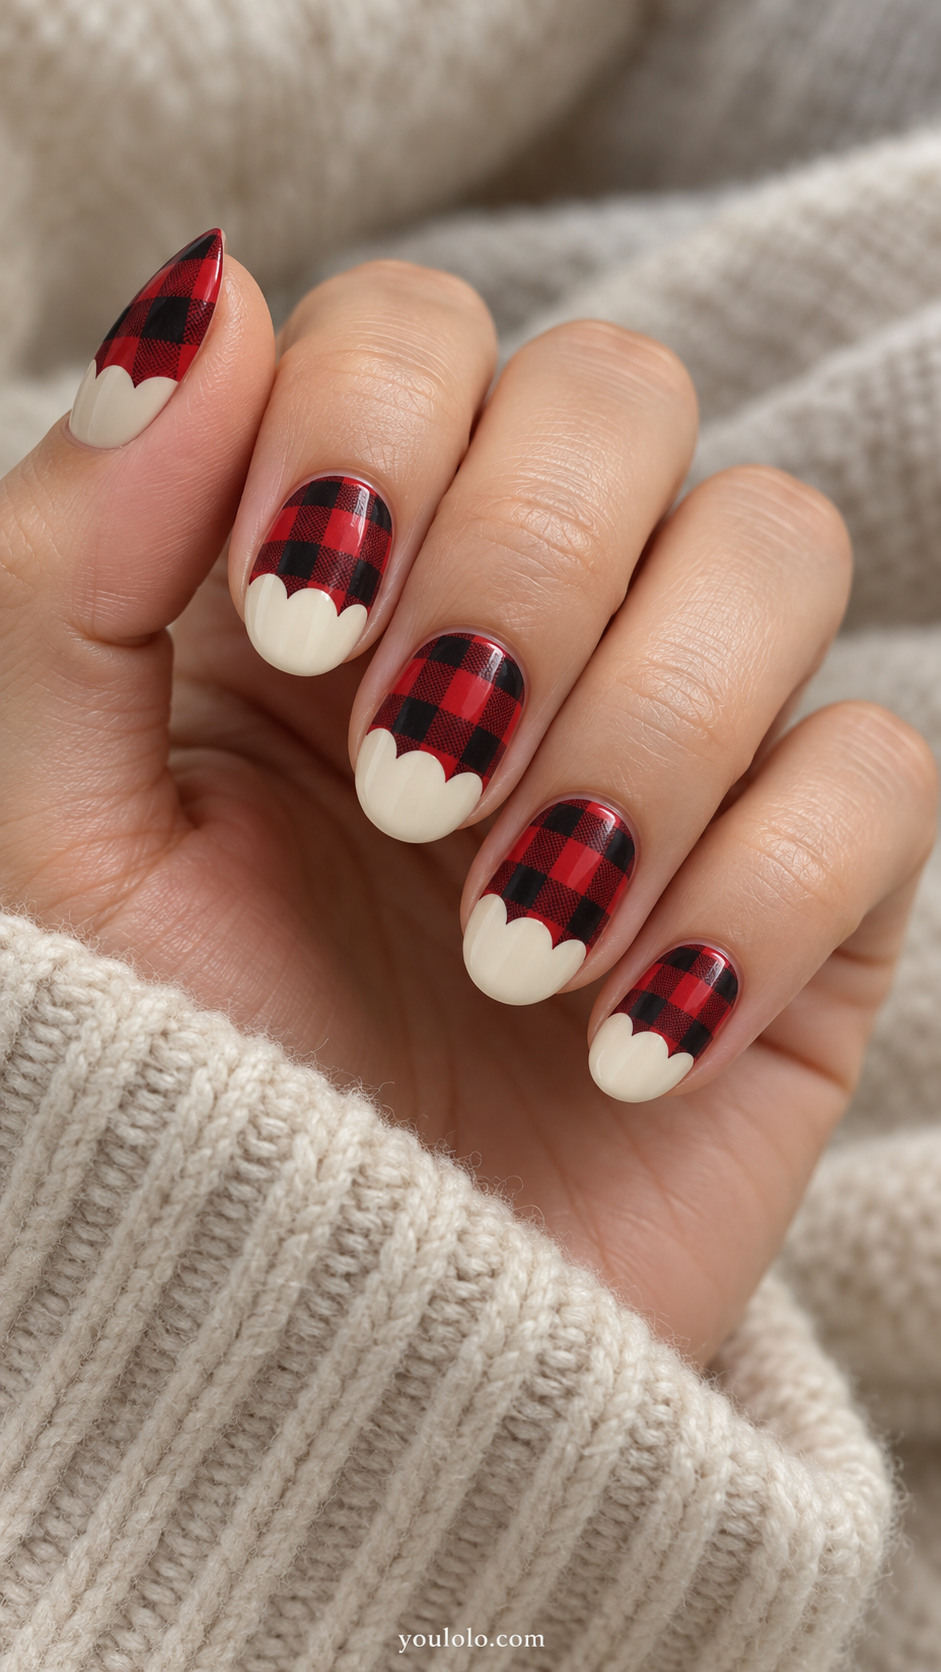
A broad scalloped cream edge softens the checked base. The red-and-black pattern takes up most of the nail, while three rounded cream curves lighten the tip. Large scallops are easier to read than a row of tiny bumps. Keep their curves simple and let the straight grid behind them create the contrast. This detail also works on a softly rounded shorter nail.
Salon brief: Oval nails with a red-and-black buffalo check base and three broad cream scallops at each free edge.
12. Buffalo Check Pill Shapes
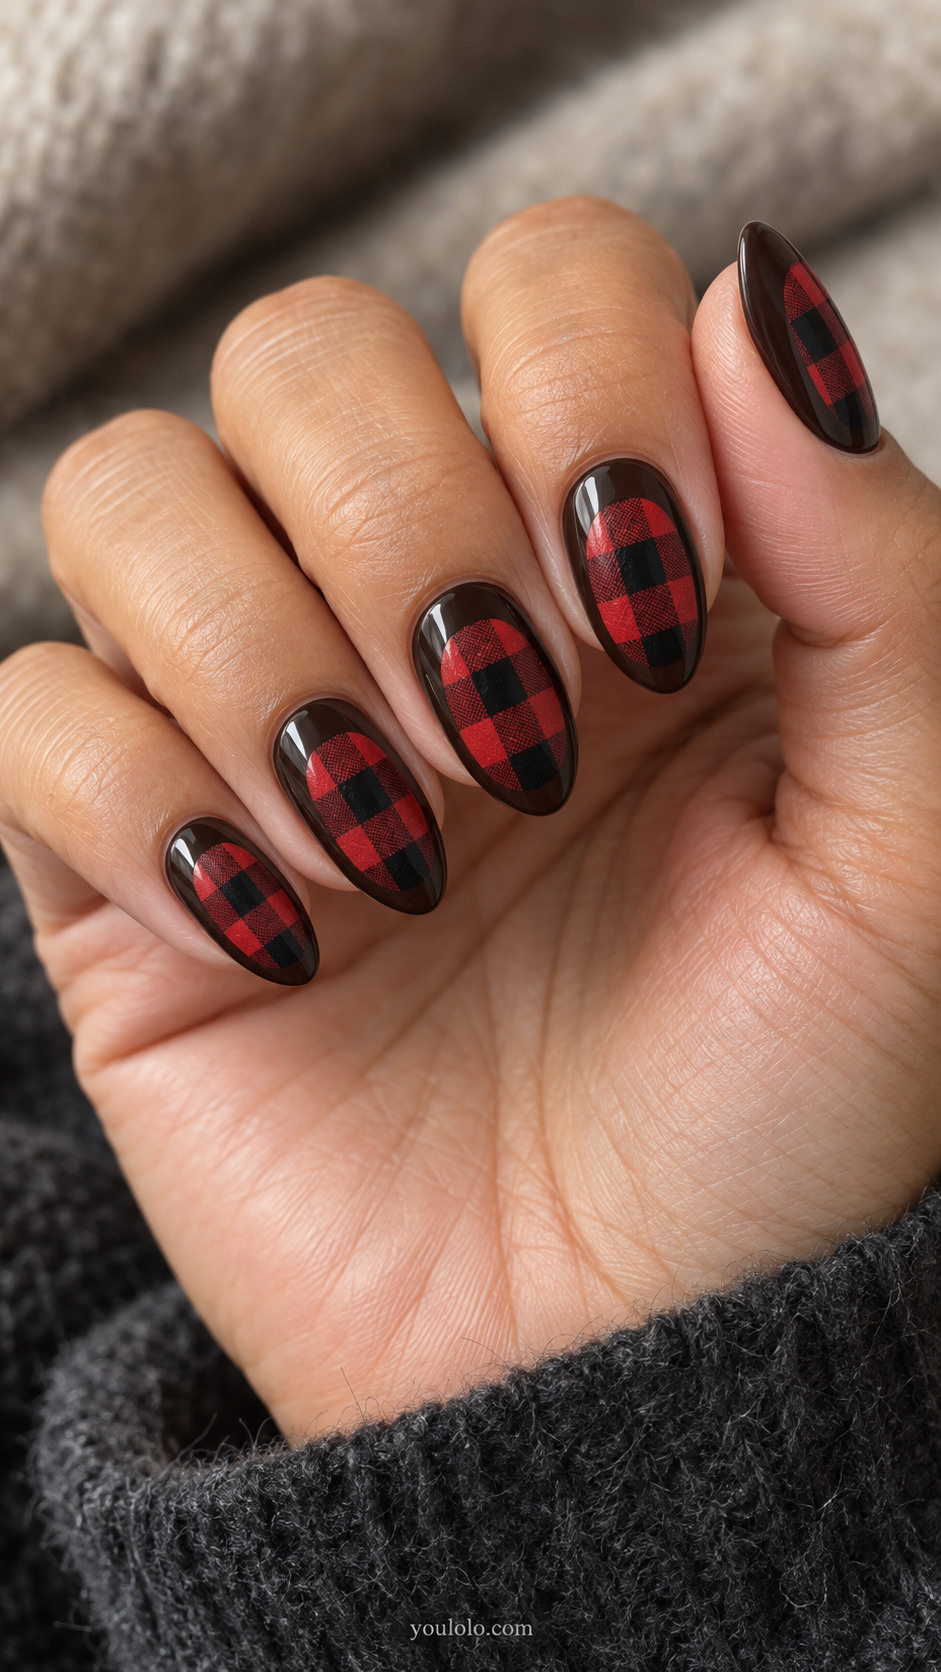
An oblong inset creates a compact swatch of flannel on an espresso background. The round-ended shape feels softer than a rectangular panel, while its dark surround keeps the red prominent. Allow enough width for more than one column of checks. The surrounding polish should stay plain and smooth, leaving the difference between the curved silhouette and square pattern to carry the design.
Salon brief: Solid espresso medium almond nails with one centered rounded oblong red black buffalo check pill on each nail, solid espresso border all around.
Matte Buffalo Checks and Contrasting Finishes
13. Matte Checks, Glossy Solids
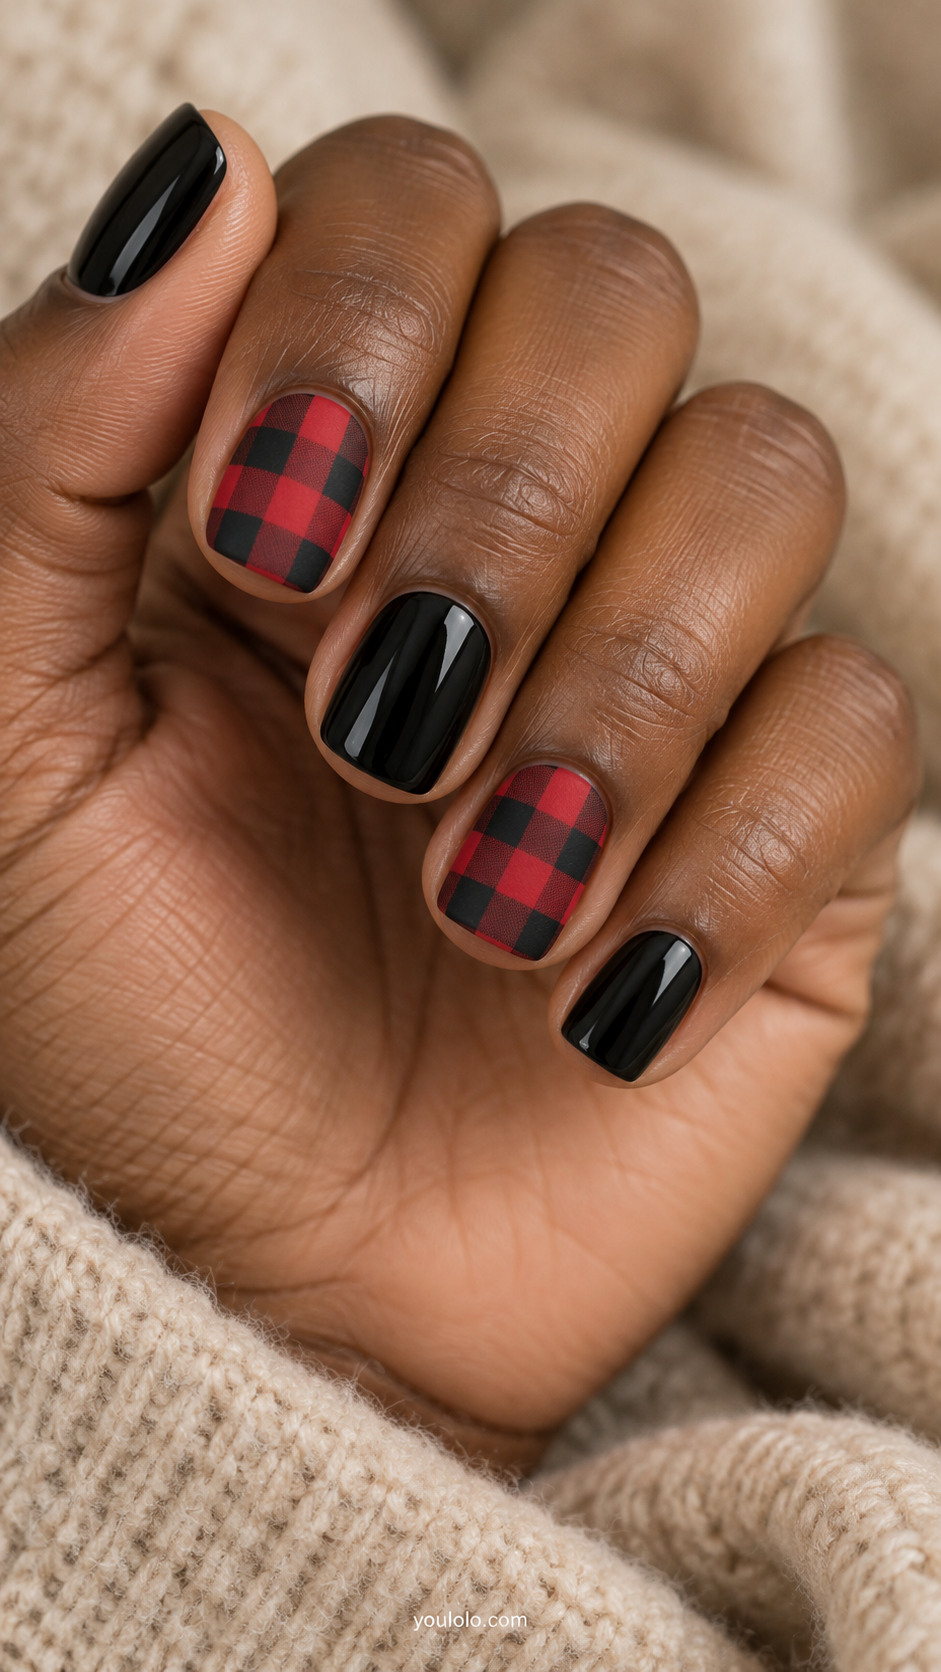
This combination uses texture as a design choice. The matte plaid appears soft and flannel-like beside glossy black nails, with no need for added gems or painted motifs. Short square tips keep the look compact and confident. Ask the artist to preserve the finish difference when sealing the design; one uniform topcoat across everything would erase the contrast that makes this set interesting.
Salon brief: Short square nails. Index and ring matte red black buffalo check; thumb middle pinky glossy solid black. Crisp finish contrast no raised details.
14. Brick Check and Suede Texture
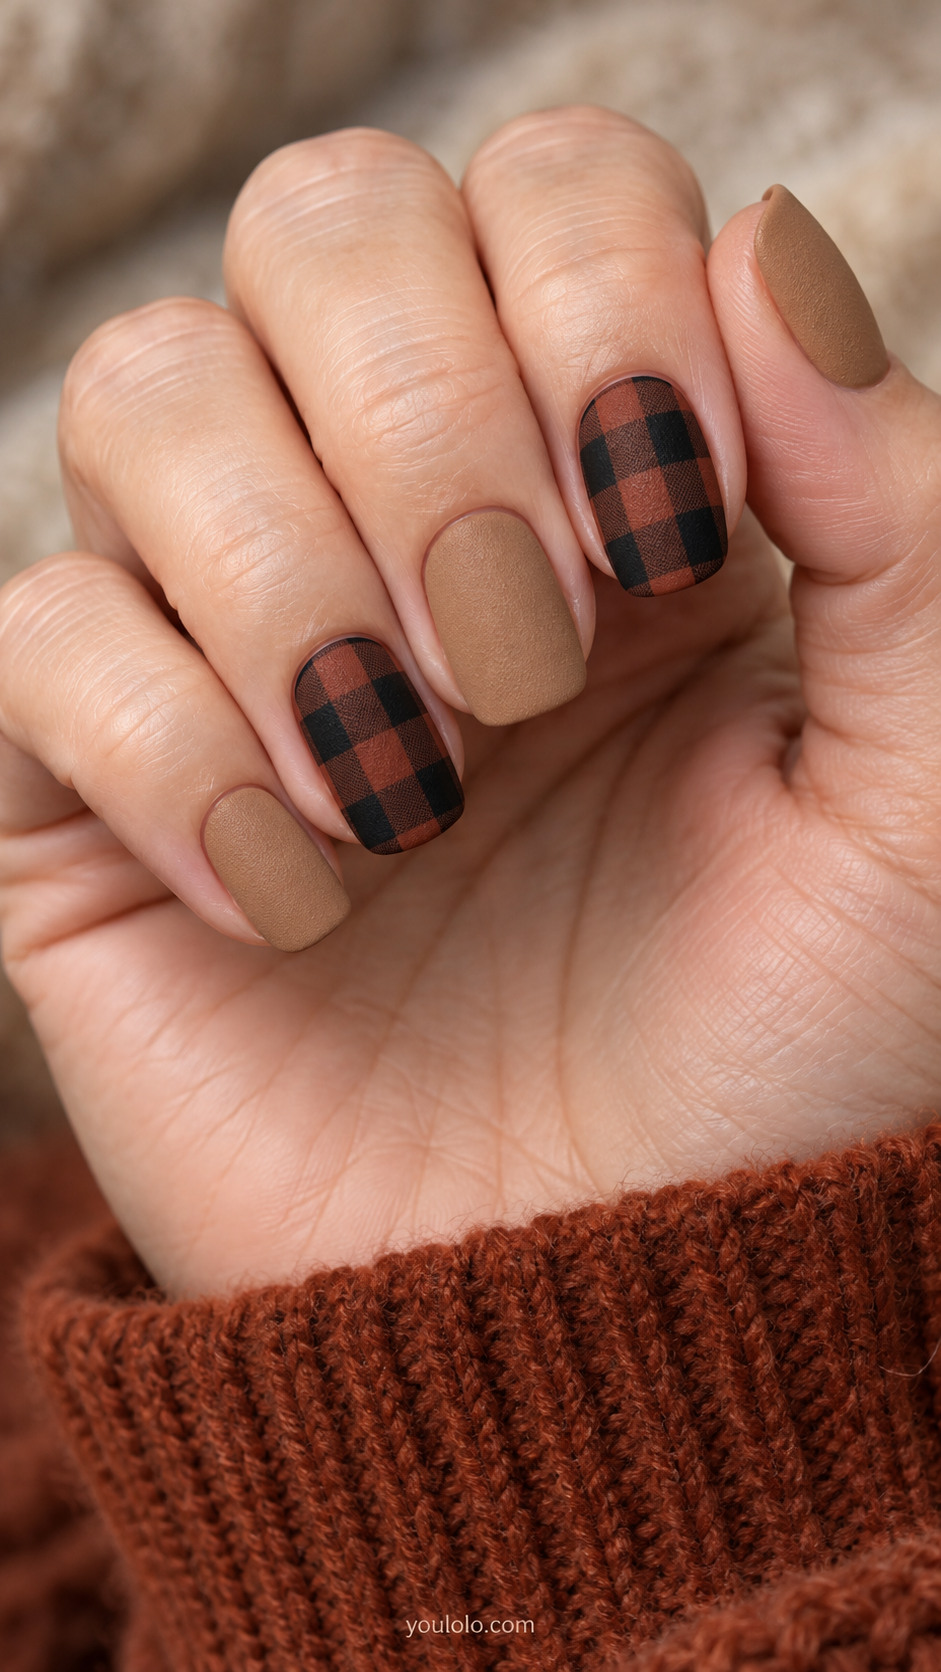
A restrained suede-like surface adds a second finish beside smooth plaid. Keep the camel nails finely textured rather than fuzzy or bulky; the red-and-black checks should remain completely flat. This makes a tactile set that still feels composed. A squoval shape suits the softened effect, and the plain camel nails prevent the combination of pattern and texture from becoming overloaded.
Salon brief: Medium squoval nails, ring and index brick black buffalo check smooth matte, middle thumb pinky plain camel matte with subtle fine suede-like powder texture no fuzz.
15. Flannel Split by a Nude Slash
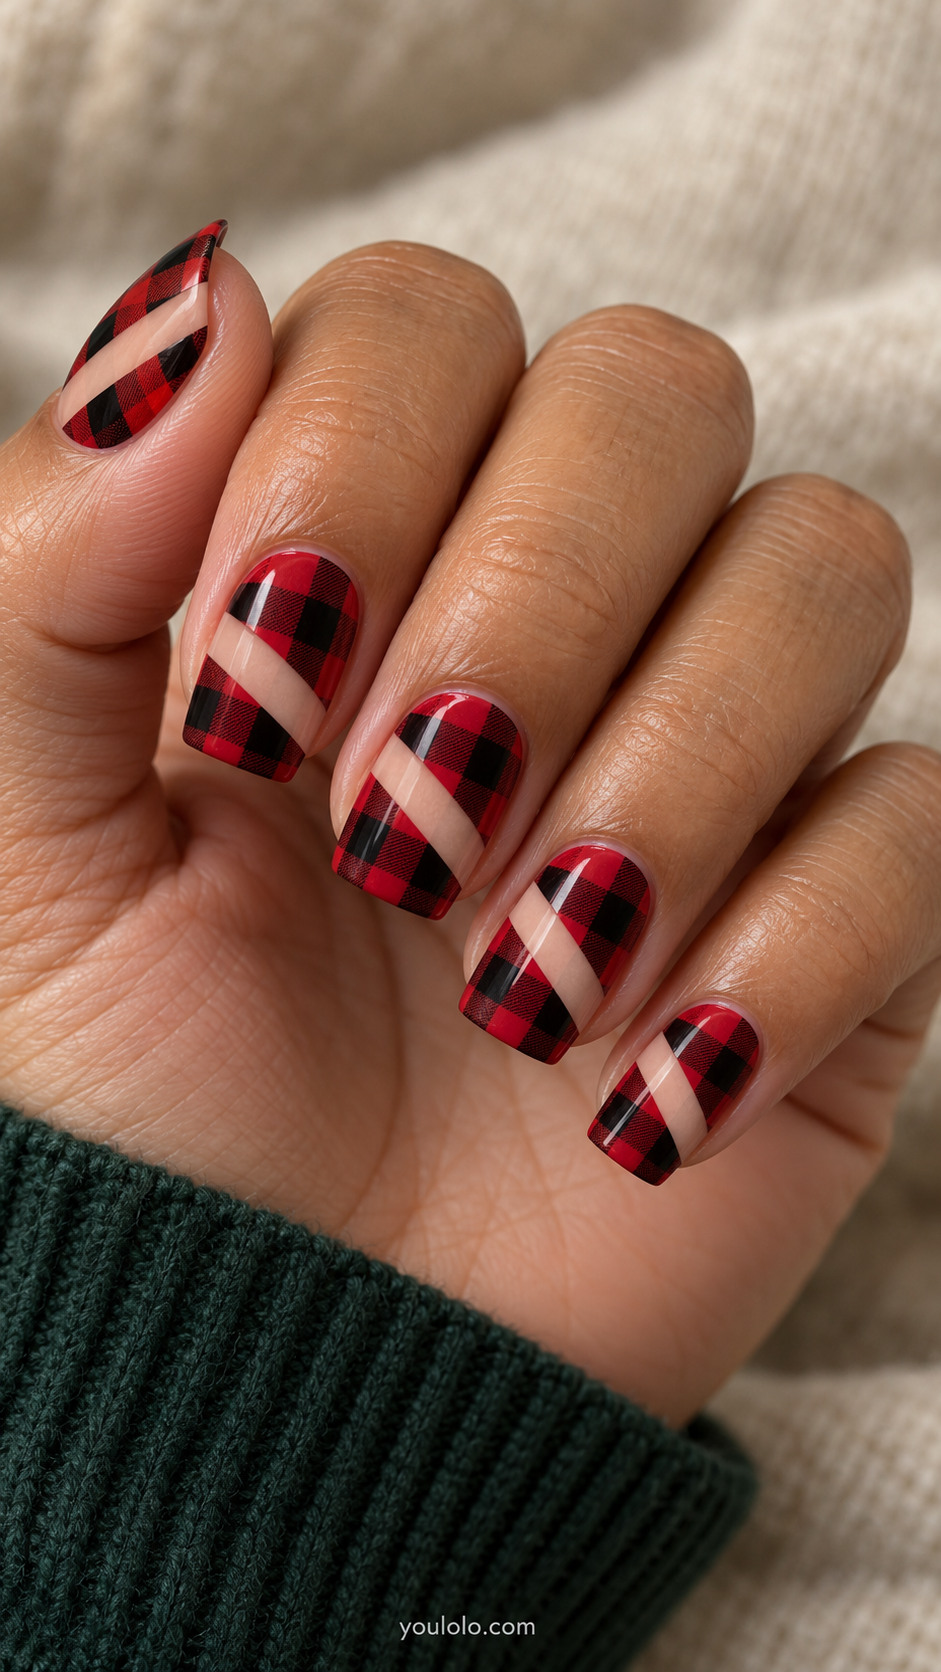
One broad nude slash breaks the grid into two connected sections. The squares should line up across the opening so the design looks intentionally interrupted, rather than assembled from unrelated patches. A medium square nail gives the diagonal room to travel. Keep the opening generous and omit outlining; the clean break between skin-toned space and dark plaid provides enough definition.
Salon brief: Medium square nails fully red black buffalo check interrupted by one wide diagonal nude slash across center of each nail, two check sections align perfectly across gap.
16. Half Plaid, Half Bare

Half coverage gives short nails a clear two-part composition. The bare-looking base feels light, while the patterned upper half has enough area for recognizable checks. A straight dividing line makes this different from a traditional curved French tip. Choose a sheer blush close to the natural nail color and skip additional trim; the change from transparent to patterned is already the central detail.
Salon brief: Short oval nails. Each nail lower proximal half sheer blush nude, distal half red black buffalo check separated by clean horizontal line; no French curve.
Playful Flannel Details and Seasonal Accents
17. Alternating Check Direction
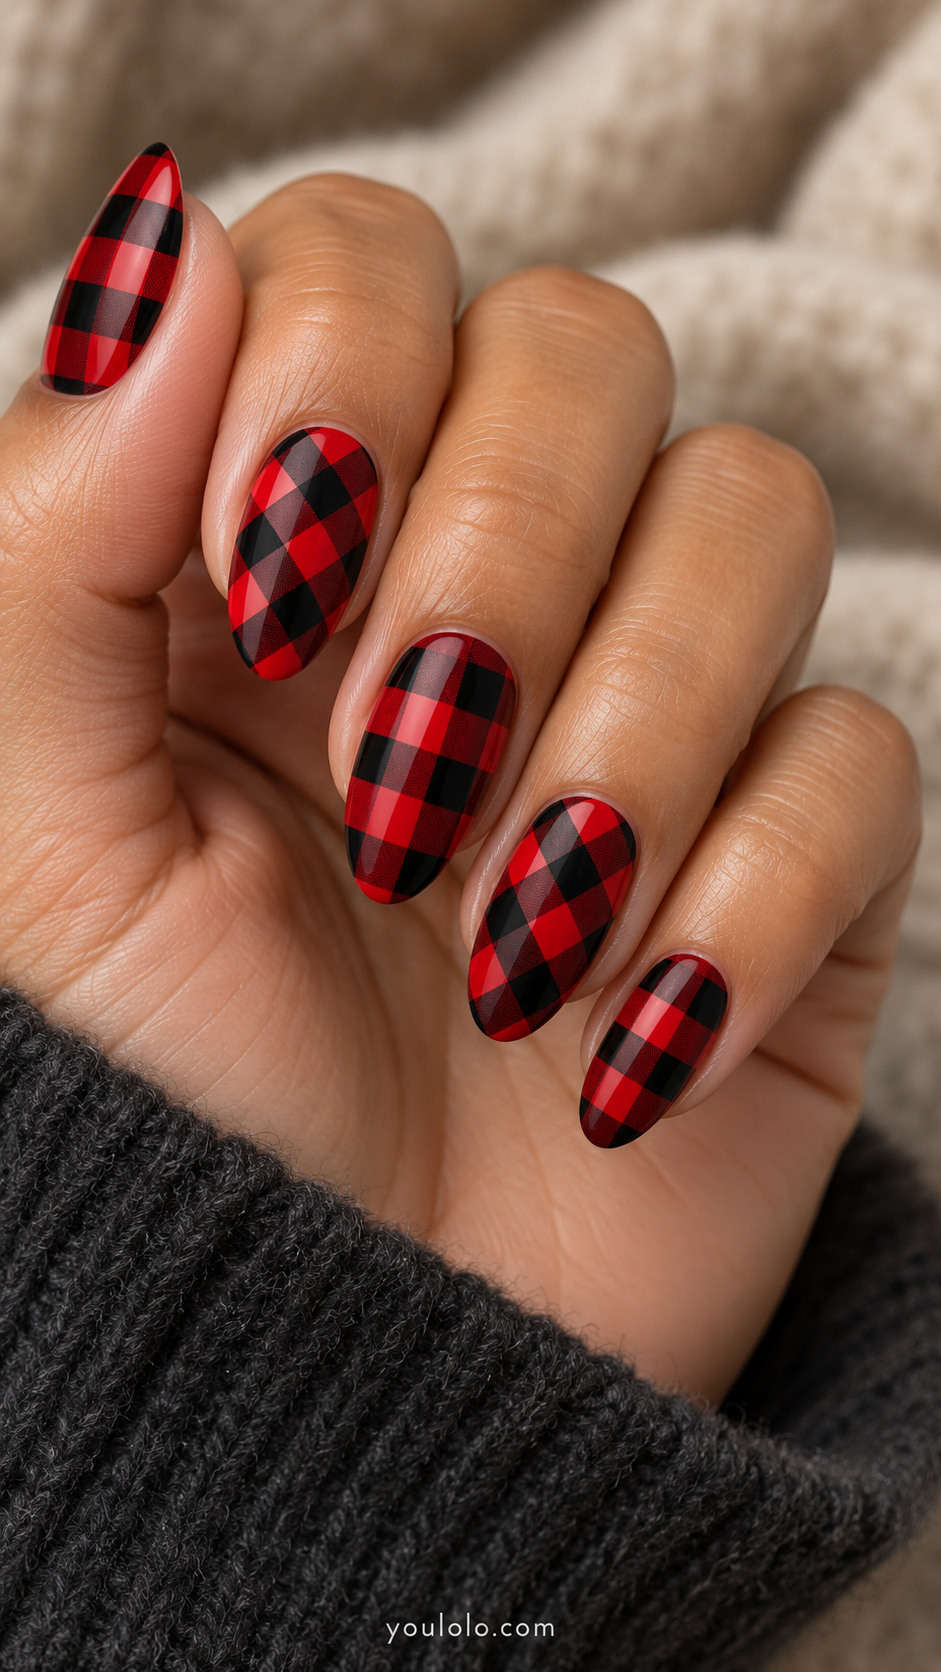
Rotating the grid changes the mood without changing the palette. Upright checks feel sturdy, while the angled versions read as diamonds, giving the set a measured back-and-forth rhythm. Use the same square size and the same three tones for both directions. That consistency keeps the manicure coordinated, and the almond outline prevents the alternating geometry from becoming too rigid or busy.
Salon brief: Medium almond nails. Red black buffalo checks on every nail, index ring grid rotated45degrees forming buffalo check diamonds, middle pinky thumb upright square grid.
18. Checkered Pocket Accent
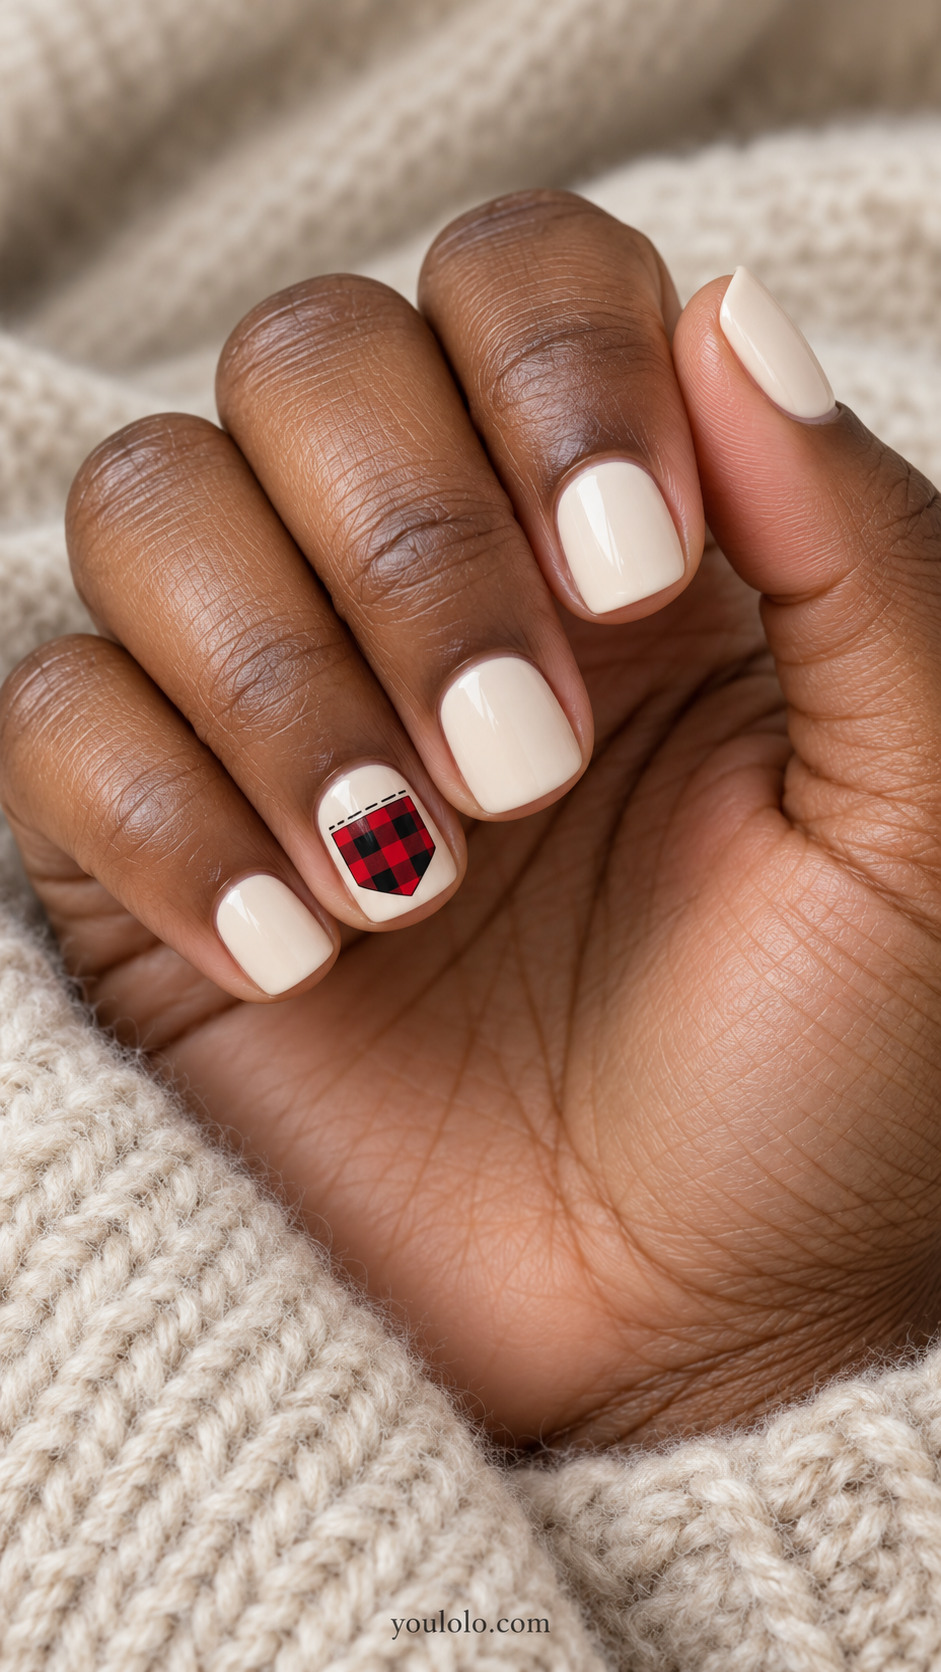
A pocket-shaped accent gives buffalo plaid a small clothing reference without painting an entire shirt. The pointed bottom and a discreet double stitch at the opening make the shape recognizable. Keep the surrounding cream nails quiet, and leave enough space around the pocket so its outline remains clear. The check needs only a few broad squares rather than a miniature dense grid.
Salon brief: Cream short square nails with one red black buffalo check pocket shape on ring nail, flat painted pentagon with straight top and pointed bottom, tiny black double stitch line at top only.
19. Patchwork Blocks in One Palette
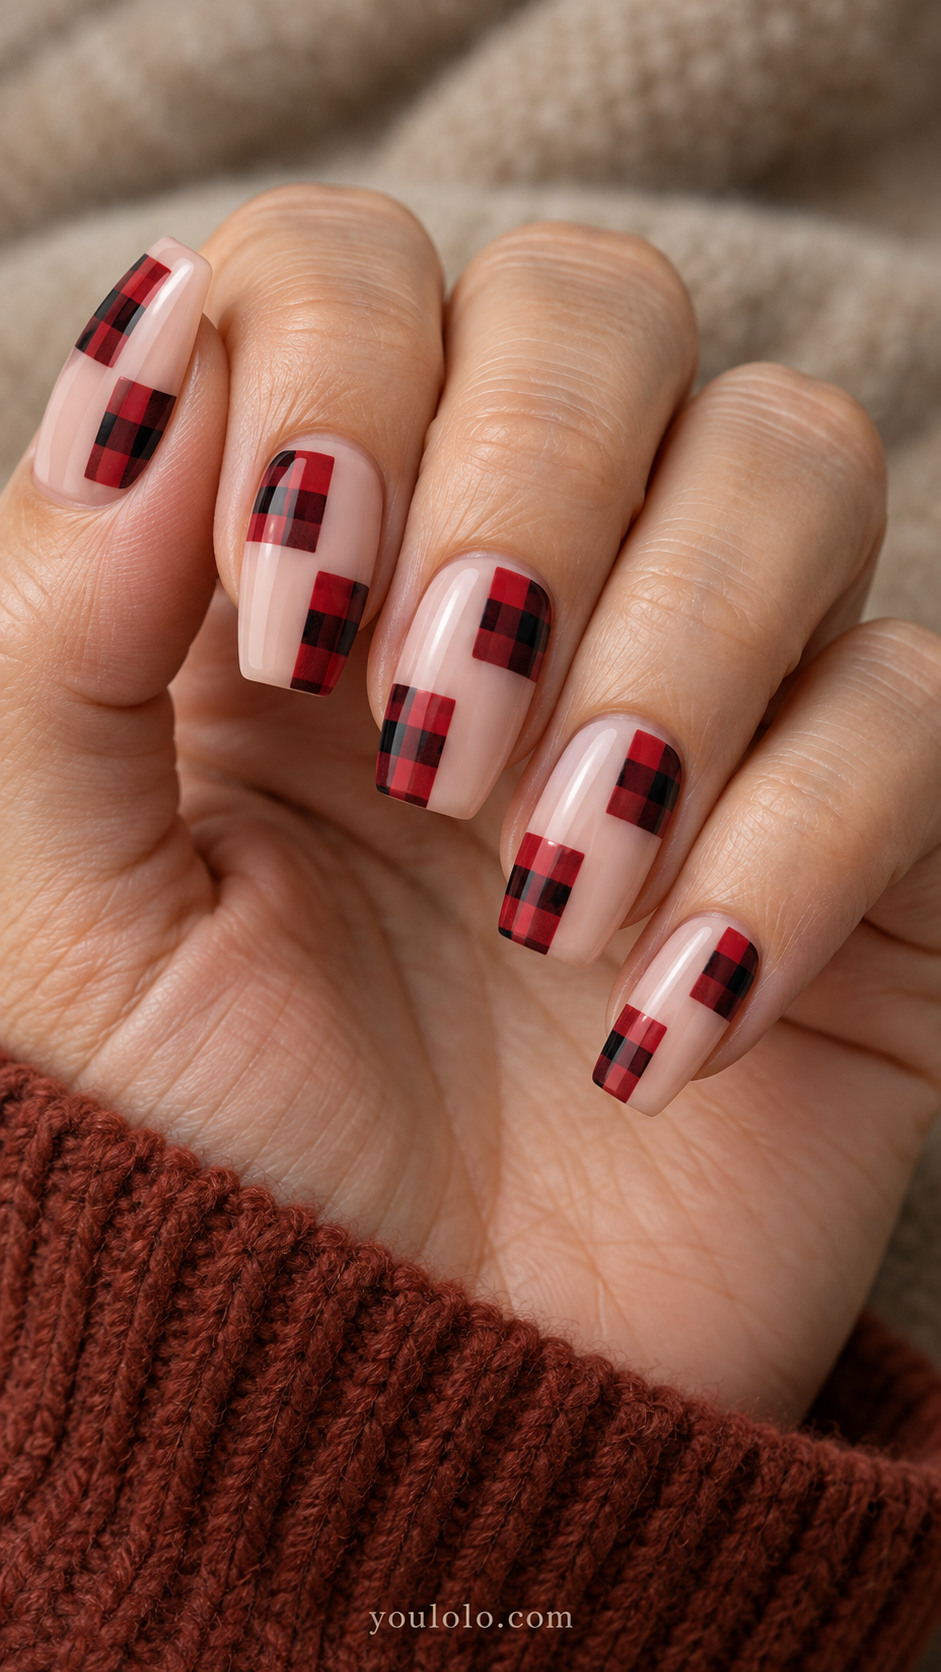
Two separated blocks give the print a patchwork layout without adding stitched outlines. Their offset placement creates movement, while the nude gaps keep the manicure from looking heavy. Use the same red-and-black grid inside every block and vary only the position. A medium coffin shape offers enough surface to separate the patches clearly; on shorter nails, use one larger block instead.
Salon brief: Medium coffin nails. Nude bases with two separated red black buffalo check rectangular patches per nail at offset corners; spaces between patches remain nude, no stitches.
20. Flannel with a Ribbed Neighbor
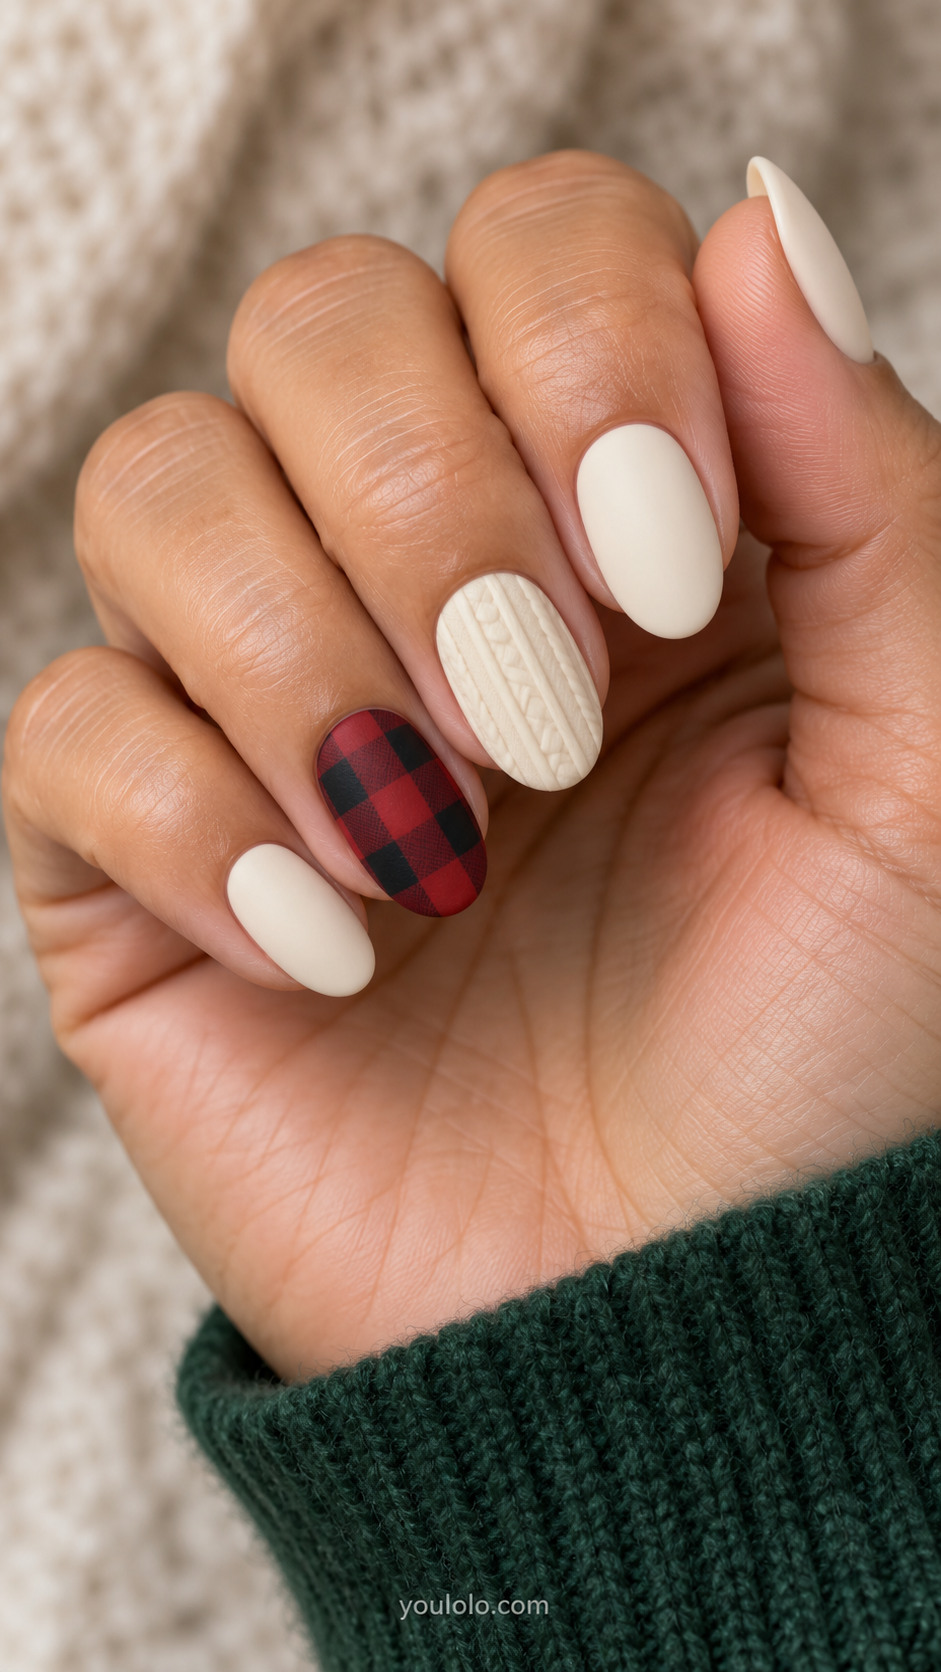
One ribbed cream nail brings a second textile reference into the set. The plaid stays flat and graphic, while the neighboring ribs add a restrained tactile detail. Keep the raised work low and the remaining nails plain so the combination does not become bulky. Cream gives the red accent breathing room, making the design feel cozy without relying on extra seasonal symbols.
Salon brief: Medium oval nails. Ring nail red black buffalo check matte, middle solid cream with fine realistic low-relief vertical sweater ribs, other nails solid cream matte; minimal raised texture.
21. Buffalo Check Heart Accent
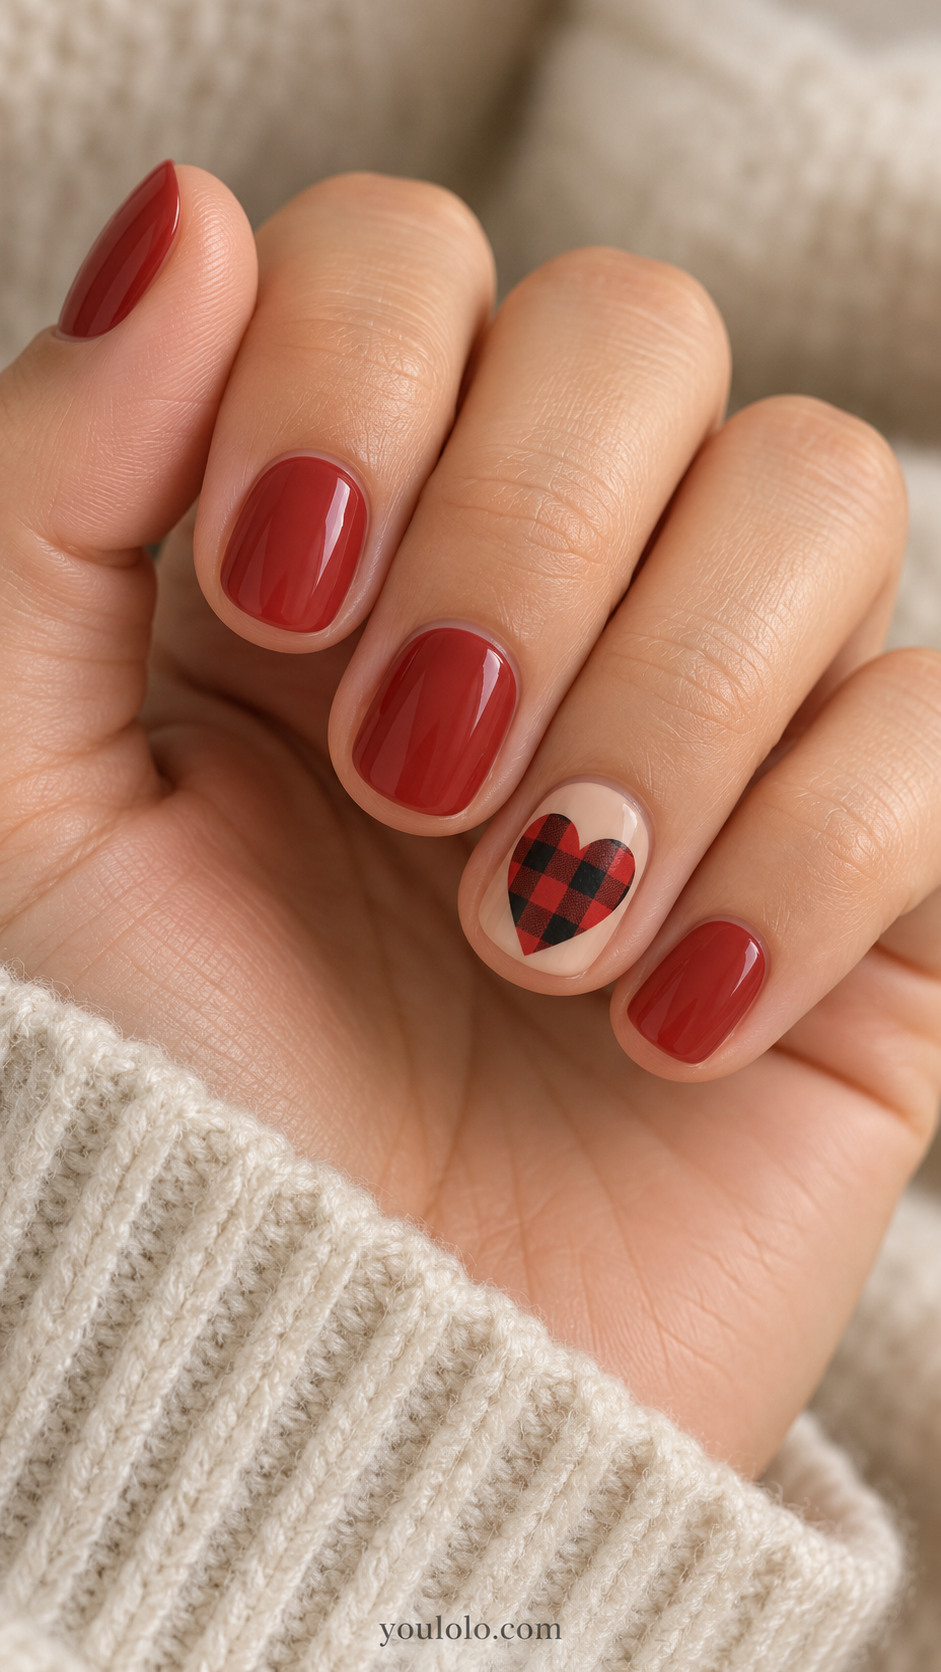
A single heart changes the outline of the print while keeping the checks inside it. The heart should be large and simple enough for the grid to remain readable, with nude space around its edges. Solid muted red on the other nails connects the accent to the rest of the hand. This works beyond winter and is an approachable option for a playful short manicure.
Salon brief: Short round nails. Warm nude nails, one large flat painted red black buffalo check heart filling center of ring nail, other nails solid muted red; no tiny hearts.
22. A Checked Holiday Ornament
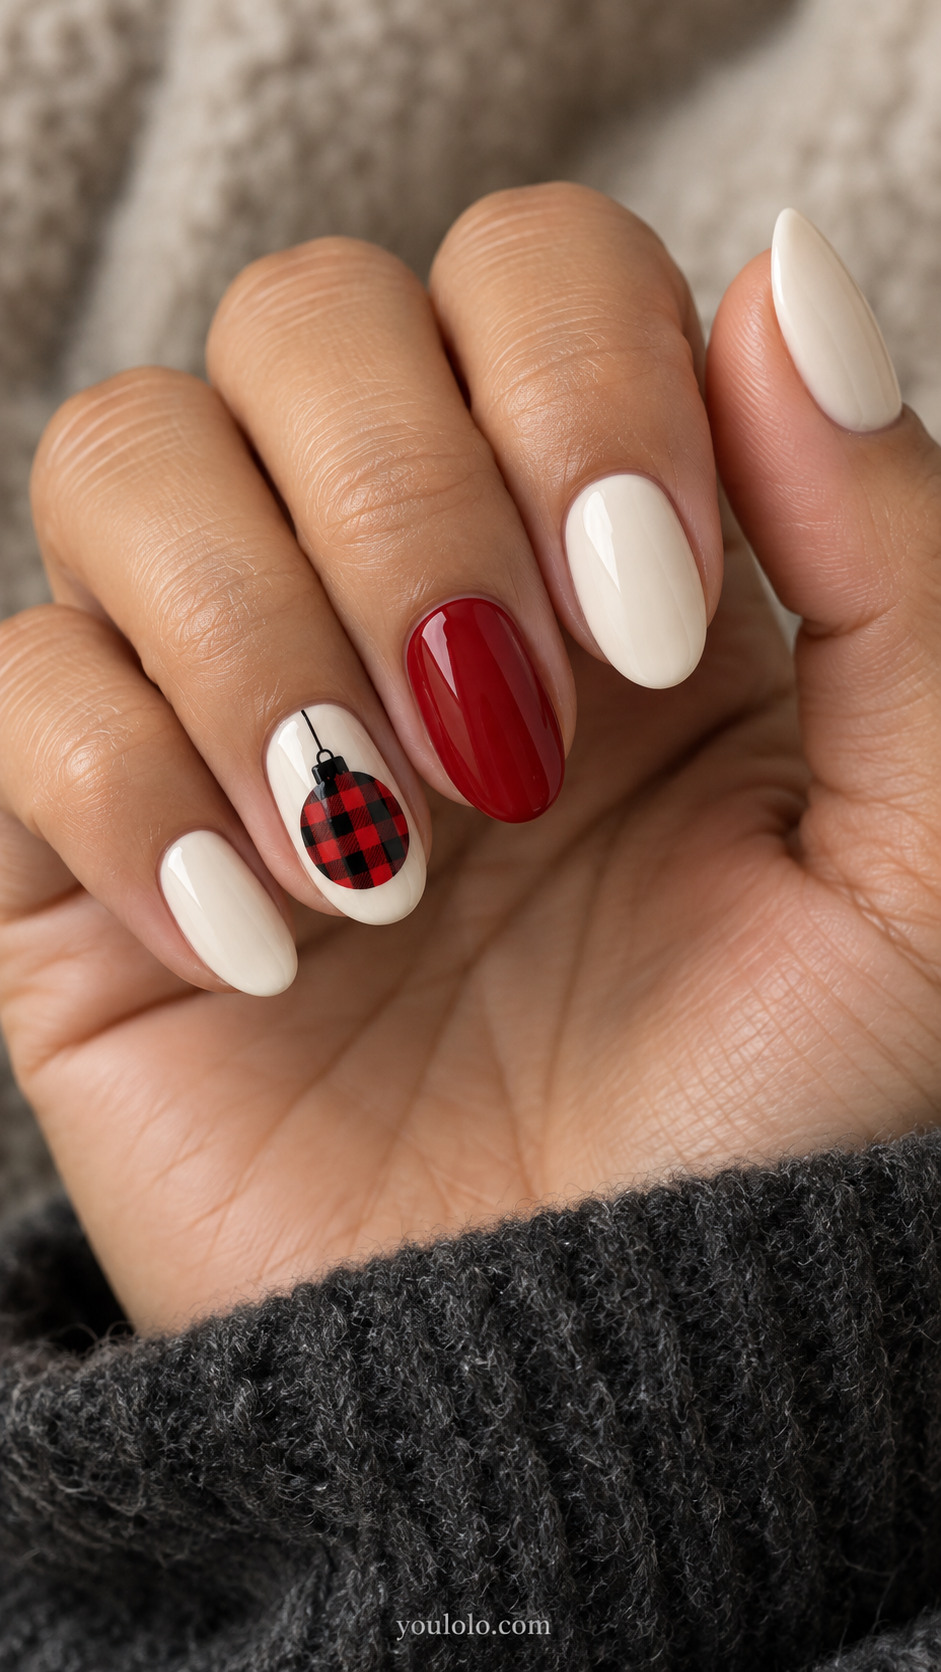
For a more explicitly festive option, place the check inside one round ornament. A tiny cap and short hanging line explain the shape, so there is no need for lettering, glitter or a whole holiday scene. Cream keeps the detail legible, with one red nail echoing the pattern. Let the ornament occupy most of the accent nail so the buffalo grid does not turn into visual noise.
Salon brief: Medium oval nails. Cream nails, ring nail one large round red black buffalo check ornament with tiny black cap and fine short hanging line; other nails solid cream and one solid red.
Layered Checks and Mixed Manicures
23. Buffalo Checks Fading into Ivory
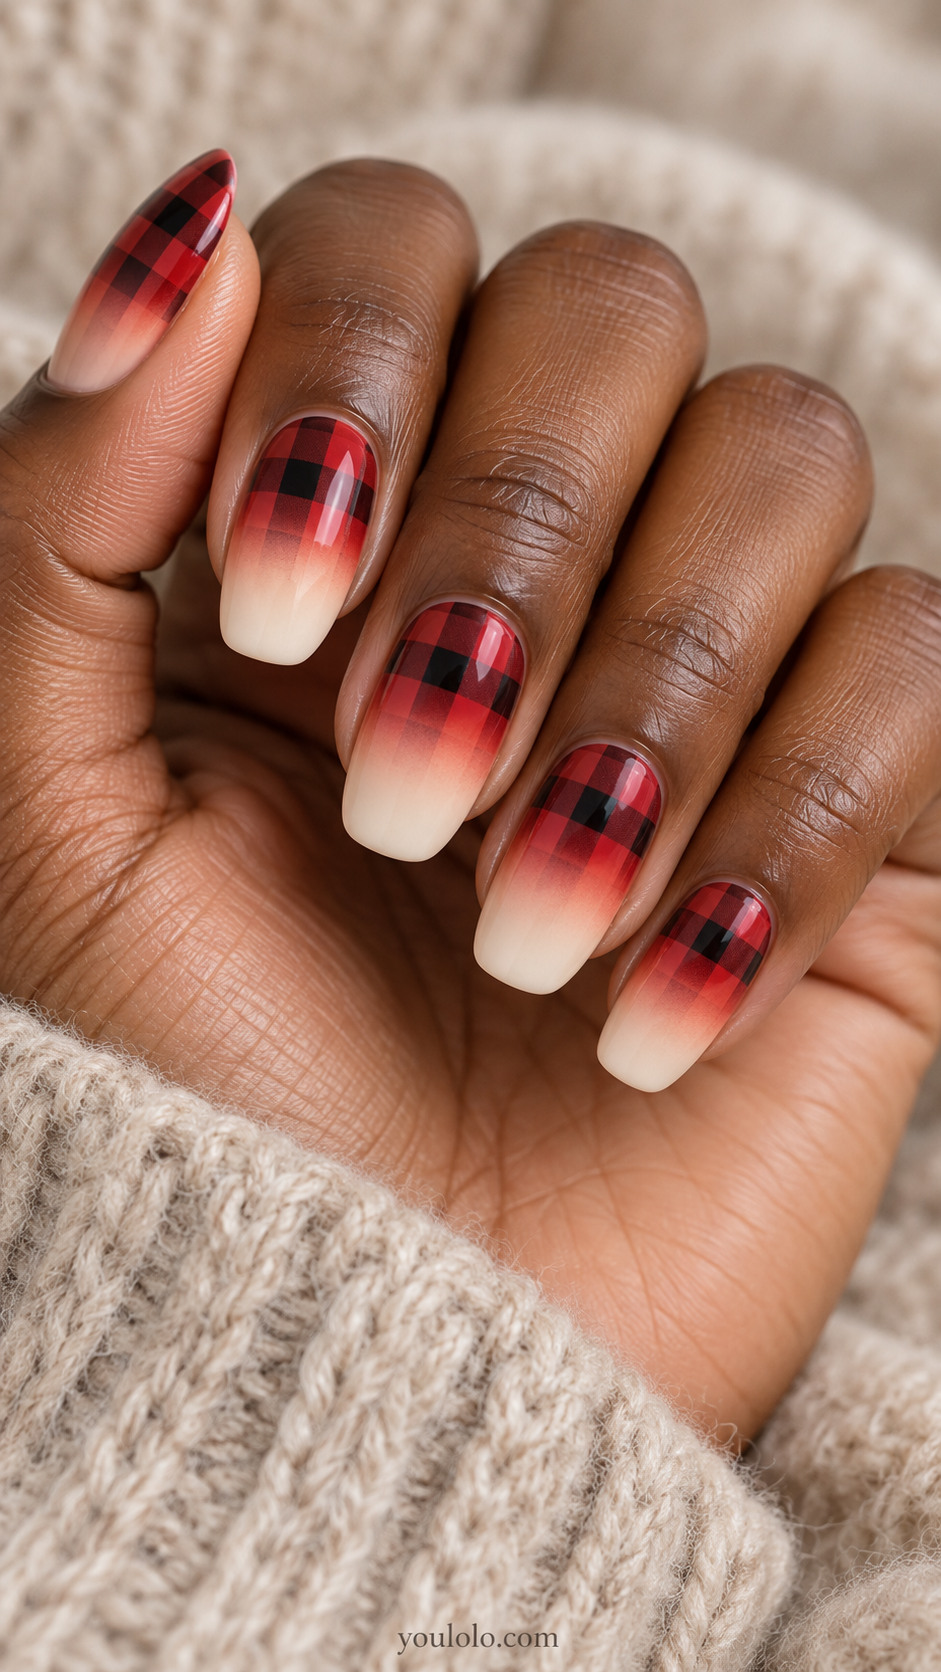
The red-and-black grid fades toward a soft ivory tip, creating a gentle contrast between crisp pattern and an airy edge. Keep the dark checks strongest near the cuticle and let both the color and the pattern soften together. A clean almond outline suits the gradual transition. Skip extra trim or glitter so the fading flannel remains the feature you notice first.
Salon brief: Almond nails with red-and-black buffalo checks near the cuticle, fading smoothly through brick red into clean ivory tips.
24. Forest Check Lightning Bolts
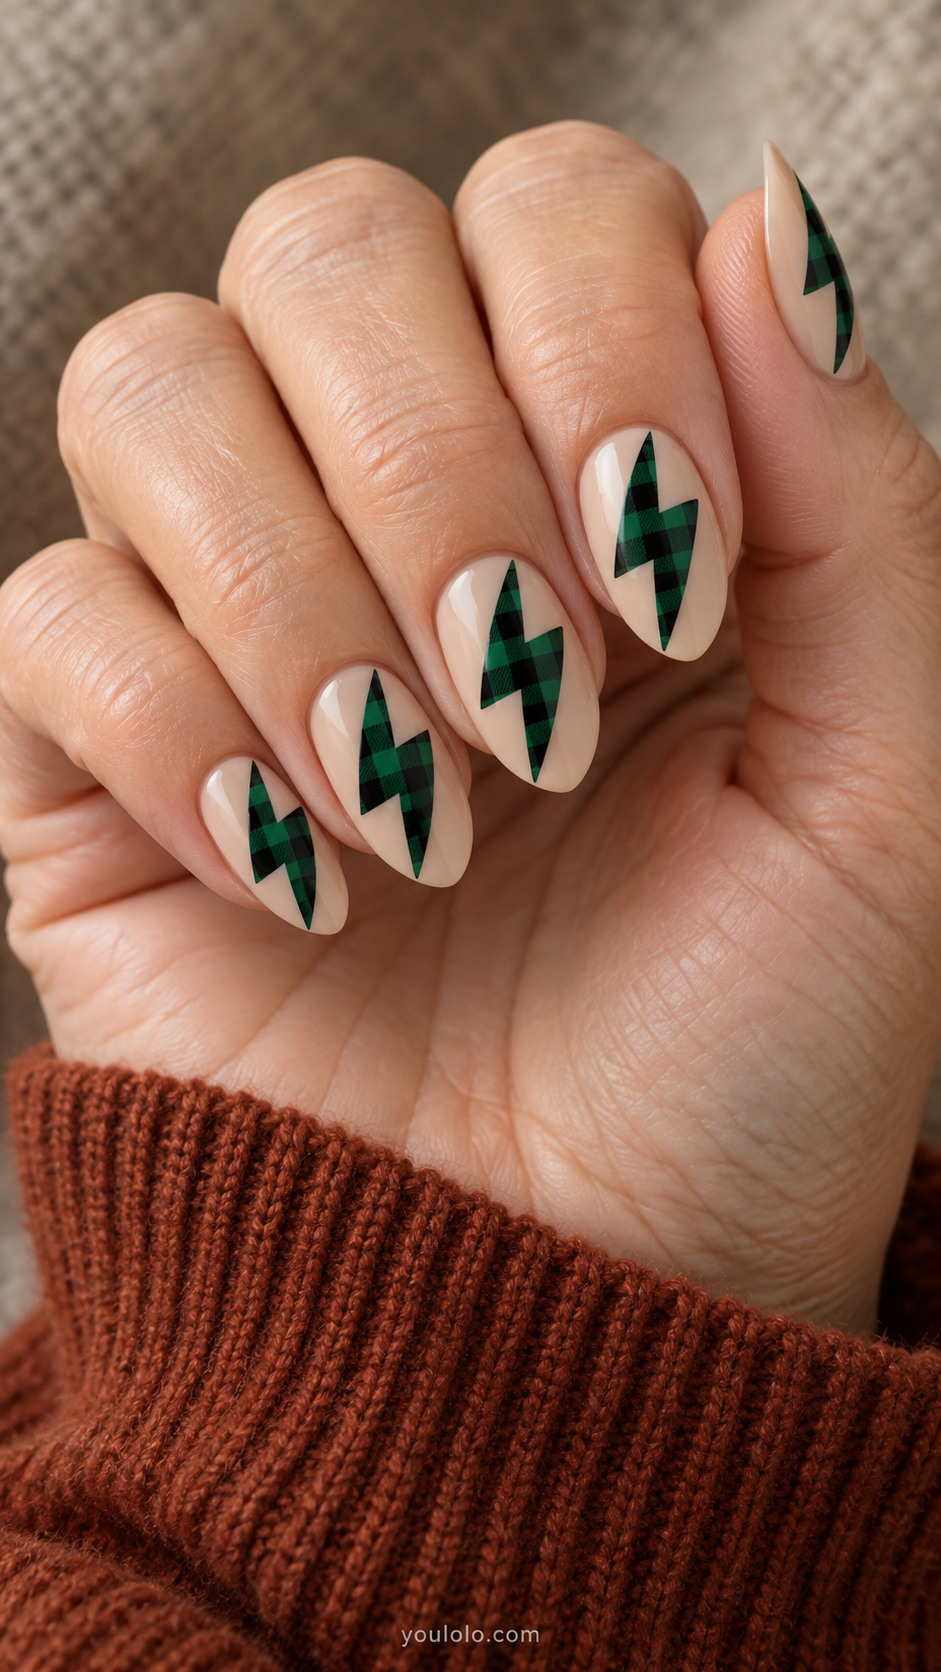
A sharply angled lightning bolt gives the cozy check an unexpected graphic outline. Forest green and black keep the pattern grounded, while the milky beige background exposes the zigzag silhouette. Make the bolt wide through its center so the squares remain readable. Keep its points clean and the rest of the nail bare of decoration; the angular shape supplies plenty of movement on its own.
Salon brief: Milky beige almond nails with one large forest-green-and-black buffalo check lightning bolt centered on each nail. Leave beige space all around the zigzag shape.
25. Buffalo Check and Color Blocking
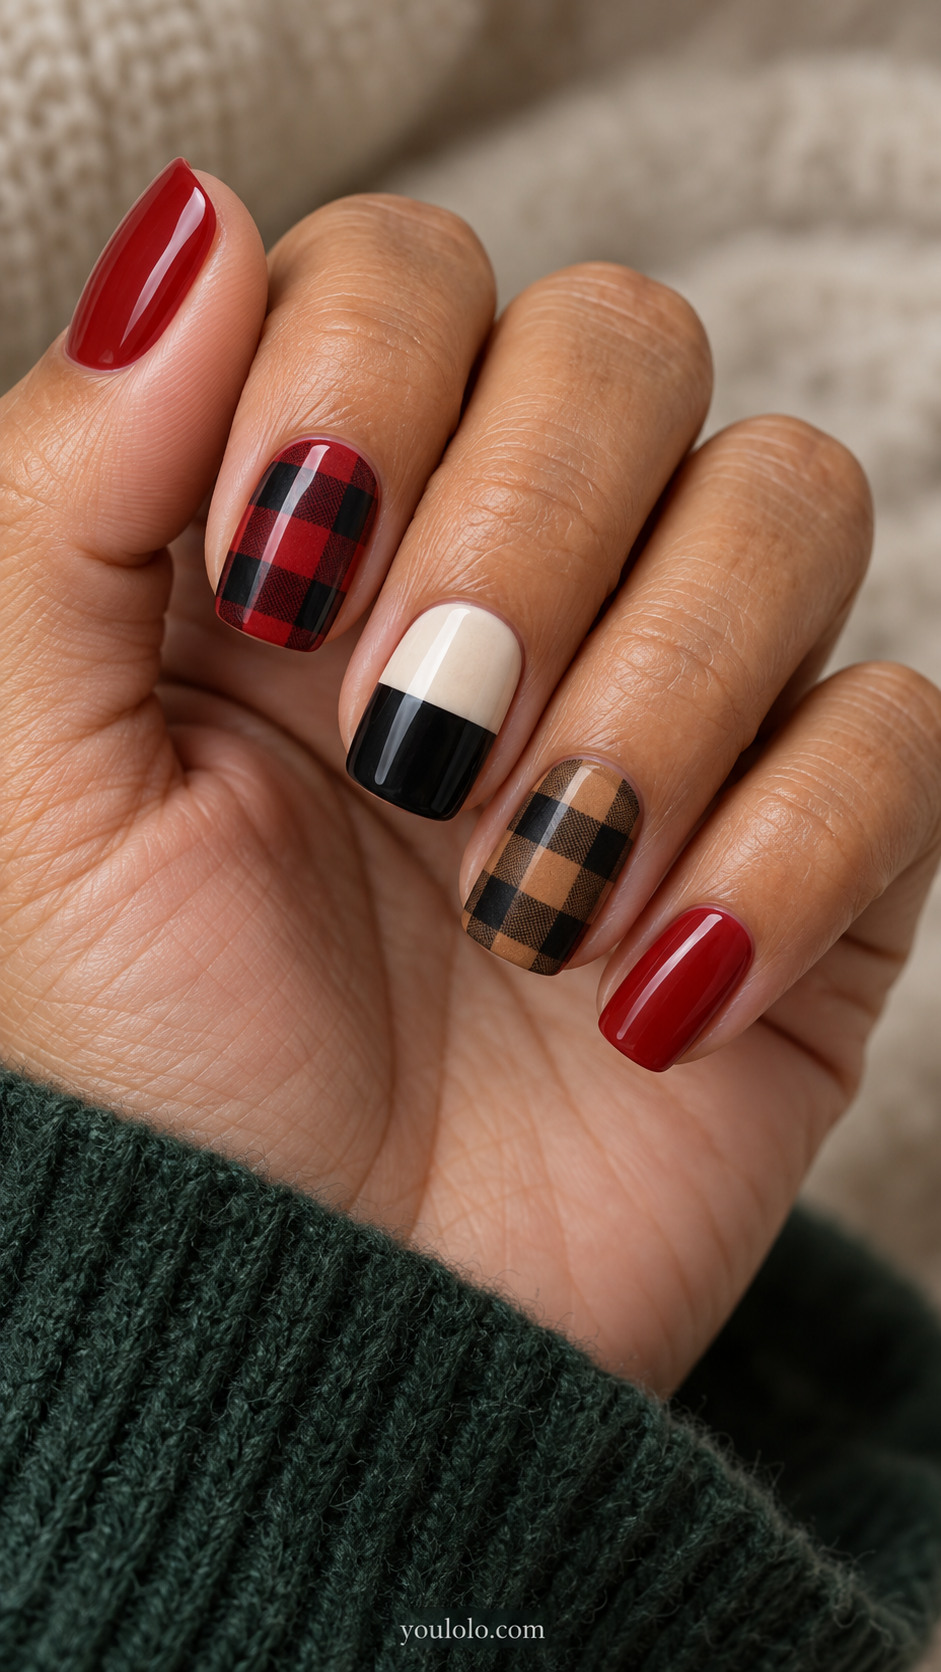
This mixed set combines two related check palettes with a simple color-blocked nail. Red connects to brick, while camel relates to the cream panel, giving the different elements a shared warmth. Keep the buffalo squares the same scale on both accents. The plain nails are essential here: they provide a resting point so the manicure feels composed rather than like several unrelated samples.
Salon brief: Medium squoval nails. Index full red black buffalo check, middle upper half cream lower half black horizontal block, ring full camel espresso buffalo check, thumb and pinky solid brick red; flat glossy.
Choose the Buffalo Check Layout Before the Colors
For a quiet manicure, start with one patterned ring nail and four solid neighbors. For a stronger graphic look, choose full coverage or an oversized check. Small shaped accents need fewer, larger squares than a full nail; otherwise the design can become a dark blur.
Ask your artist to compare the pattern on the narrowest nail as well as the widest. A check that looks spacious on a thumb may need a slightly smaller scale on the little finger. The aim is a consistent visual rhythm, rather than forcing the exact same number of squares onto every nail.
A Useful Salon Brief
Bring the image and specify four things: nail length and shape, which fingers carry the checks, the size of the squares and whether the final surface should be glossy or matte. For mixed finishes, point out exactly which nails should reflect light. A quick painted sample can help you decide how dark the middle tone needs to be.
Buffalo Plaid Nails: Frequently Asked Questions
What makes buffalo plaid different from ordinary plaid?
Buffalo check uses broad, evenly spaced crossing bands that form a simple square grid. Many other plaid designs add narrow stripes, several band widths or more colors. For this look, keep the large square structure clear and let the overlapping bands create the darkest tone.
Can buffalo plaid work on very short nails?
Yes. A single accent nail, a full check with only a few broad squares or a small pocket-shaped accent can suit short nails. Avoid squeezing a very dense print into a tiny area. Short squoval and round shapes both work; choose the shape you already find comfortable.
Does every nail need the same check pattern?
No. Plain nails make the patterned ones easier to appreciate. You can use two neighboring accents, a matching thumb and ring nail, or one checked nail surrounded by a related solid color. Keep the palette or square size consistent when mixing placements.
Are buffalo plaid nails only for Christmas?
No. Red-and-black checks fit autumn and winter, while camel, espresso and forest versions can work as everyday graphic nail art. An ornament shape makes the theme explicitly festive; simple checks alone do not require a holiday occasion.
Should buffalo plaid nails be glossy or matte?
Gloss gives the colors a crisp, polished look. Matte emphasizes the flannel association and can make dark checks feel softer. A mixed set can use both, provided the finish changes are deliberate. Choose the effect from the sample rather than assuming one finish will suit every palette.
How do I keep the pattern from looking like a checkerboard?
Use a visible middle tone between the base and the darkest overlap. A two-color alternating square pattern reads more like a checkerboard. Broad translucent-looking bands and darker intersections preserve the layered flannel effect, even when the painting is completely flat.
Save the Detail You Want to Keep
Choose one favorite image and note what caught your eye: a larger check, the open space around an accent or the contrast of matte and gloss. Keeping that one feature clear makes it easier to adapt the manicure to your own length and everyday style.