
The Best Fluffy Pancakes recipe you will fall in love with. Full of tips and tricks to help you make the best pancakes.


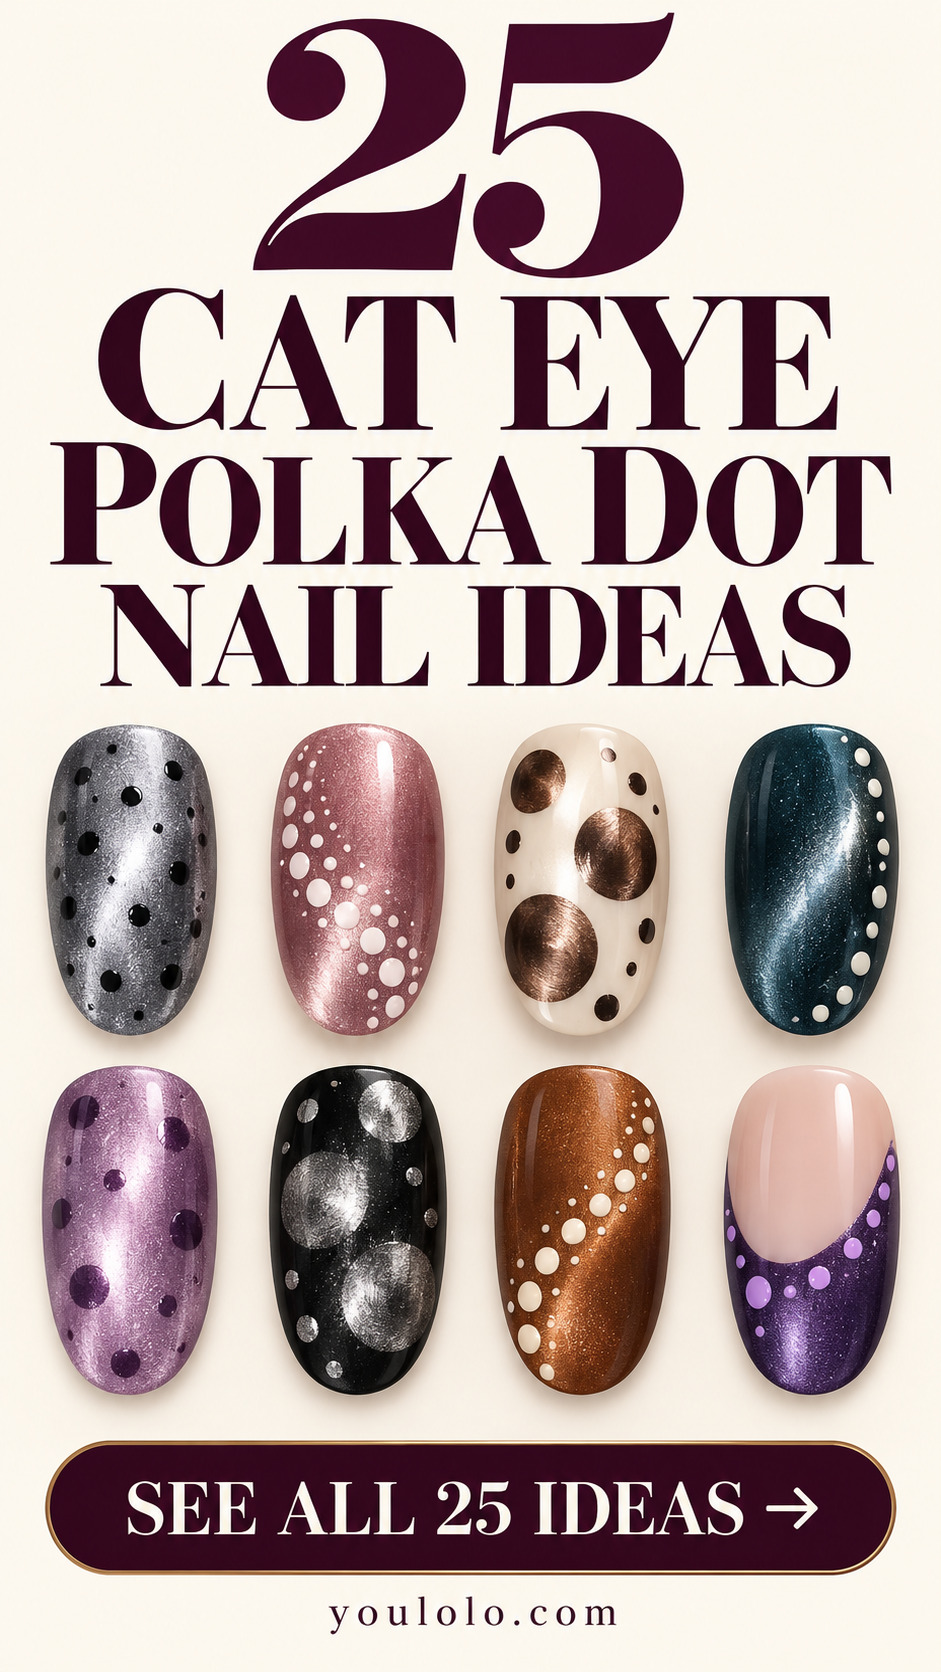
Cat eye polka dot nails combine two very different details: a soft, shifting magnetic finish and crisp circles that stay graphic. The best versions leave room for both. A few well-placed dots can bring a velvet manicure to life; too many can hide the very finish you chose.
These 25 designs explore more than a color change. You will find short dotted sets, open-lane layouts, inverse magnetic spots and French tips with a clear reason for every detail. Save the shape and placement you like, then use the salon brief below each design to discuss your own version.
Start here: choose a full magnetic base for a soft all-over glow, or magnetic dots on an opaque base when you want the circles themselves to stand out.
Soft, Short and Easy-to-Wear Cat Eye Polka Dot Nails
1. Silver Velvet, Ink-Blue Dots
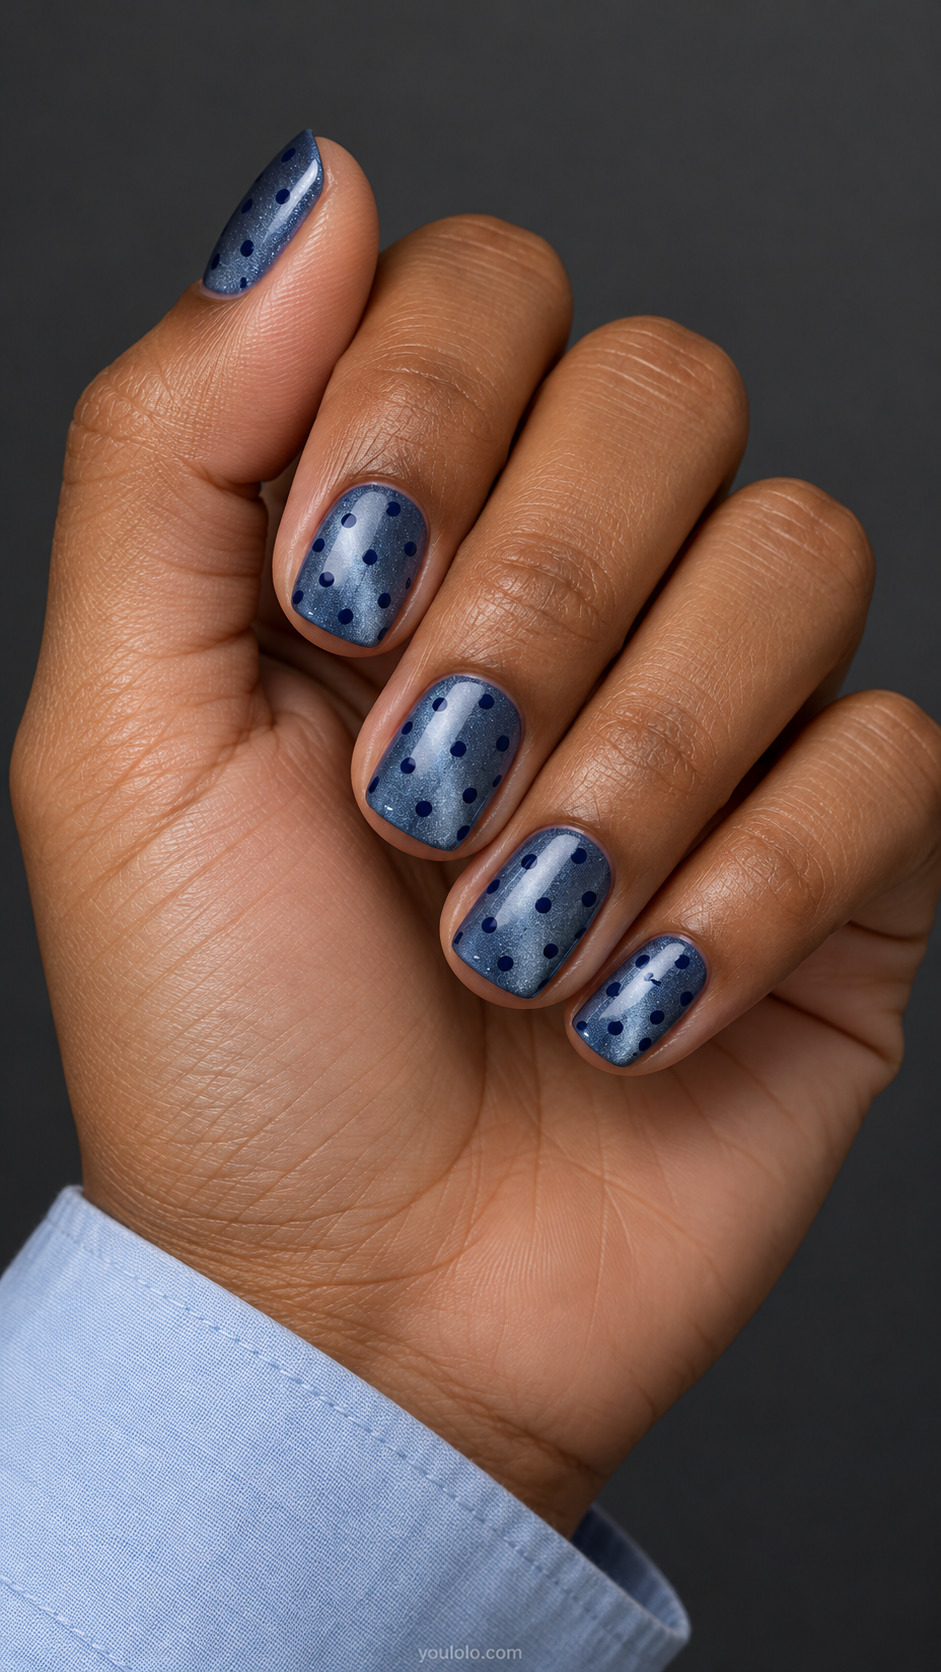
Ink-blue spots give this silver velvet base a crisp, almost printed finish. The short squoval shape makes the pattern feel tidy instead of costume-like, while open gaps let the magnetic sheen show through. Choose dots that are small enough to read as a repeat, but large enough to remain visible when you are looking at your whole hand.
Salon brief: Short squoval nails; silver-blue magnetic velvet base with sparse small opaque ink-blue dots in staggered rows.
2. Blush With a Tiny Dot Gradient
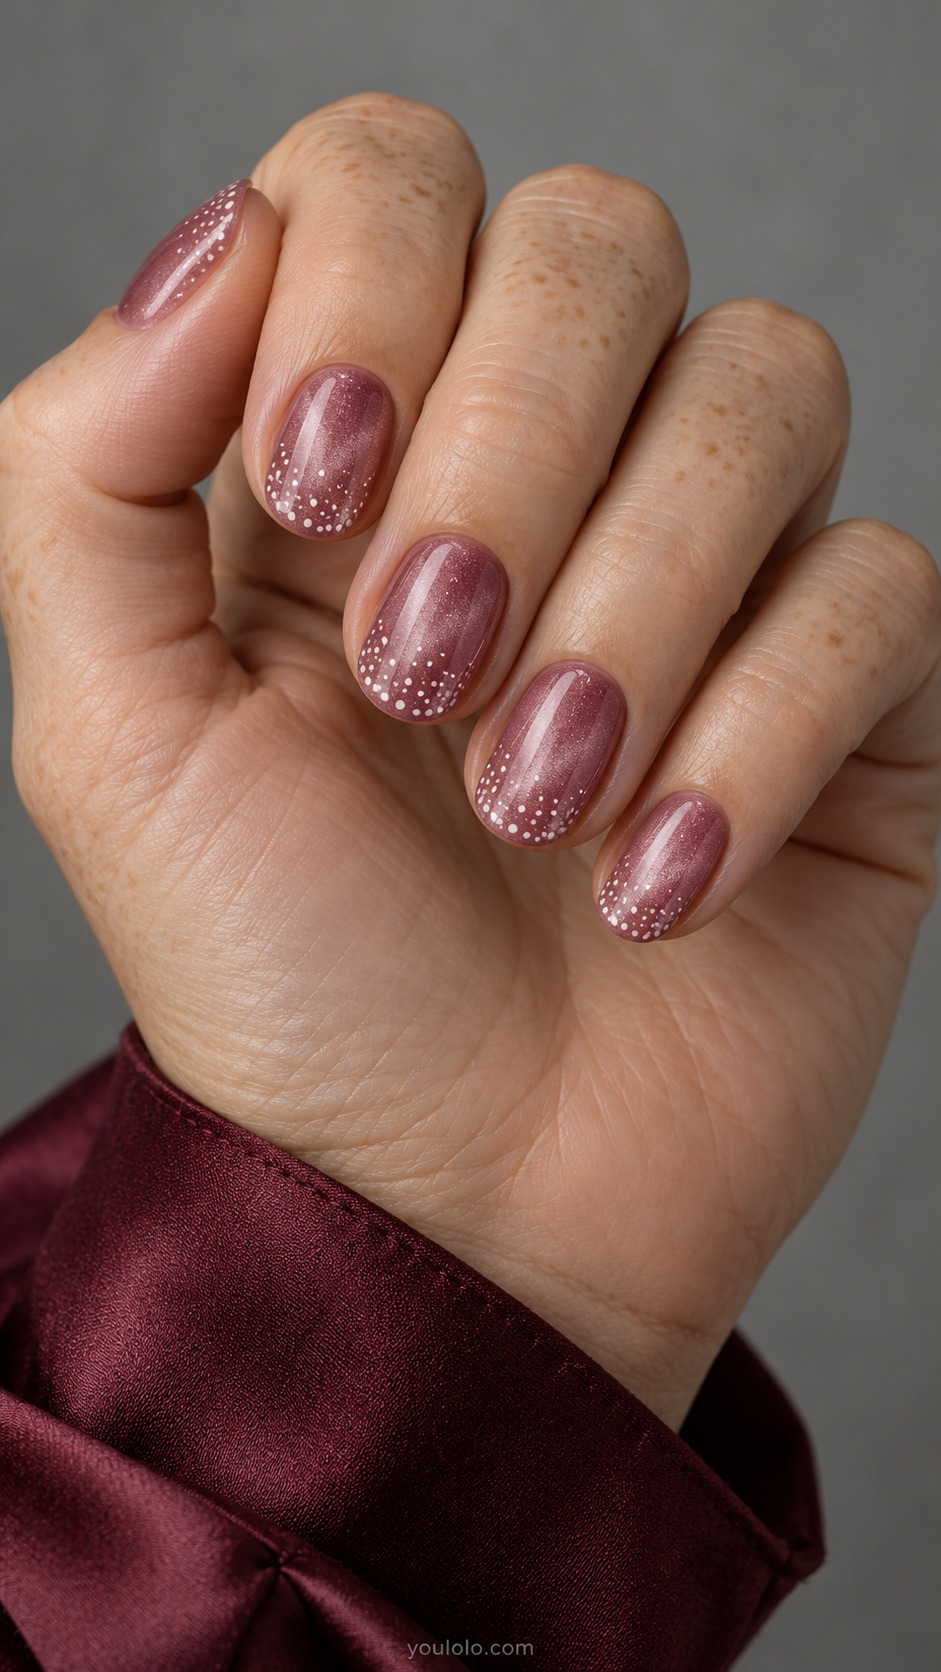
This is the softer way to wear polka dots: cluster them toward the free edge and let them disappear into the rosy base. There is no hard smile line, so the finished look sits between a dotted French and a delicate fade. Keep the smallest dots separate rather than turning them into a solid white band.
Salon brief: Short oval nails; sheer rosy magnetic base, tiny ivory dots only near tips thinning gradually toward center, no french line.
3. Espresso Dots on Buttercream

Turn the usual formula inside out. Here the cream background stays quiet and the chocolate circles carry the magnetic depth. Larger dots give each little pool of shimmer enough room to show its shape. A warm, opaque base is important; too much shimmer underneath would compete with the detail and make the circles harder to distinguish.
Salon brief: Medium almond; opaque buttercream base bearing five large round espresso magnetic cat-eye circles per nail, each circle with internal silky crescent reflection, no full nail shimmer.
4. Teal Velvet With a Dotted Side Border
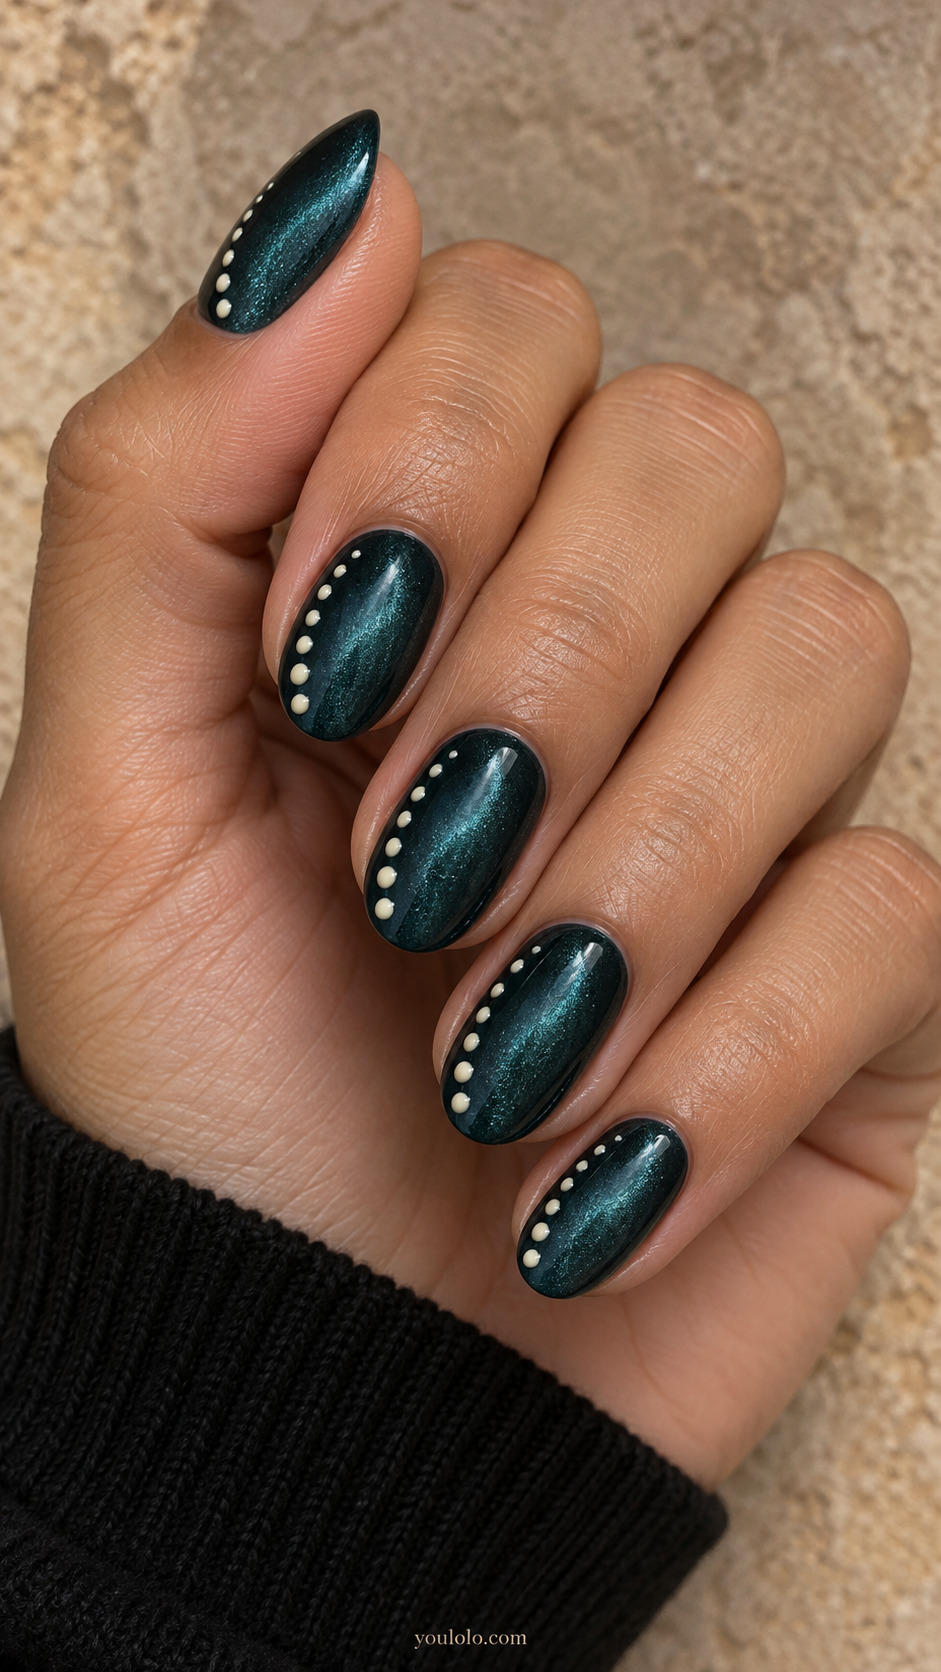
A single dotted side border gives the teal glow its own frame without surrounding the whole nail. The off-center placement is especially pretty on an oval shape, where the line can follow the sidewall naturally. Leave a visible gap between every circle. If they touch, the design starts reading as a beaded stripe instead of separate dots.
Salon brief: Medium oval; deep teal magnetic velvet with one curved row of small cream dots following only left sidewall on each nail; clear central shimmer.
5. One Dotted Accent, Four Quiet Nails
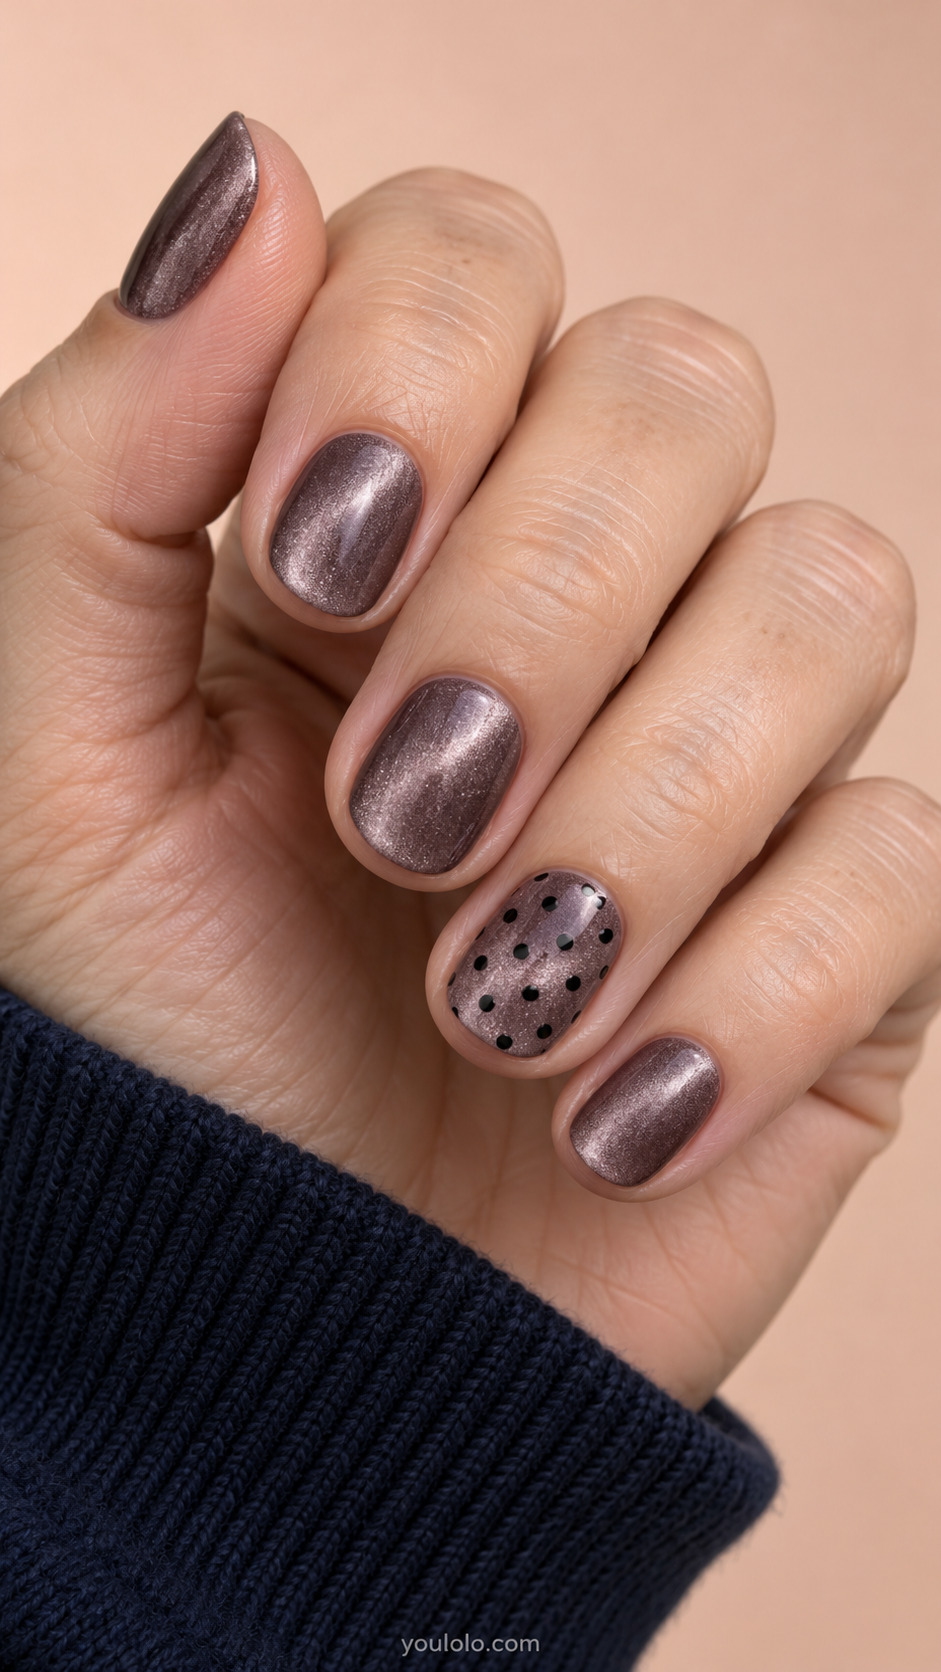
One patterned ring nail is enough when the base already has this much movement. Mauve-gray keeps the set understated, and small black dots add contrast without introducing another bright shade. This is a useful starting point if you usually choose a single color: you still get four calm nails, with one detail that rewards a closer look.
Salon brief: Short rounded nails; mauve-gray magnetic velvet on all five, only ring nail with allover evenly spaced black polka dots; other nails no art.
French Tips, Borders and Clever Open Space
6. Magnetic Tips With Floating Dots
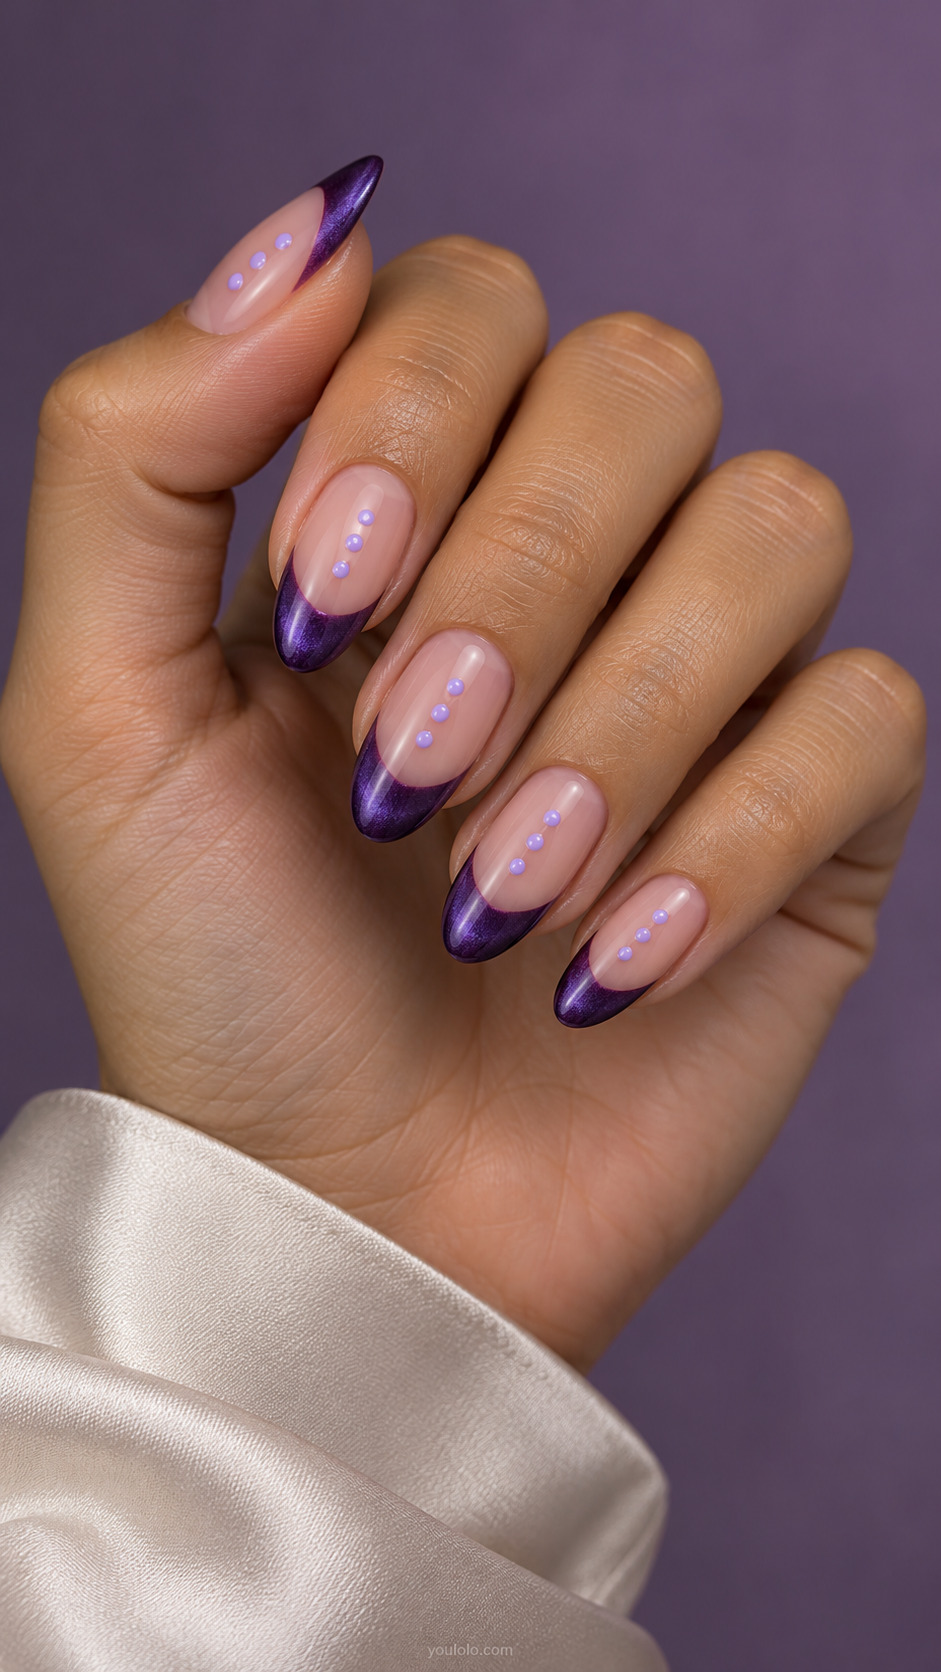
The violet tips hold the magnetic finish while small lilac dots float below them. That separation matters: the dots should not sit directly on the smile line or look like an accidental extension of the French. A medium almond provides enough clear nail-bed space for both elements. Keep the nude base translucent so the purple stays the focal point.
Salon brief: Medium almond; sheer nude base, deep violet magnetic french tips; three tiny flat lilac dots float in nude area on each nail, separated from tip.
7. Diagonal Half-Dot Nails
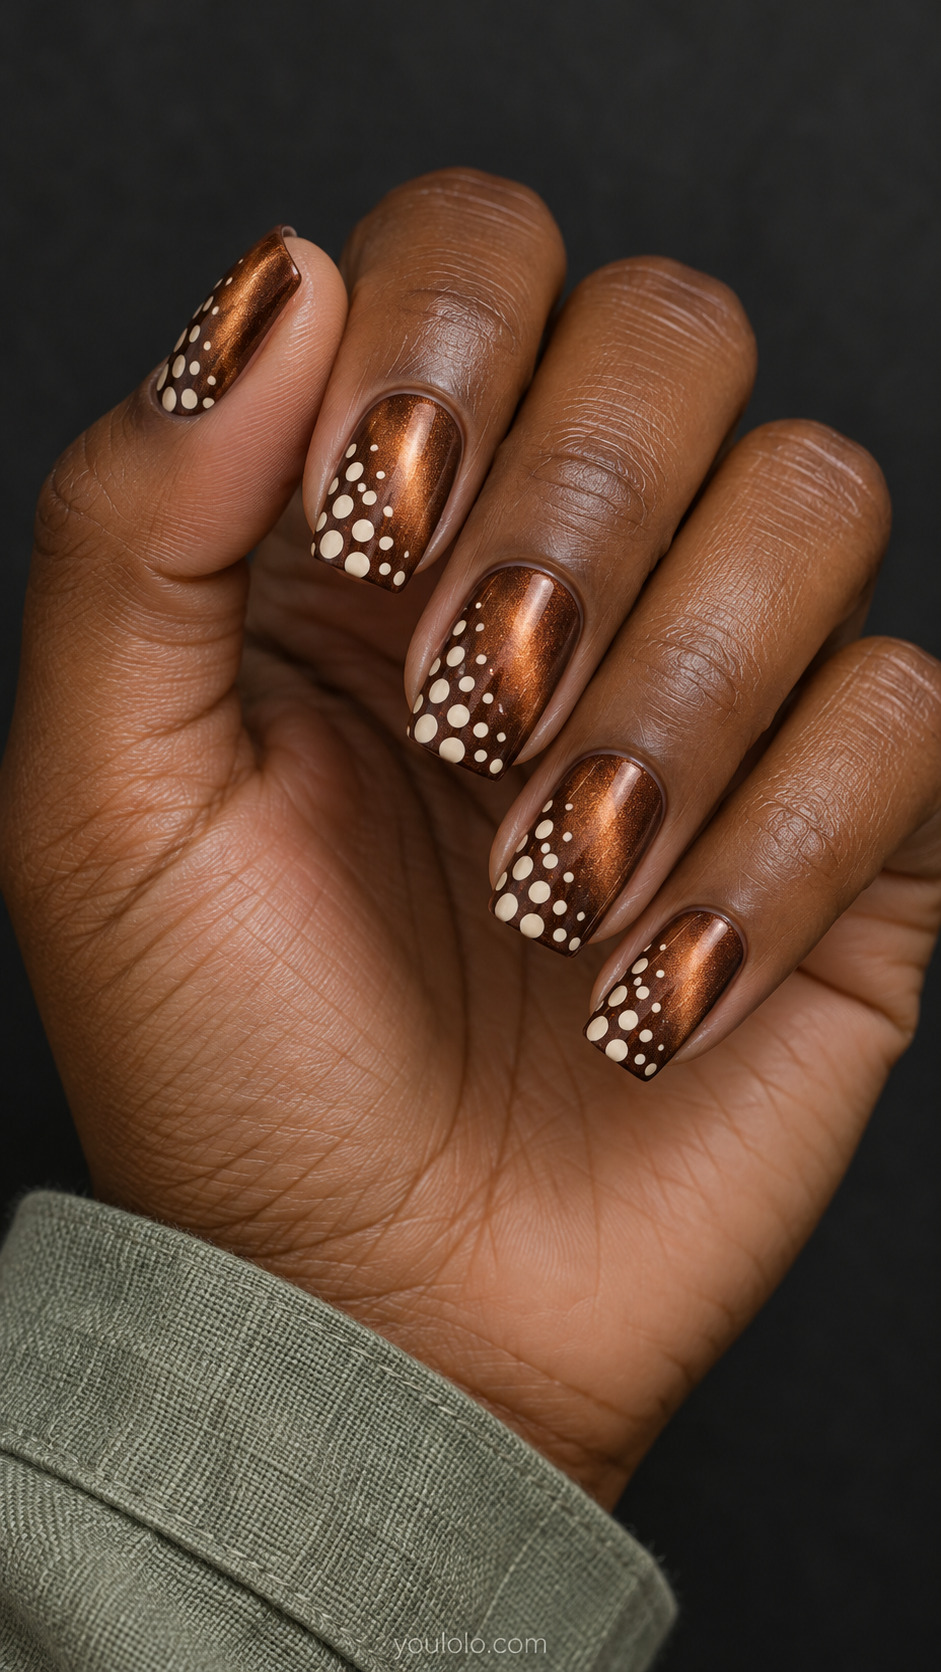
Rather than covering the entire copper surface, place the dots within one diagonal half. The bare-looking upper section is still magnetic, so it catches light while the patterned section stays graphic. Ask for an imaginary diagonal boundary with no dividing stripe. That small omission makes the design feel lighter and lets the eye complete the shape.
Salon brief: Medium soft square; copper magnetic base; only lower-left diagonal half covered with ivory polka dots, upper-right half clear copper glow, no painted dividing line.
8. The Dotted Cuticle Crescent
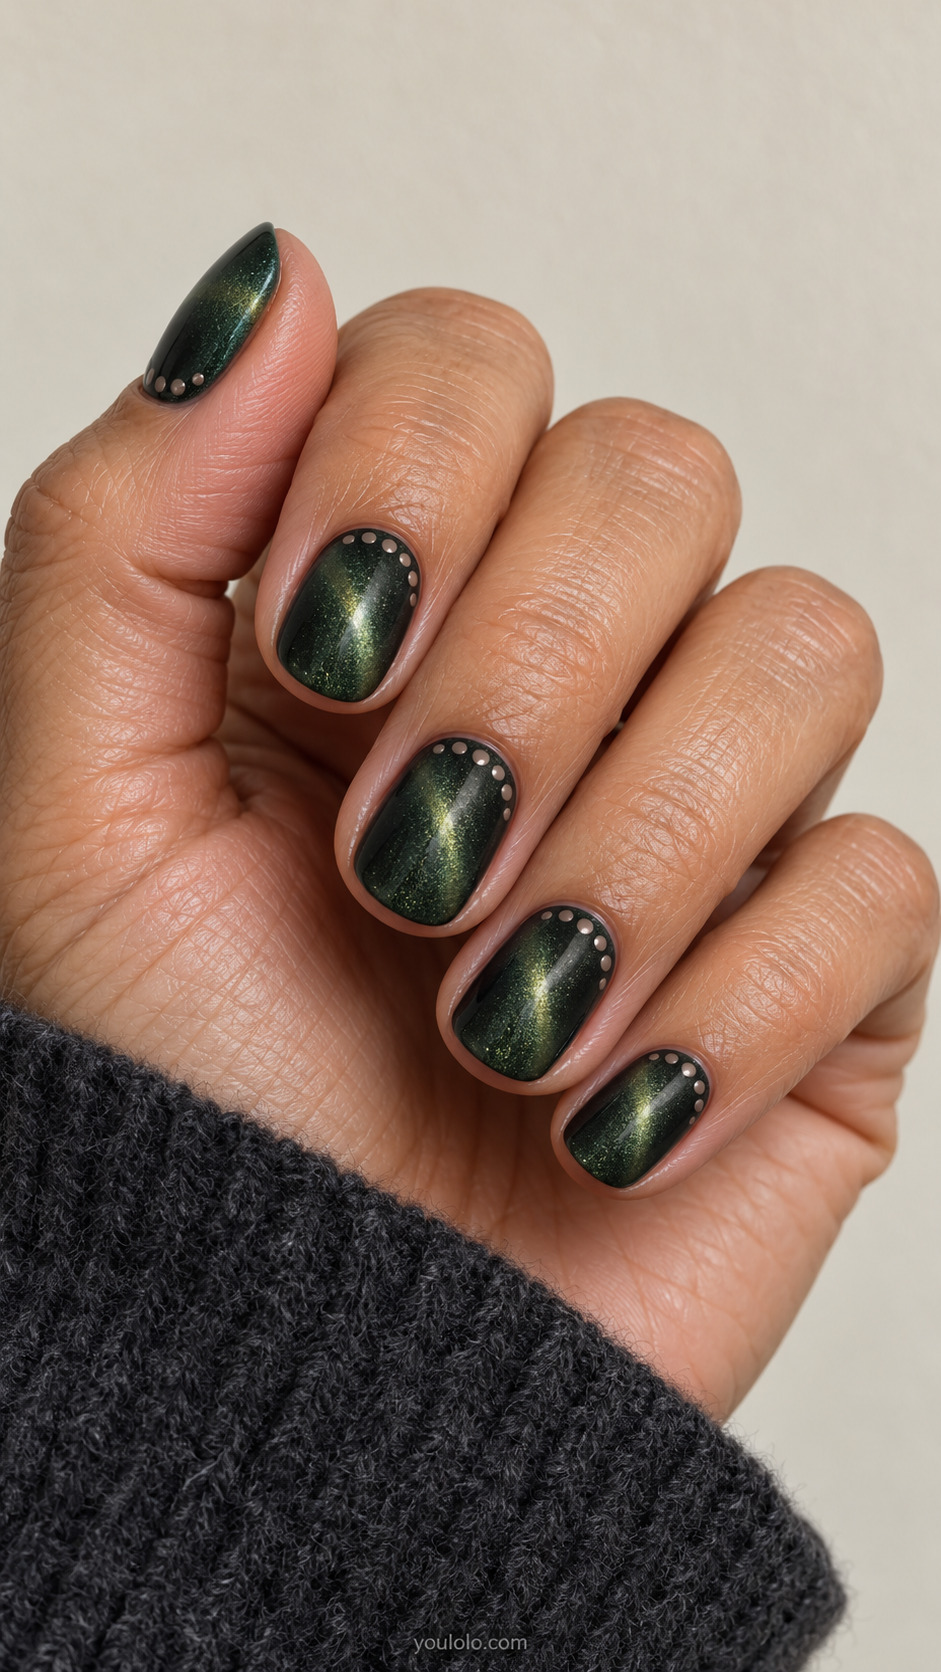
A curved row of pale dots near the cuticle works like a tiny collar around the green glow. Keep the circles away from the skin and follow the natural arc rather than forcing a straight line across every finger. Short ovals suit the idea well because the curve repeats the outline of the nail without adding visual length.
Salon brief: Short oval; bottle green magnetic base with fine luminous stripe, delicate arc of five tiny taupe dots curves around cuticle with space from skin, rest plain.
9. Champagne Halos With Black Dot Centers
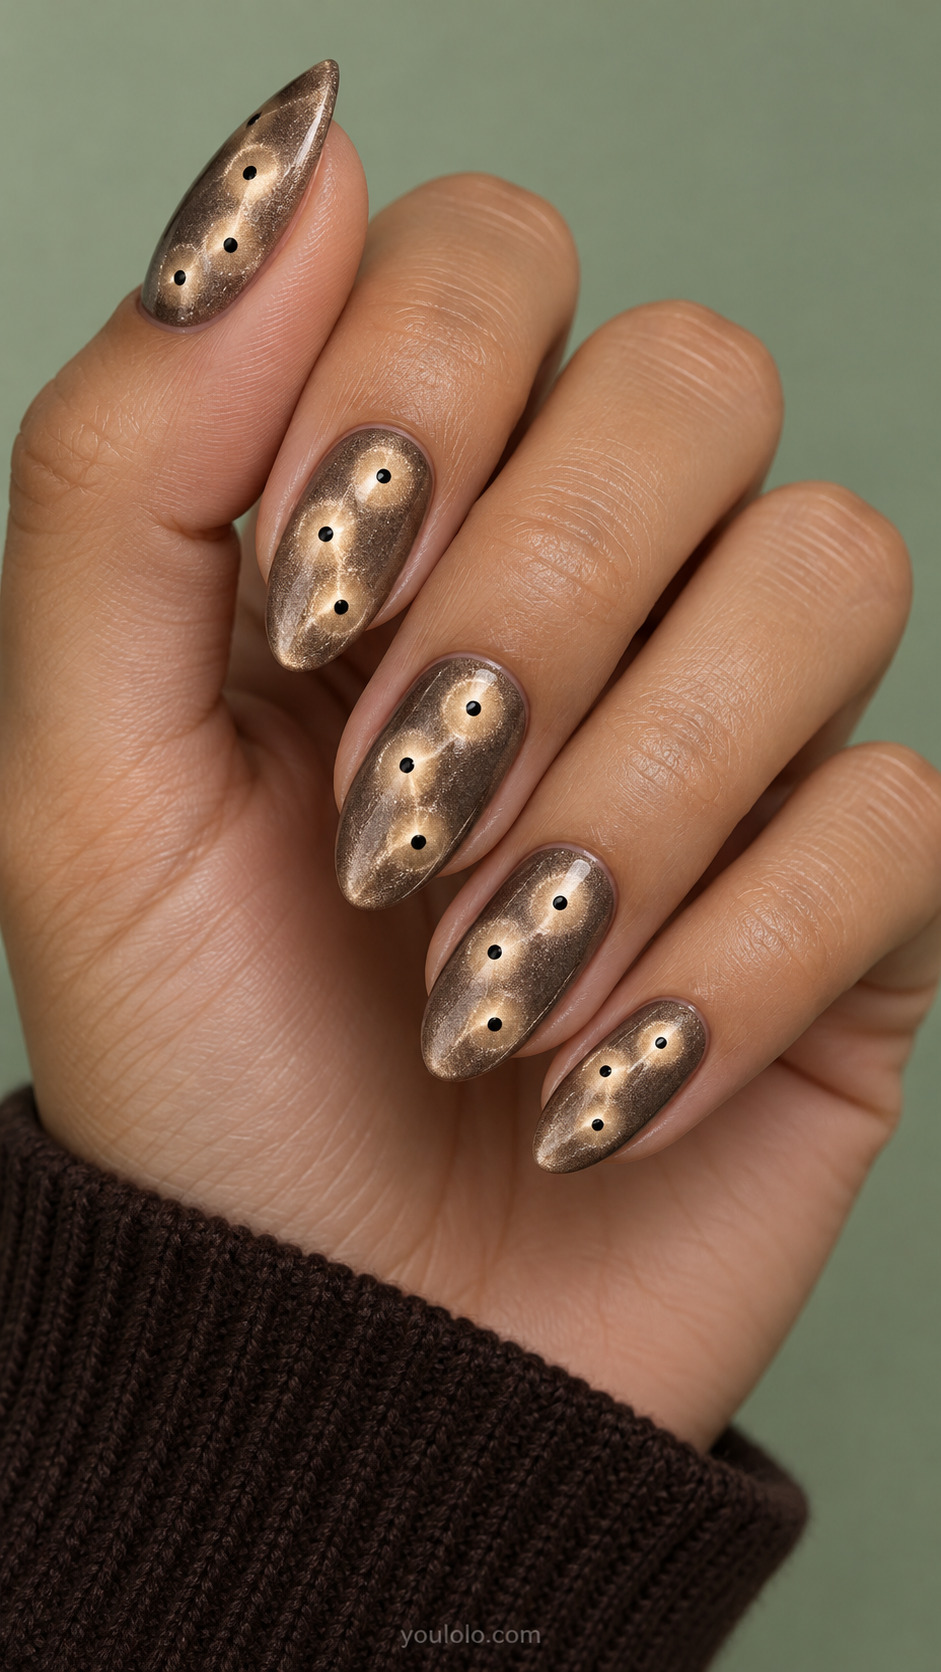
Black centers make these soft champagne halos look more graphic than an ordinary shimmer manicure. The light around each dot should stay blurred, with a clean opaque circle at its center. This is a detailed salon brief rather than a quick dotting exercise: ask your artist to test the halo effect on a sample tip before committing to the set.
Salon brief: Medium almond; champagne magnetic velvet with three round glowing halos per nail, a crisp small opaque black dot centered in each luminous halo; halos soft internal light not painted rings.
10. Two Sizes, One Clean Grid
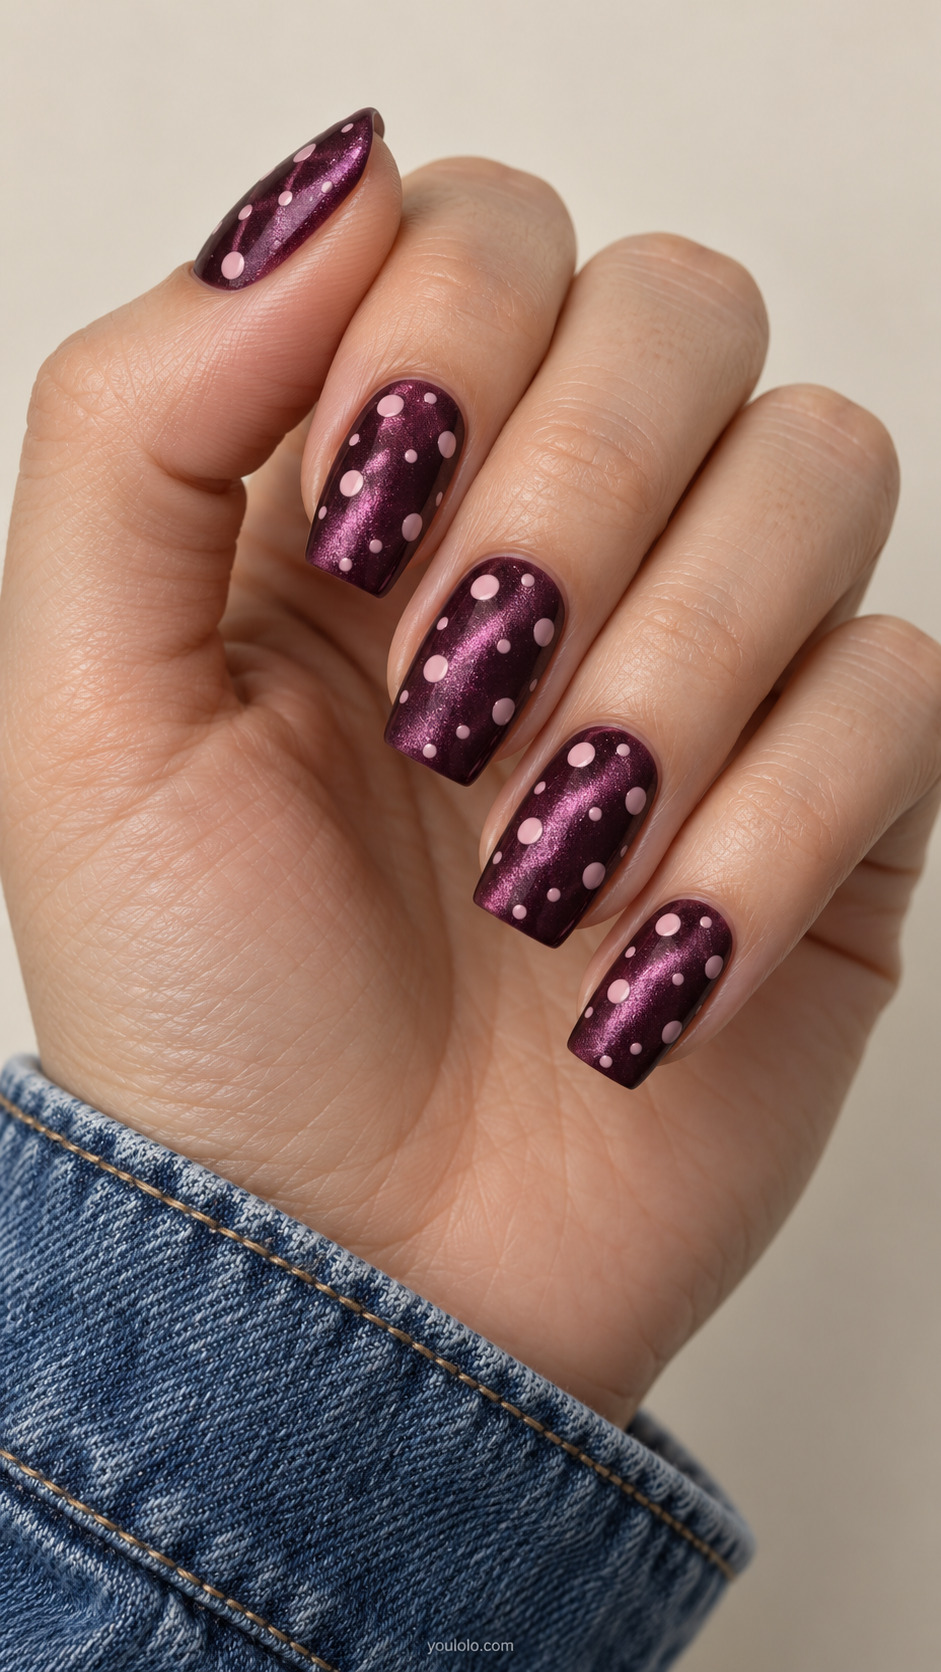
A deliberate large-small rhythm changes a familiar polka-dot print. Pale pink circles stand out against the plum base, and the alternating scale gives the eye something to follow across each nail. A tapered square offers a generous surface for the arrangement. Keep the spacing consistent even when the dot size changes, so the result looks considered rather than crowded.
Salon brief: Medium tapered square; plum magnetic velvet, alternating large and tiny opaque pale pink round dots in regular diagonal grid.
Magnetic Dots and Graphic Finish Contrasts
11. The Dot-Free Racing Stripe
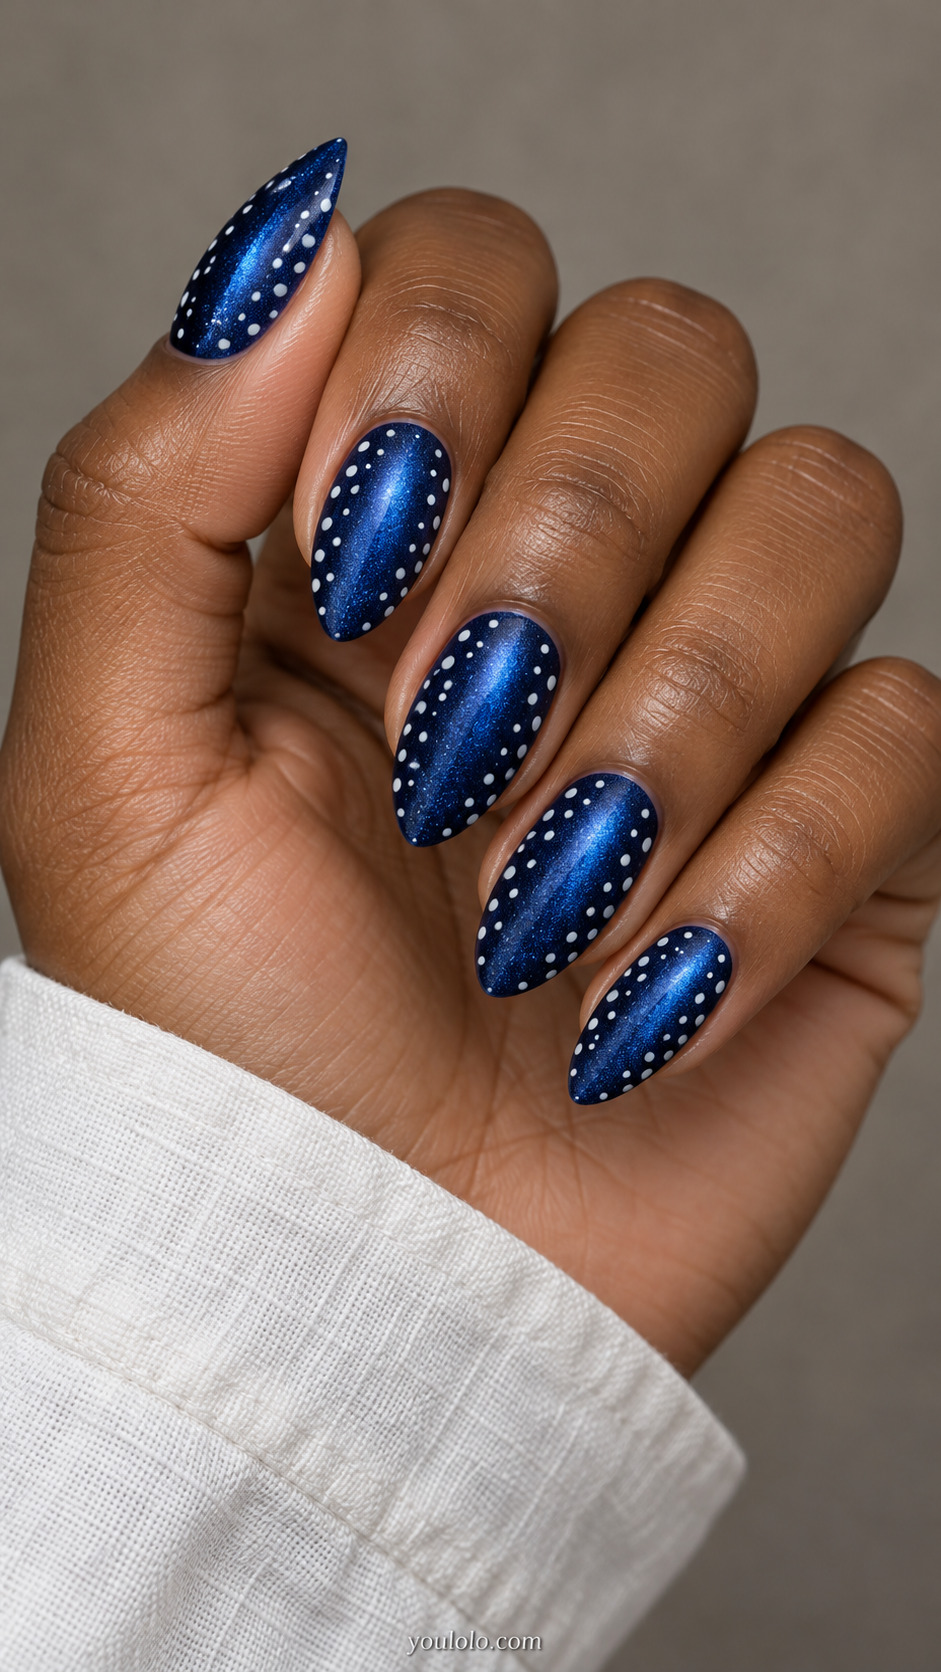
The blue shimmer needs somewhere to breathe, so this layout leaves a slim clear lane down the middle. White dots sit on either side, creating a stripe through absence rather than paint. Place the central gap before adding the dots. On narrower nails, reduce the number of circles instead of squeezing them closer together and losing that open channel.
Salon brief: Medium almond; cobalt magnetic velvet, white small polka dots cover sides but narrow vertical stripe down middle intentionally dot free, no actual stripe painted.
12. Split-Tone Magnetic Circles
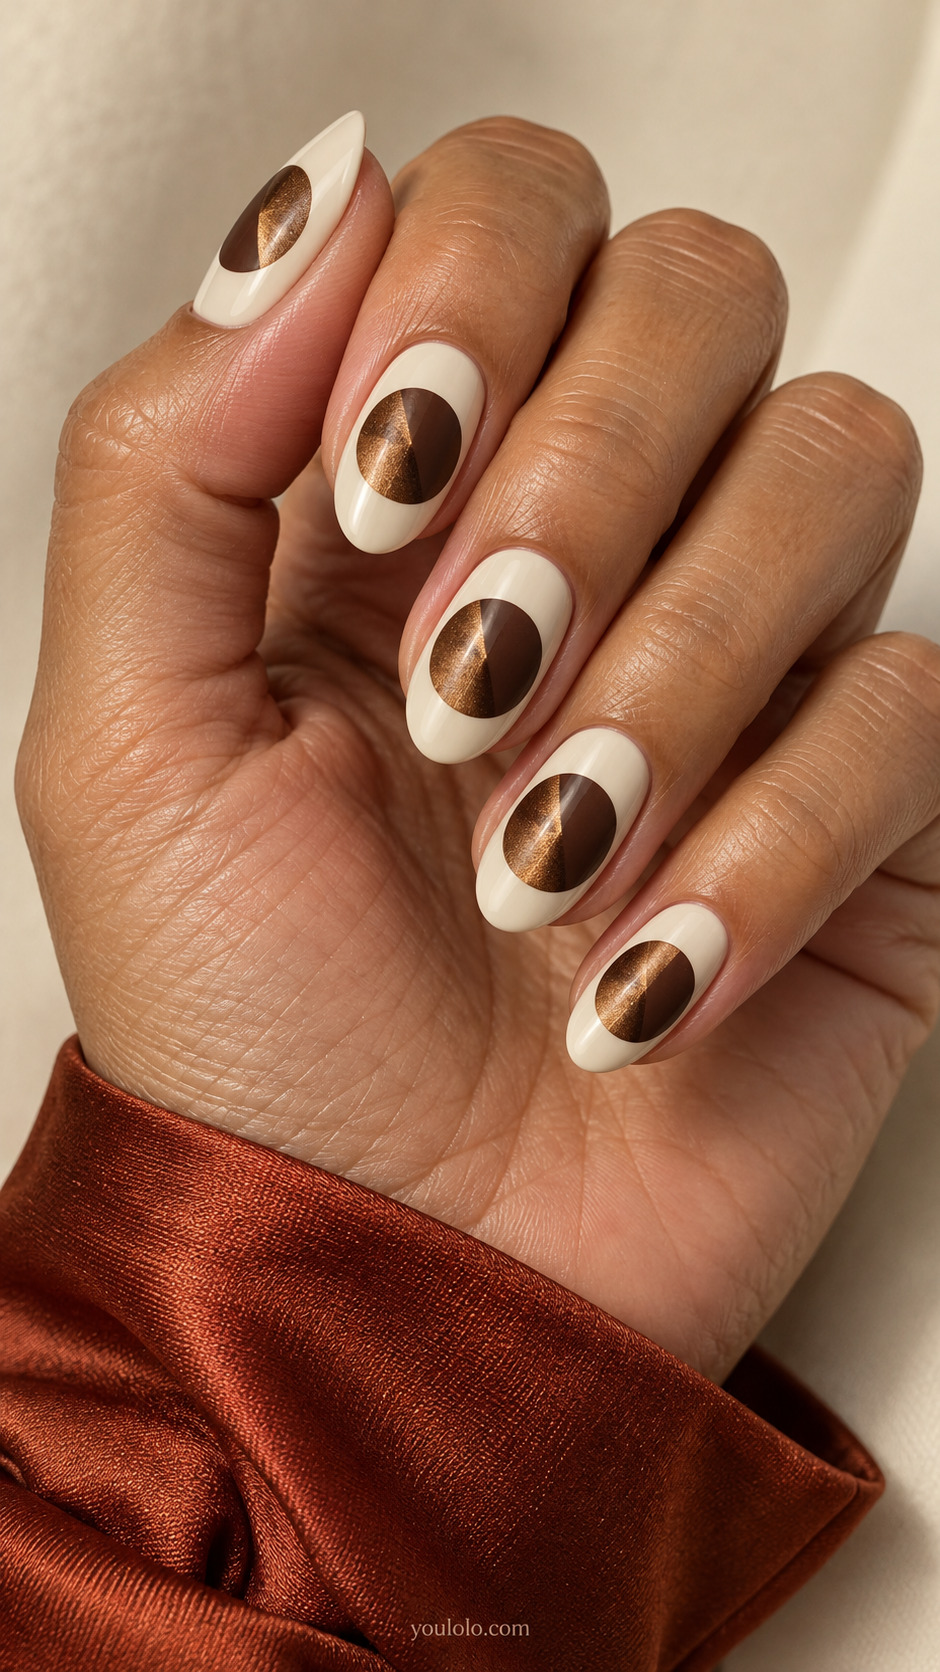
One divided circle makes a strong focal point on each cream nail. A bronze magnetic half catches the light while an espresso half stays flat, giving the simple disc two different moods. Keeping the split direction consistent makes the design feel orderly. Leave plenty of cream around the circle so its round outline stays clear, especially on a shorter nail.
Salon brief: Medium oval nails with an opaque cream base and one large round disc per nail, divided into a bronze magnetic half and a flat espresso half.
13. Black Satin and Magnetic Silver Spots
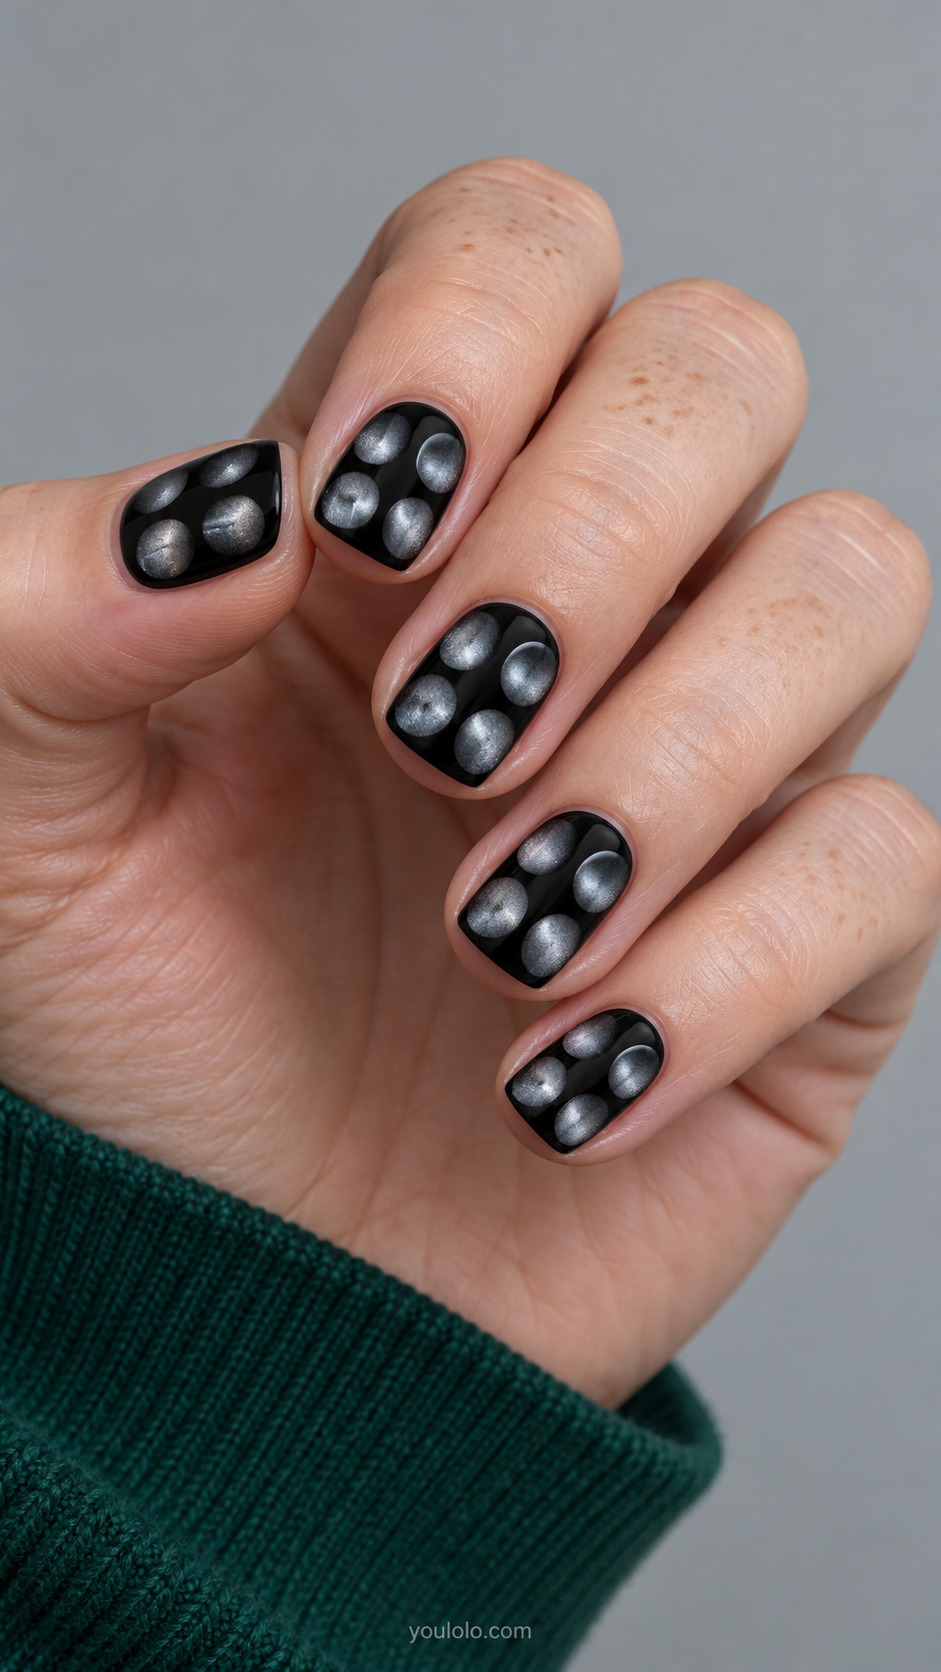
Silver magnetic dots over black put the shimmer exactly where you want it. The surrounding dark polish creates a strong outline, so the circles look luminous without needing gems or raised embellishment. Short squares keep this graphic choice wearable. Ask for smooth, flat dots under the top coat; the dimension should come from the finish rather than a bulky surface.
Salon brief: Short soft-square nails; smooth opaque black background with four large silver magnetic round dots per nail, each luminous shaded dot flat painted not rhinestone.
14. Lilac Magnetic Dots, Alternating Scale
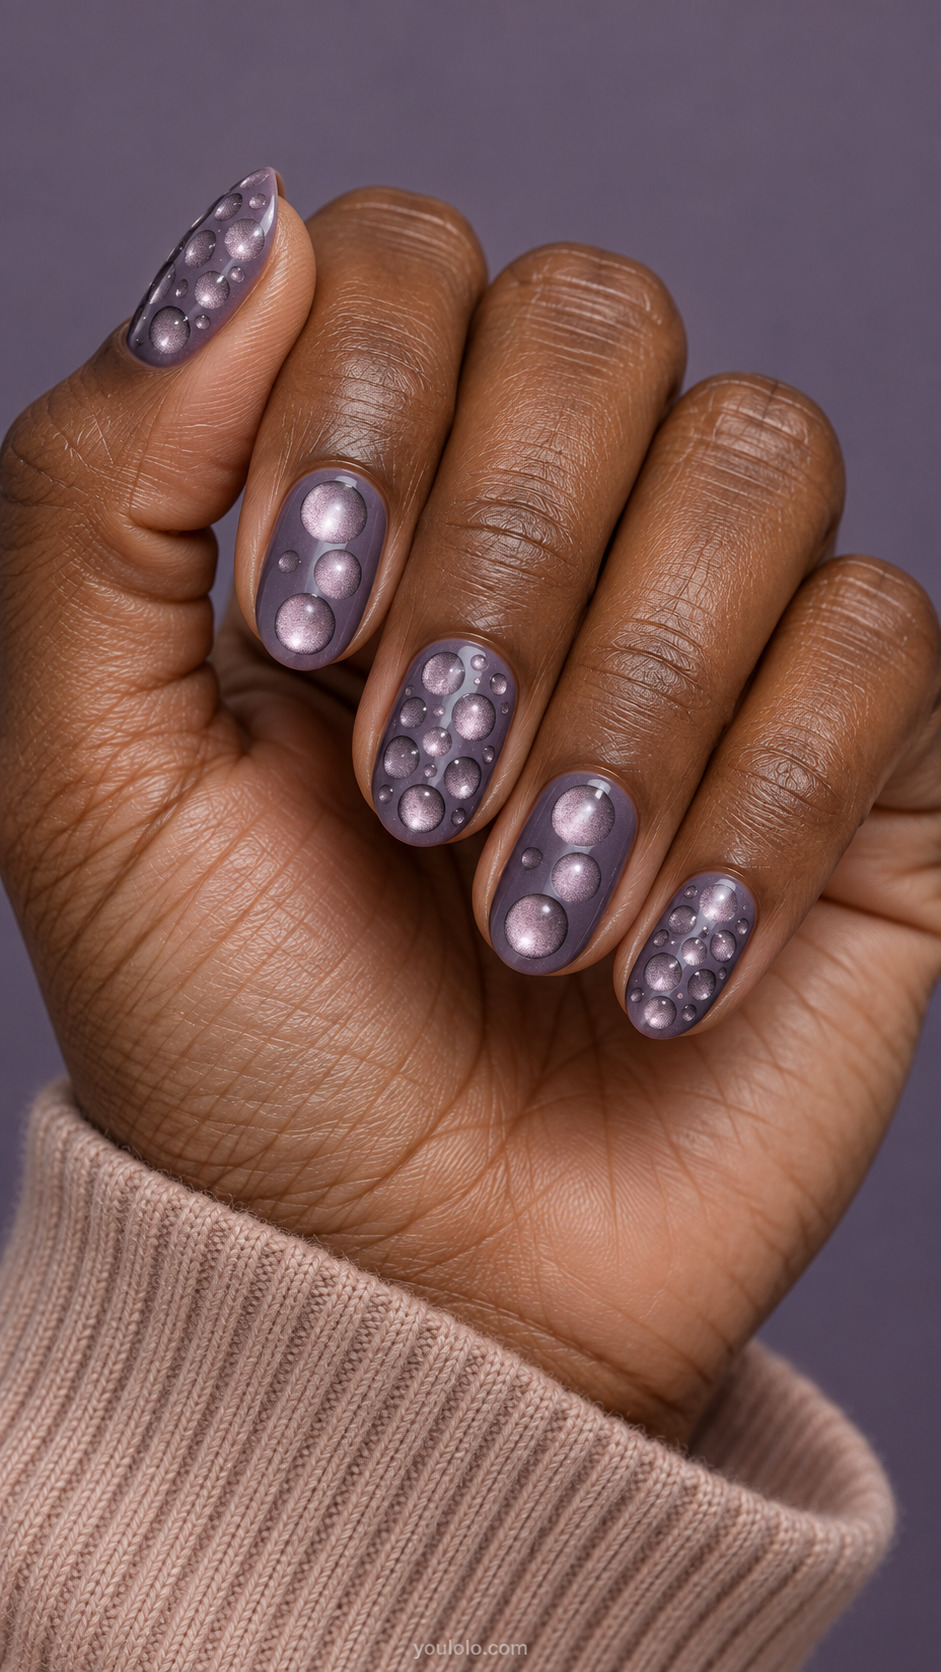
This lilac set changes scale across the hand instead of adding a different motif to every finger. Small magnetic dots create a fine repeat on some nails, while larger circles give the others a slower rhythm. Keep both sizes within the same lavender-silver family. The shared palette holds the manicure together even though the amount of open space changes.
Salon brief: Short almond; opaque smoky lavender base; thumb middle pinky with many tiny silver magnetic circles, index ring with just three large lilac-silver magnetic discs, no opaque white dots.
15. Pink Dots Across a Cocoa Beam
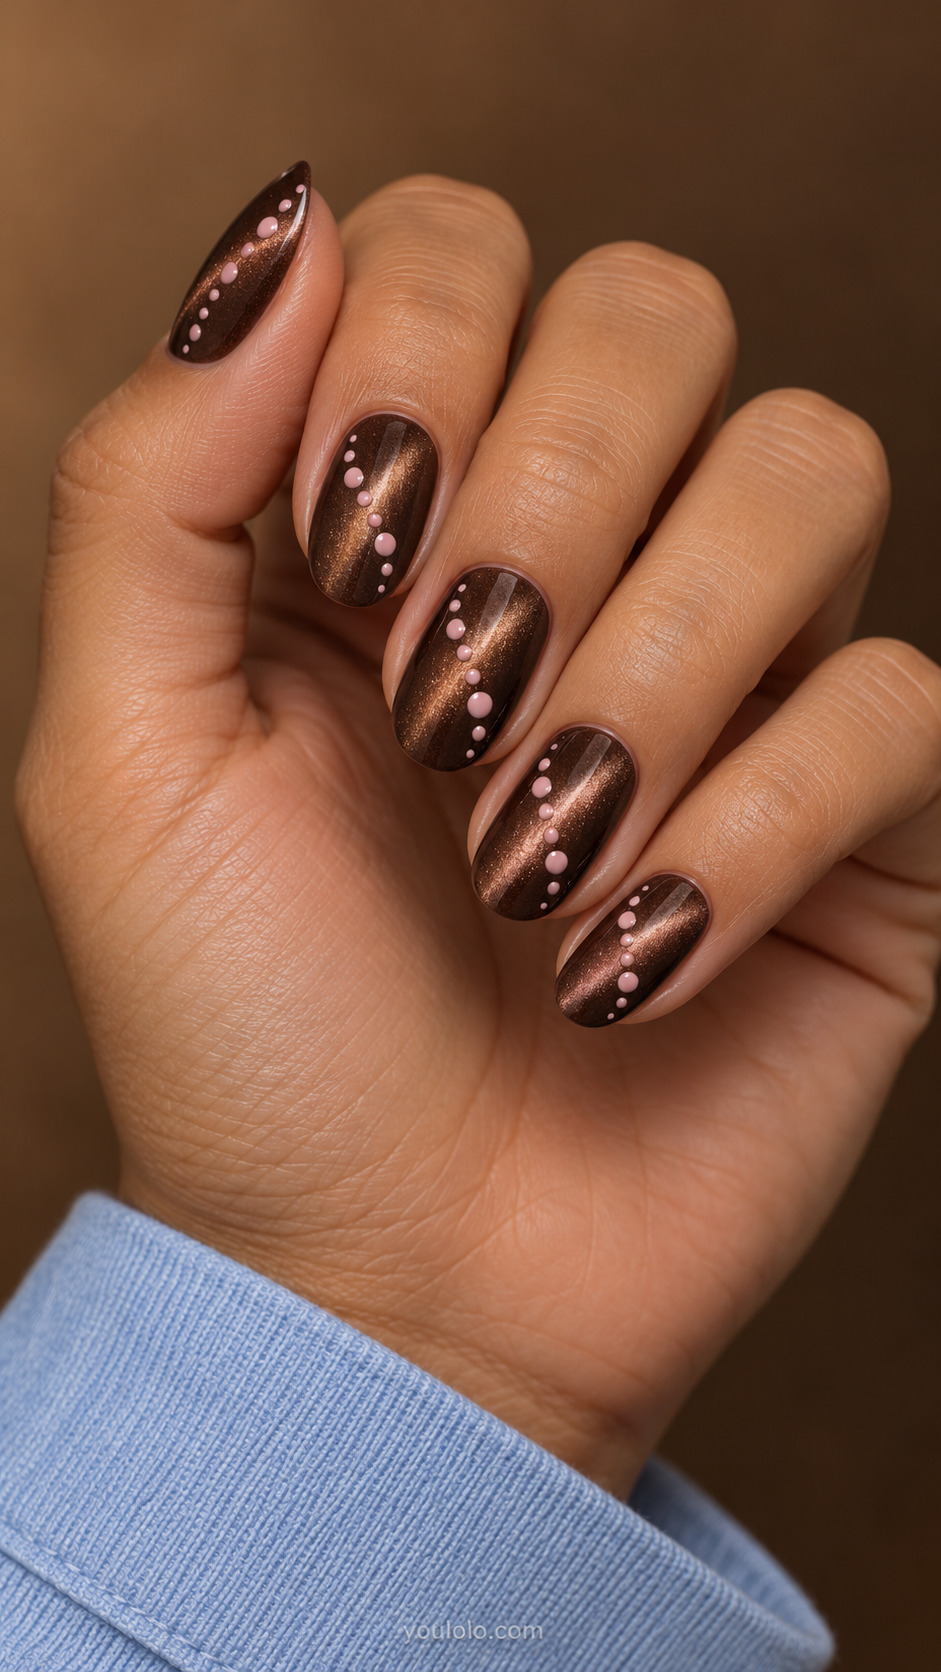
Soft pink dots cross a chocolate cat-eye beam for a pattern with two directions at once. The narrow magnetic highlight supplies the depth, while the flat spots keep the surface readable. Do not place every dot directly on the brightest part of the beam. Allowing some to sit in darker areas makes the pink look clearer and the contrast more interesting.
Salon brief: Medium oval; chocolate magnetic base with narrow diagonal cat eye beam; flat soft pink dots placed in loose diagonal trail perpendicular to beam, leaving negative space.
16. Sage Magnetic Dots Across a Matte Band
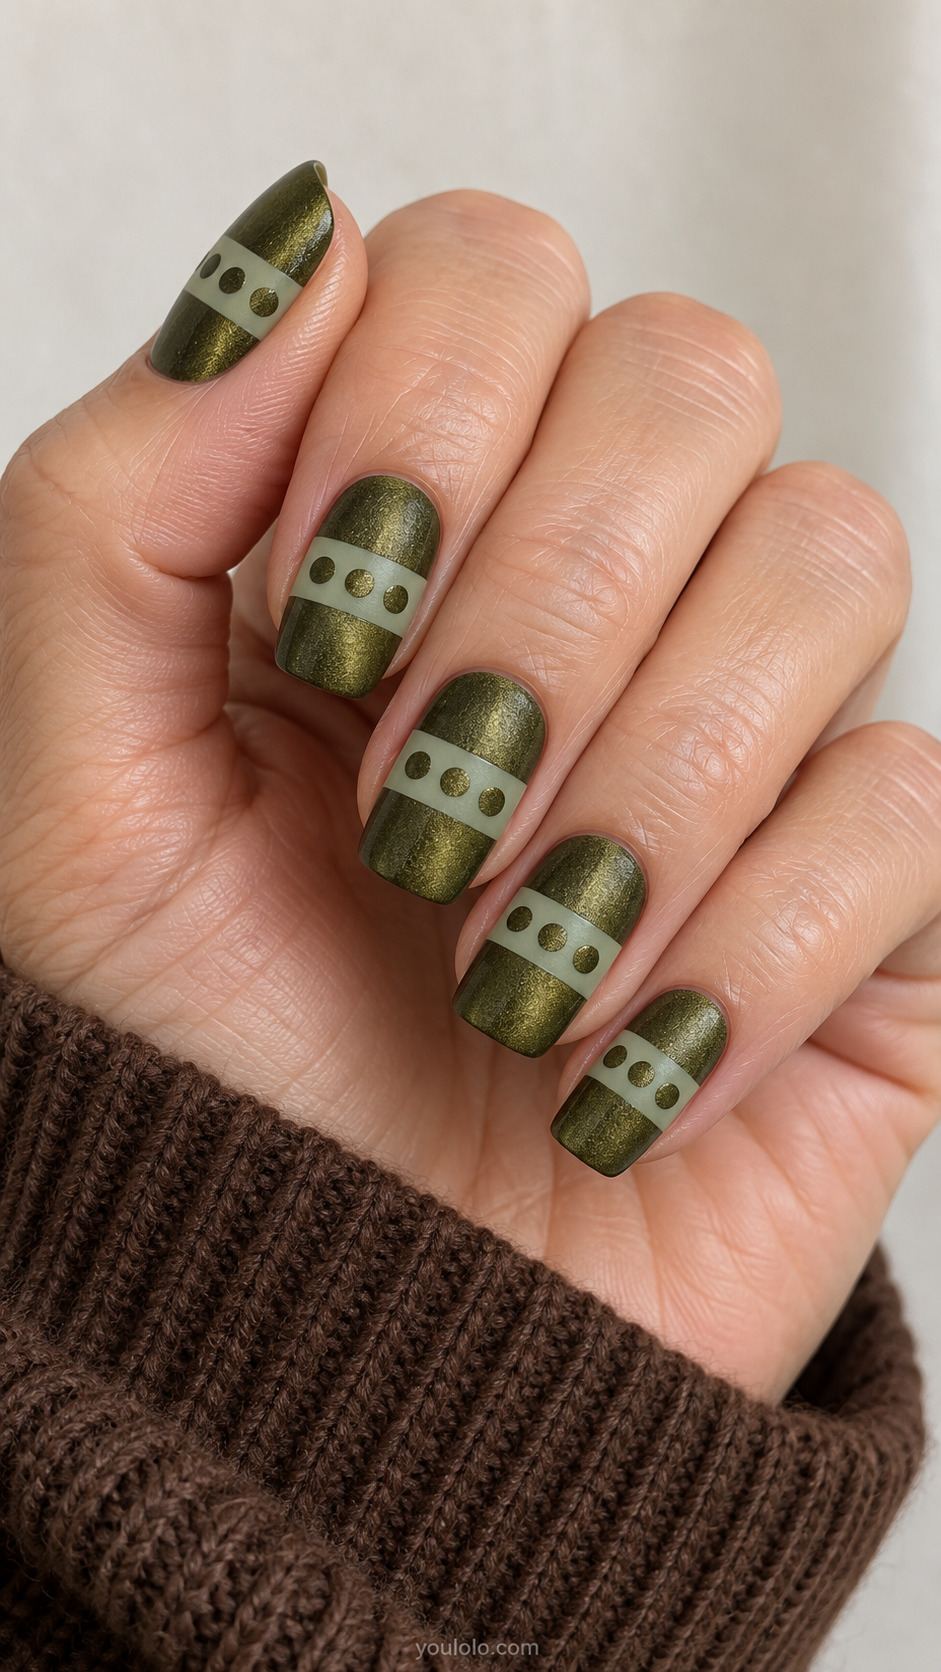
A matte sage band interrupts the olive shimmer, then magnetic dots bring a little glow back into that flat section. The horizontal arrangement feels different from the usual vertical panels and French edges. Keep the band broad enough that the circles do not touch its borders. This finish contrast is most effective when the rest of the nail remains simple.
Salon brief: Medium squoval; rich olive magnetic nails with a wide horizontal matte sage band across middle, exactly three olive magnetic round dots inside the band, upper and lower nail stay unadorned magnetic olive.
17. Magnetic Dots With Fine Ring Outlines
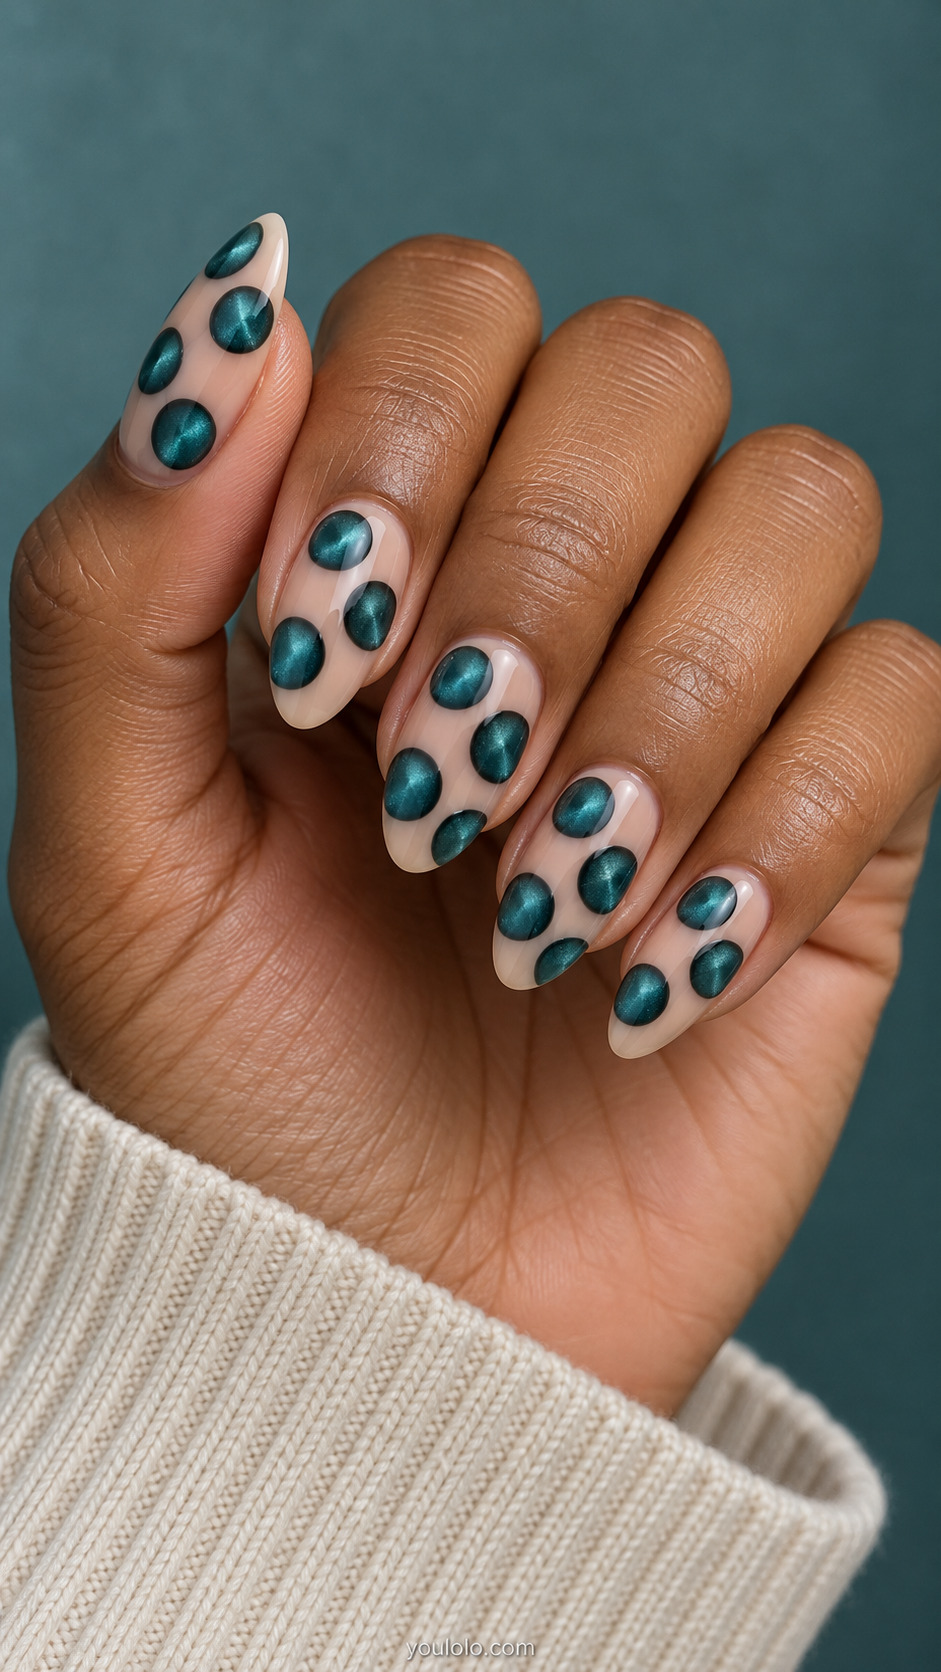
Thin dark outlines sharpen the edges of these teal magnetic circles on a sheer base. Think of them as painted rings around little pools of light, not raised metal settings. The outlines should be much finer than the dots themselves. With generous space between each circle, the design feels airy enough for medium almonds despite its jewel-like visual depth.
Salon brief: Medium almond; sheer beige base with four large teal magnetic round dots on each nail, each dot with very thin dark teal painted perimeter; no gems.
Dot Grids, Fades and Statement Placement
18. Lavender Dots in a Checkerboard Rhythm
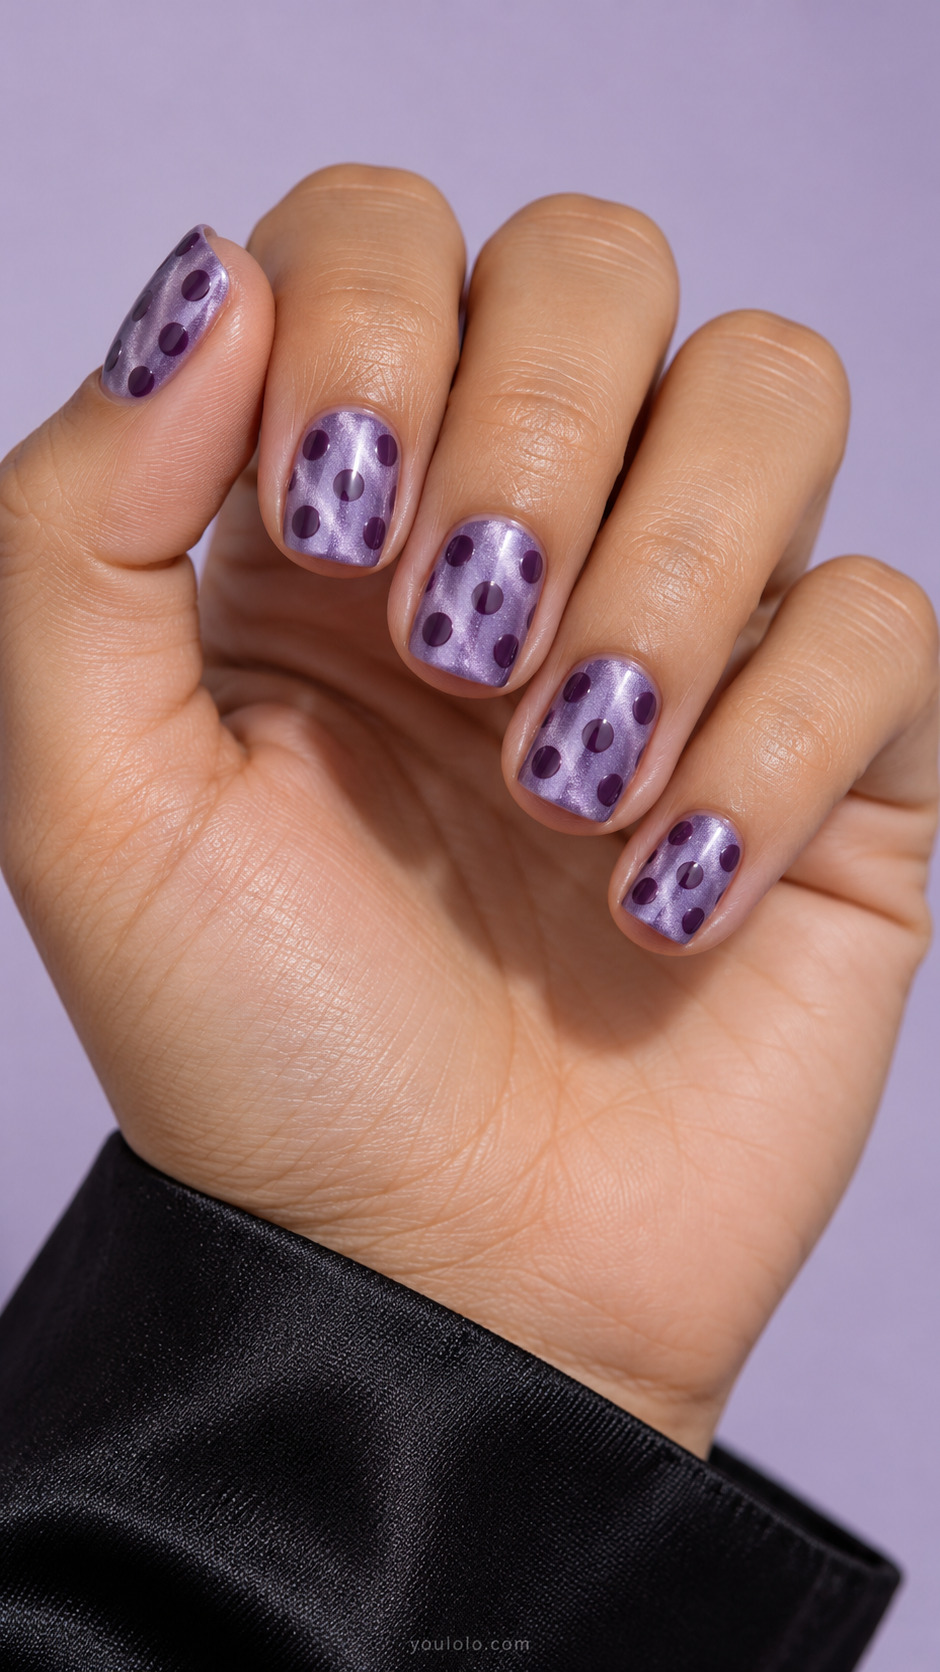
A staggered dot grid gives lavender velvet a clean, ordered pattern. There are no actual checkerboard squares here; the alternating empty spaces do the work. Small square nails suit the tidy arrangement, but leave a little breathing room near the edges. If the nail bed is narrow, two offset columns will preserve the same rhythm better than a cramped third.
Salon brief: Short square; lavender magnetic base, plum dots arranged in spacious three-column staggered checkerboard rhythm; no checkerboard squares.
19. Dense Tips, Clear Cat-Eye Bases
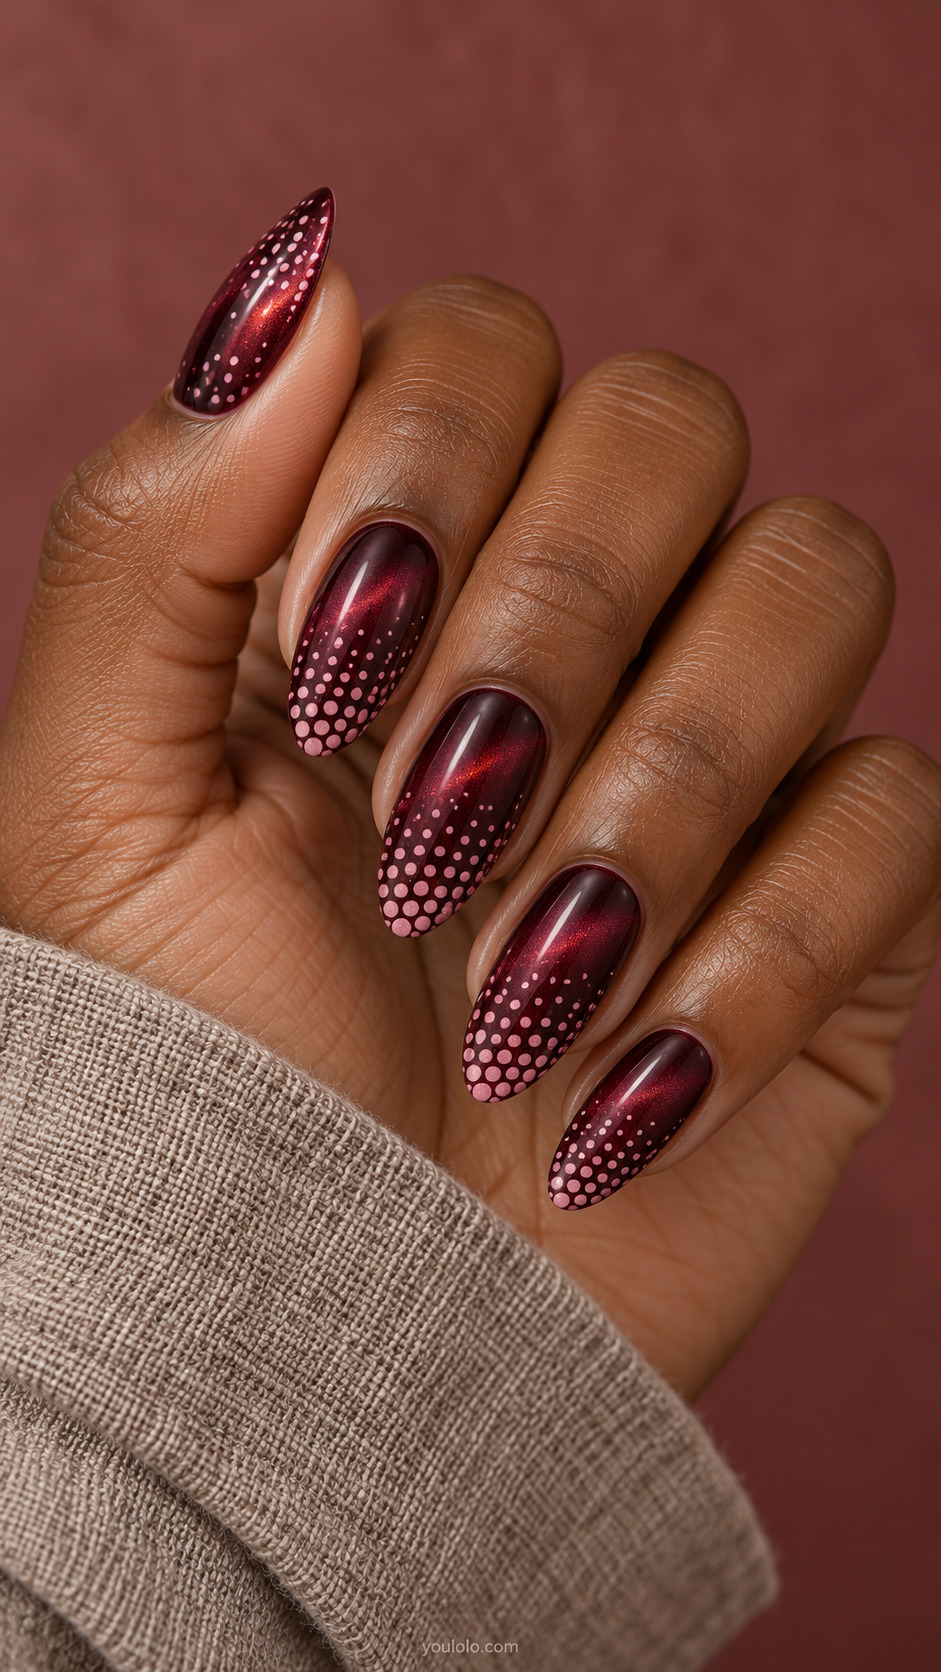
The dots become denser toward the tips, giving the burgundy a soft patterned fade. Longer almonds provide room for a gradual transition, but the cuticle area should stay mostly clear to show the magnetic depth. Use a mix of tiny dot sizes rather than extending a uniform row all the way down. The effect should feel dispersed, not striped.
Salon brief: Long but wearable almond; burgundy magnetic glow, tiny pink dots packed at tip and rapidly tapering in size down to mid nail; lower third clear.
20. Dotted French Over a Silver Glow
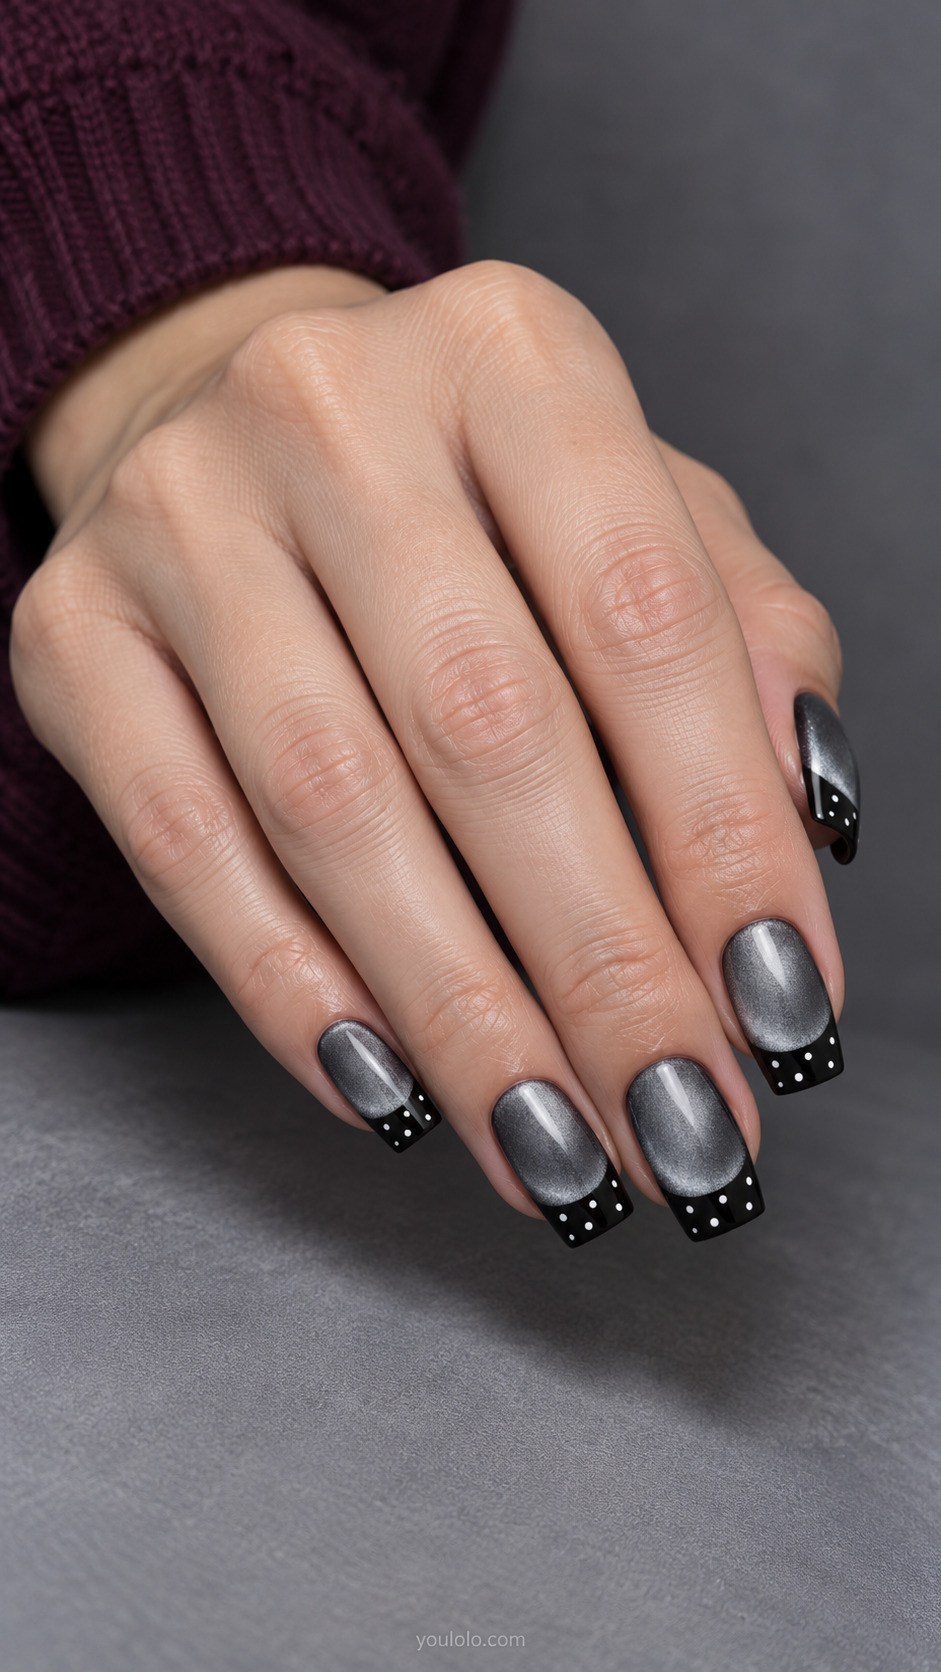
A dotted dark tip is an easy way to combine a familiar French outline with a magnetic nail bed. White spots remain inside the black band, leaving the silver area clean. The soft-square shape makes the tip feel graphic and structured. Adjust the band width to your actual free edge; a very deep tip can overwhelm a shorter nail.
Salon brief: Medium soft-square; silver magnetic nail bed with opaque soft black french tips; white tiny dots restricted to black tip, bed unadorned.
21. Large Offset Dots on Amber Velvet
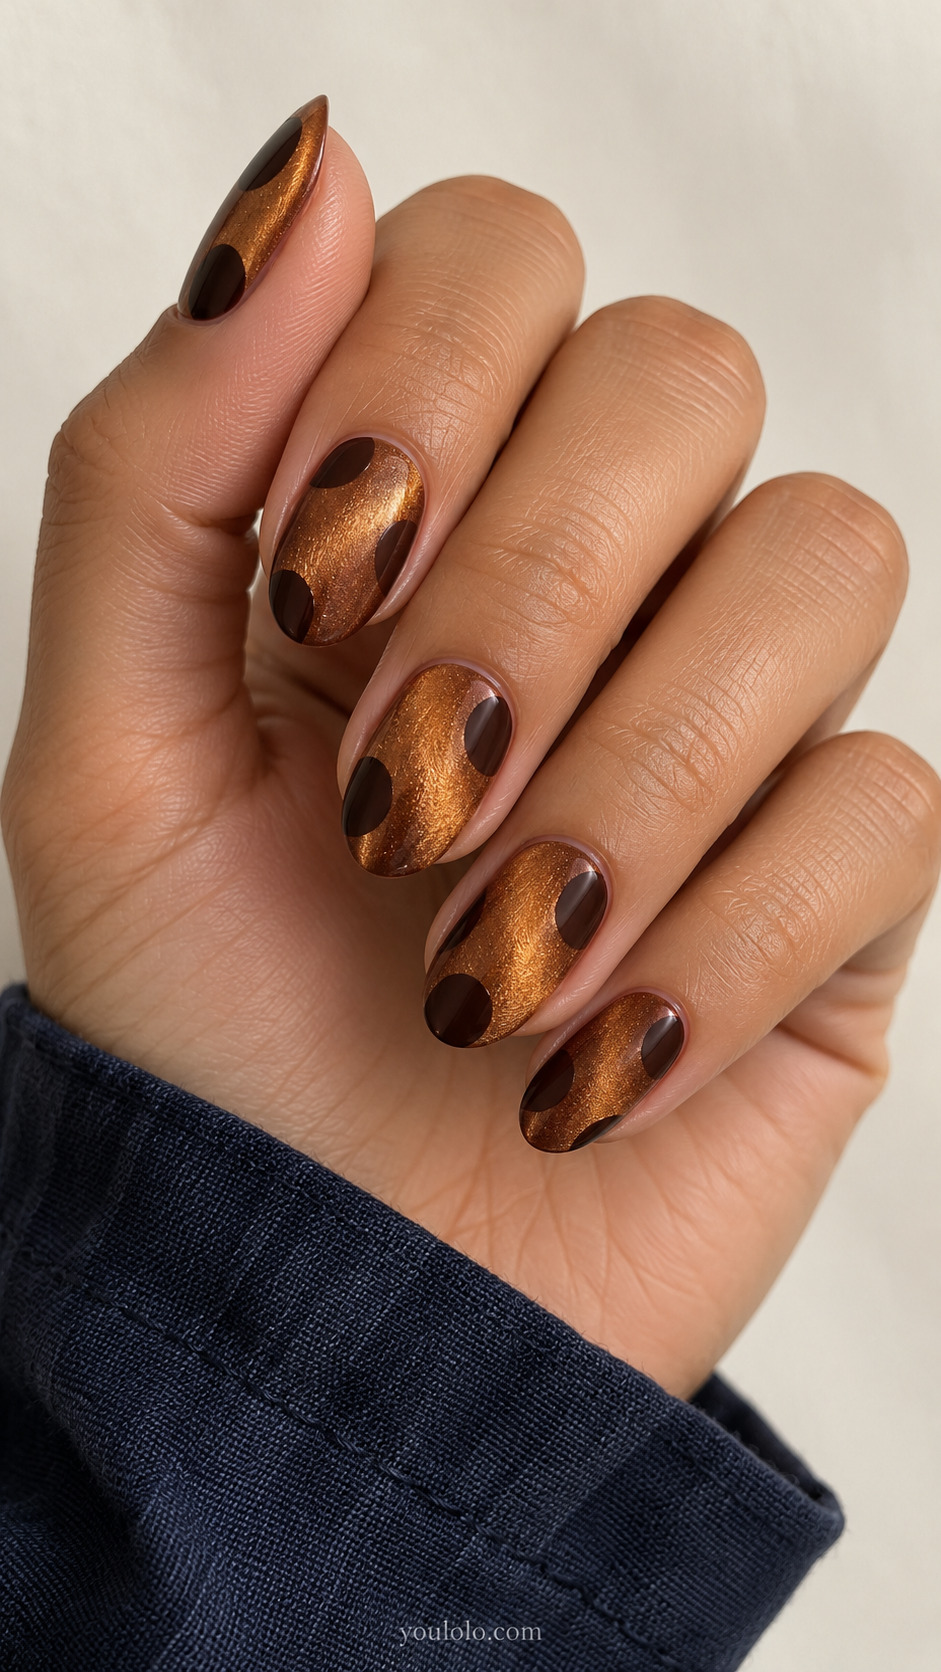
Oversized circles crop into the sides of amber velvet for a print that feels intentionally off-center. The cut-off edges are the point, so avoid trying to fit every dot neatly inside the nail. Three large shapes can make more impact than a field of tiny spots. Keep their edges round and the remaining amber space broad enough to show the glow.
Salon brief: Medium oval; amber magnetic velvet with just three oversized flat chocolate dots on each nail partially cut off at alternating side edges, editorial cropped polka dot print.
22. Rose Velvet With a Dot Size Ladder
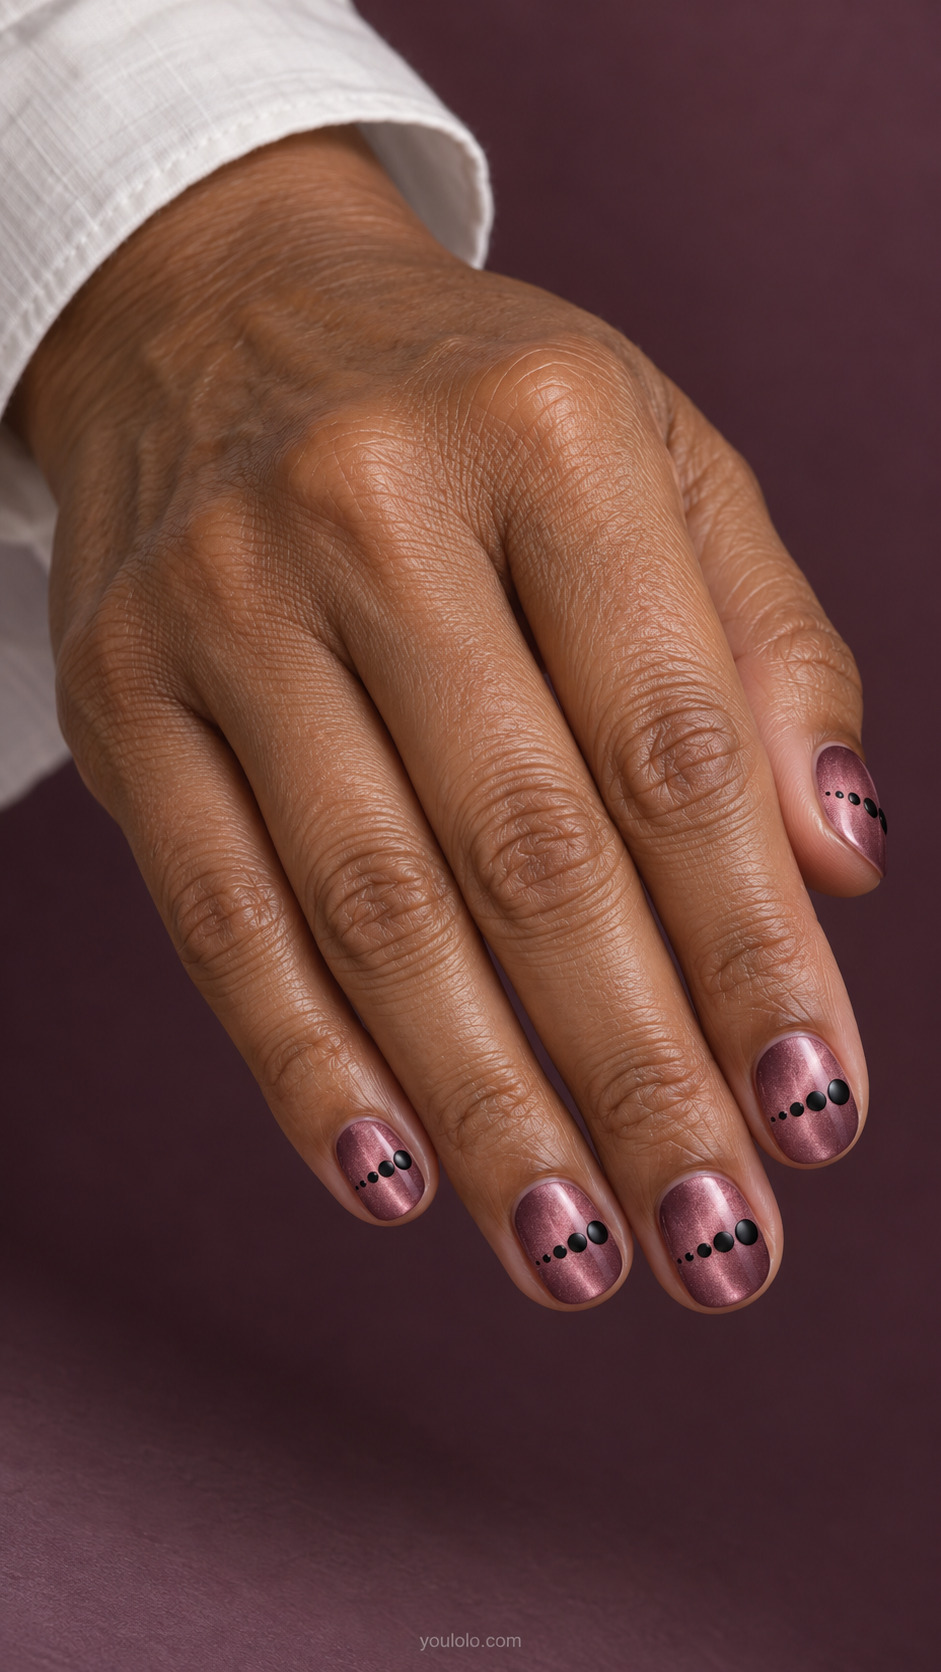
A single row changes gradually from tiny to bold across a rosy magnetic base. This size ladder is a small detail with a surprisingly graphic effect, especially on short round nails. Keep the dots aligned across the middle while allowing their diameters to grow. Leave both the base and tip open so the pattern does not become visually heavy.
Salon brief: Short round; dusty rose magnetic base, single horizontal row of five black circles across middle of each nail increasing smoothly from tiny at one side to large at other, no vertical rows.
23. Magnetic Dot Islands on Milky Nude
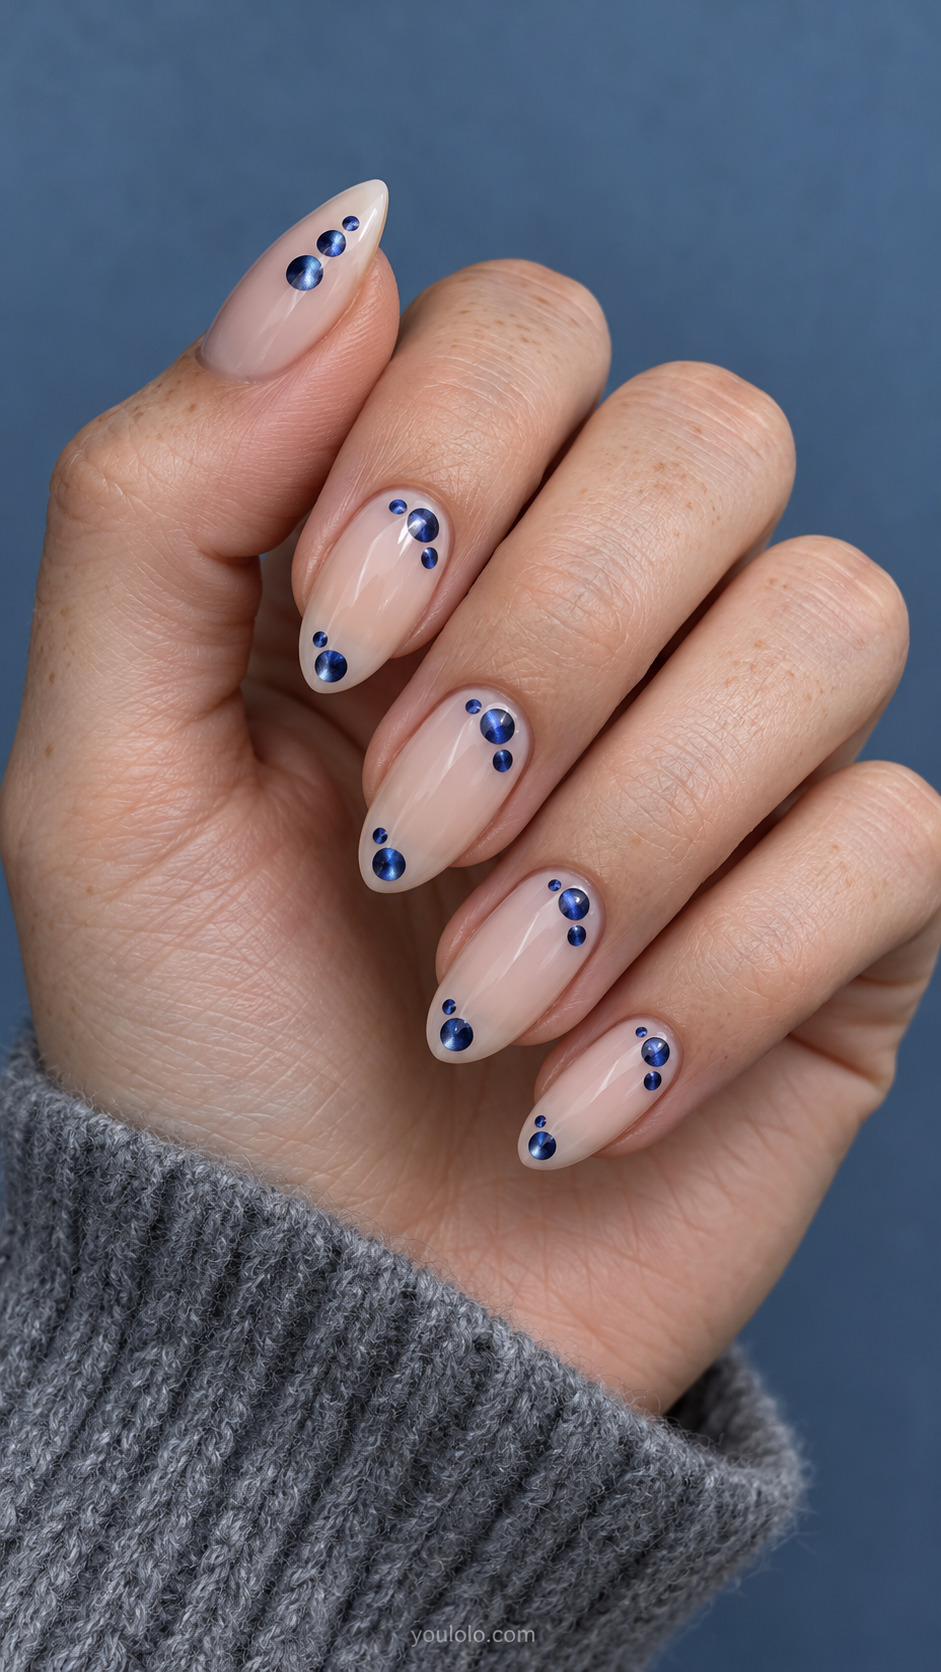
Small sapphire circles form separate islands on a milky nude background. Clustering them near opposite ends leaves a large calm area between, which is what makes the arrangement feel light. Each dot carries its own magnetic reflection rather than sitting over a sparkly base. Ask for compact groups with a visible gap between circles, so they stay dots instead of blobs.
Salon brief: Medium almond milky nude nails with small sapphire magnetic circles in clusters near opposite ends, leaving the centers clear.
24. An Asymmetric Dotted S-Curve
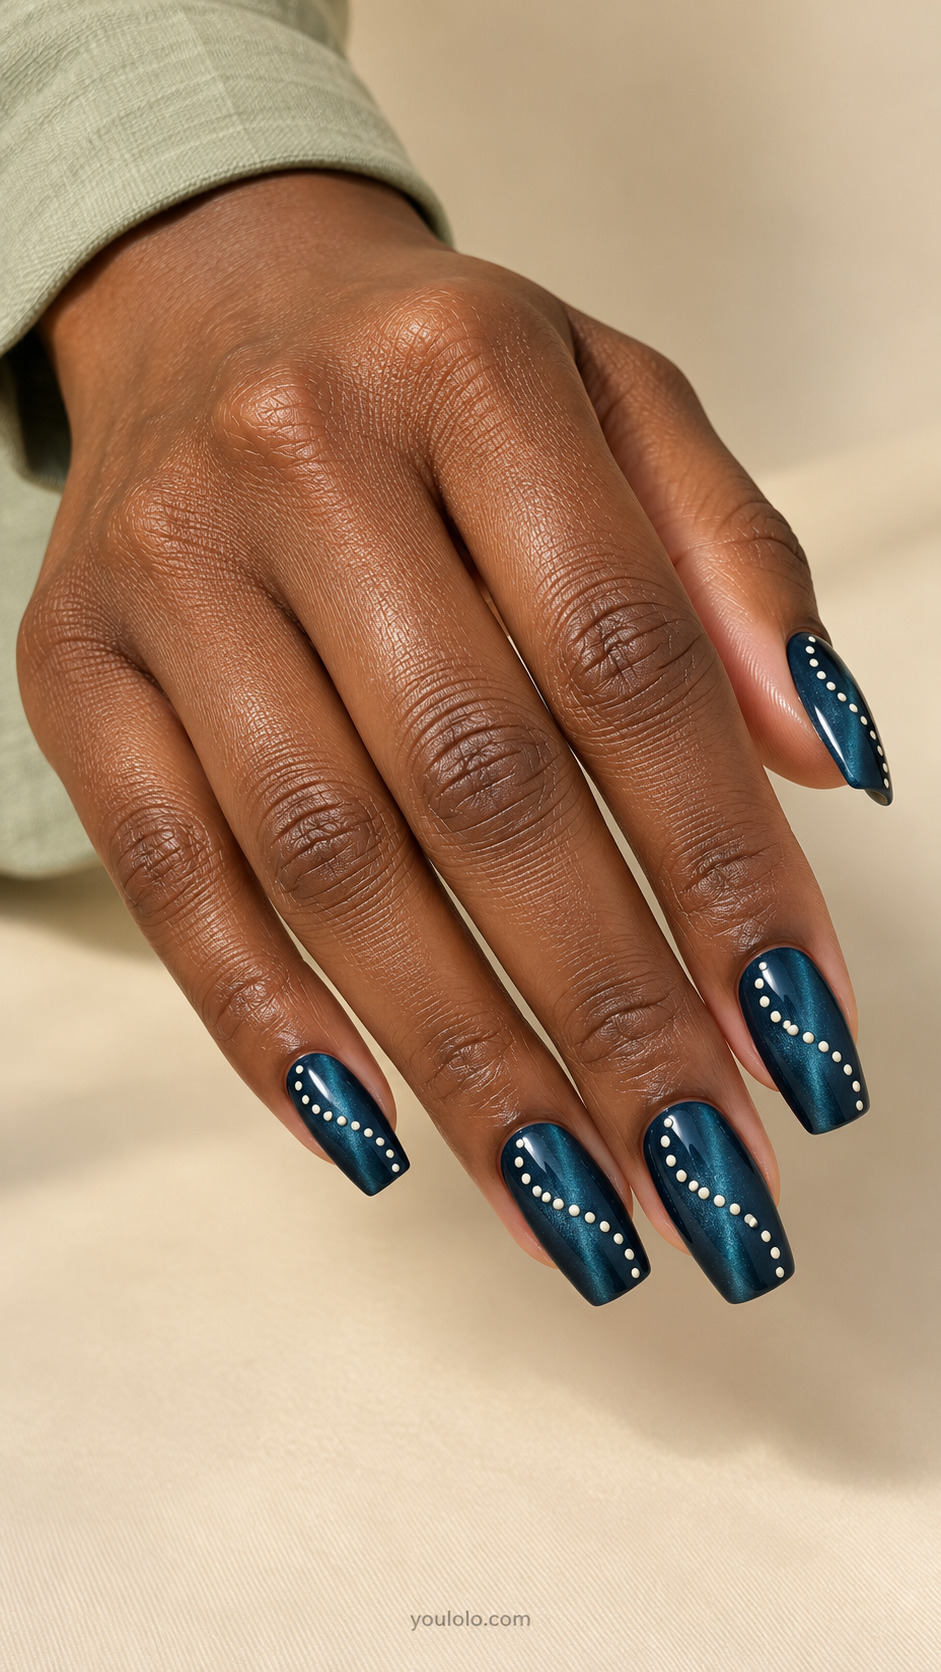
A loose S-curve gives the dotted pattern movement without adding a painted swirl. The pale circles stay separate as they travel over the deep petrol-blue base. A medium tapered square gives the curve enough space to bend naturally. Begin with the overall path, then decide the number of dots; forcing the same count onto every nail can distort the line.
Salon brief: Medium tapered square; petrol-blue magnetic base, fine ivory dots tracing one gently sinuous s-curve from cuticle-side to opposite tip; unconnected dots no stripe.
25. Mixed Finish, Matched Dot Scale
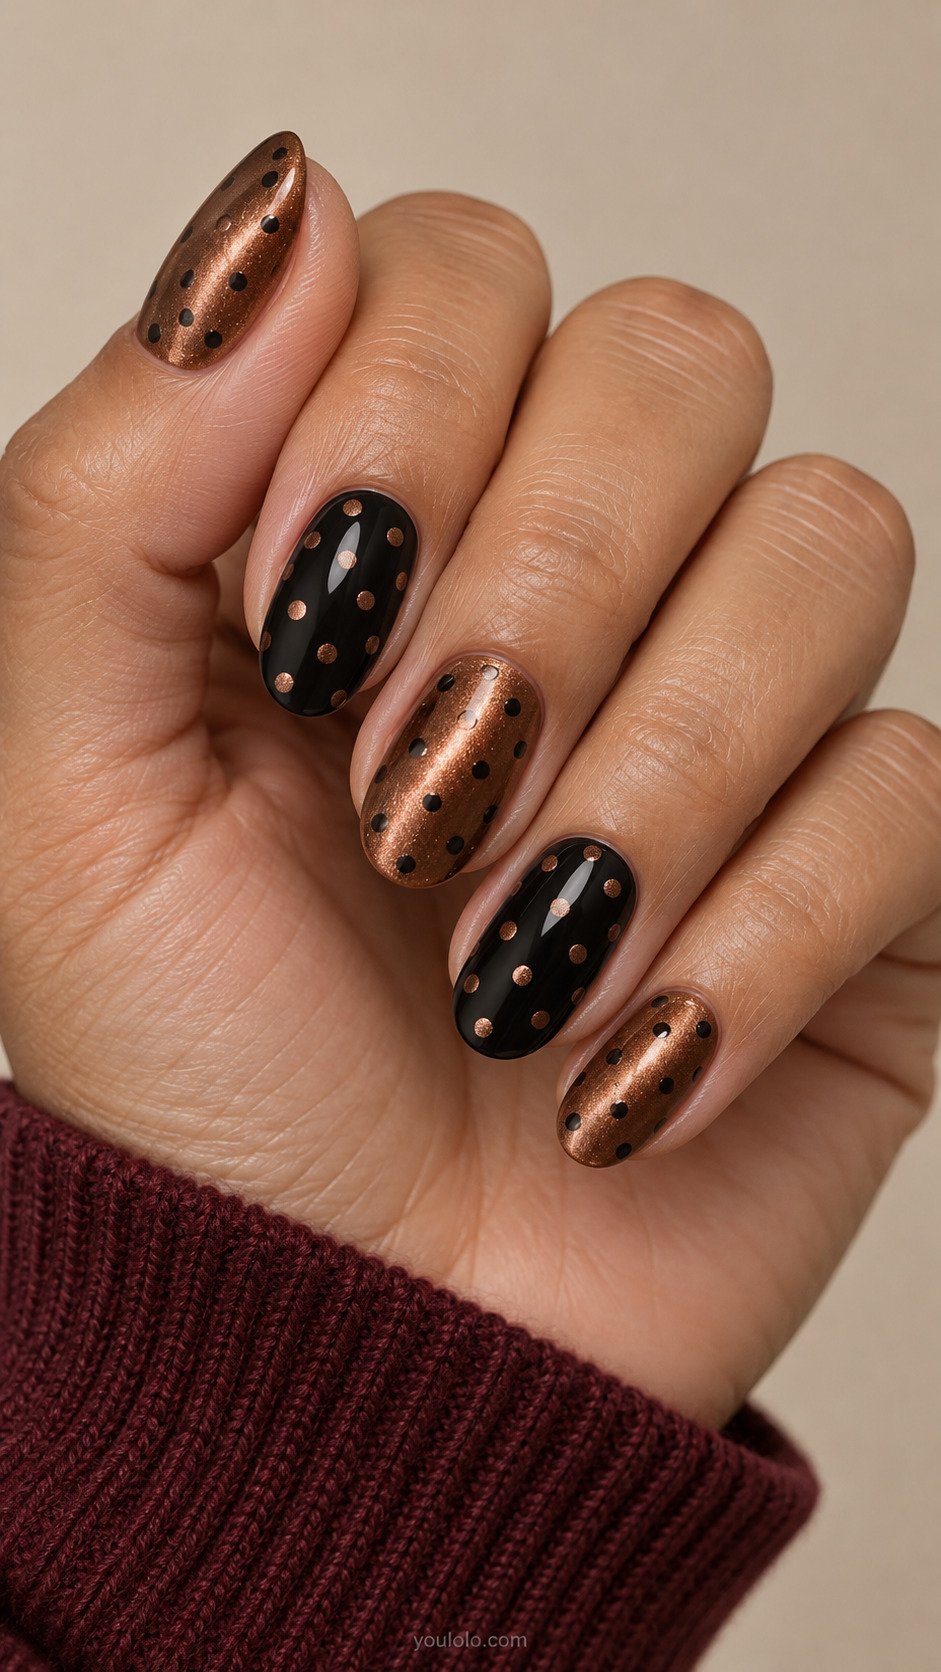
This set alternates which element gets the magnetic finish. Bronze nails carry dark dots, while dark accent nails carry glowing bronze circles. The shared dot scale connects the two treatments, making the reversal feel deliberate rather than mismatched. Keep the black areas smooth and unadorned. Extra lines or charms would distract from the finish swap that makes this manicure work.
Salon brief: Medium oval; thumb middle pinky soft bronze magnetic with small black polka dots; index ring opaque black with equally spaced bronze magnetic dots; consistent dot size throughout.
How to Choose a Cat Eye Polka Dot Design
Start with your nail length, then decide where the shimmer belongs. Short nails usually look clearer with a handful of distinct dots or a single accent nail. A medium almond or square gives you room for divided circles, open lanes and fades. More length is useful only when the layout needs it.
| Your priority | Choose | Ask your artist to preserve |
|---|---|---|
| Subtle everyday detail | A rosy dot fade or one dotted accent | Visible magnetic space between dots |
| A bold graphic look | Inverse silver dots or cropped oversized circles | Clean round edges and opaque background |
| A modern French | Magnetic tips or dotted dark tips | A proportionate smile line |
| A more detailed appointment | Split circles, halos or mixed finishes | A sample tip to confirm the effect |
What to Tell Your Nail Artist
Bring one reference for the shape and one for the layout if your favorite design uses a length you do not wear. Be specific about dot scale, whether the dots are flat or magnetic, and where you want open space. For intricate effects, agree on a sample nail first. The same color can read differently depending on the magnetic highlight and lighting.
Choose the magnetic finish before discussing extra decoration. A broad velvet glow and a narrow cat-eye stripe create different backgrounds for the same dot pattern. You do not need both effects on every finger. If using a gel system, follow the product maker’s application and curing directions rather than a generic timing rule.
Cat Eye Polka Dot Nails: Your Questions
Can cat eye polka dot nails work on short nails?
Yes. Small staggered spots, a dotted side border or one patterned accent can fit a short nail comfortably. Scale the design to the nail bed; copying the exact dot count from a much longer nail often makes the pattern look cramped.
Should the dots or the base be magnetic?
Either can work, but the result is different. A magnetic base gives the whole nail a soft glow beneath crisp flat dots. Magnetic circles over an opaque base make the individual spots the focal point. Decide which effect you want before picking colors.
Are cat-eye nails the same as glitter nails?
They are different finishes. Magnetic polish uses responsive particles arranged with a magnet, creating areas of light and depth. A scattered glitter effect does not automatically create that shaped cat-eye highlight. Ask to see the finish on a sample if you are unsure.
Which dot colors show up best?
Choose contrast against both the light and dark areas of the magnetic base. Ivory usually reads clearly on deeper shades; ink-blue or black is easier to see on pale silver. Test a dot over the brightest part of the finish as well as its shadowed edge.
How do I keep the design from looking busy?
Use fewer motifs, not necessarily fewer colors. Leave a clear zone, choose one dot size, or limit the pattern to a single nail. If you add an intricate magnetic effect, let the dot placement become simpler so both details remain visible.
Save your favorite layout before your appointment. A clear image and a short brief are more useful than a long list of unrelated finishes.